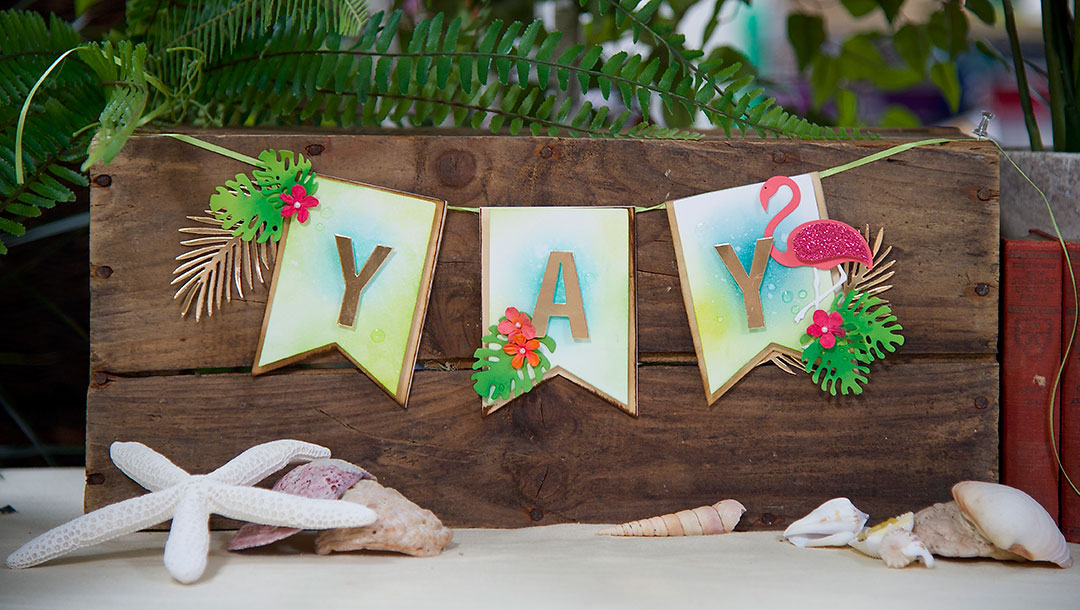
All Strung Out Summer DIY Party Banner
It is always summer here in Arizona, but summer is also just around the corner for everywhere else. What better way to celebrate, but with flamingos, palms and a party! Create this easy DIY party banner for your next summer shindig, follow the simple steps below to create yours:

- Die-cut mat board and wood paper from larger Banner die. Die-cut mixed media paper from the same-shaped, smaller Banner due.
- Adhere wood paper to mat board.
- Use a Tool ‘N One with the sponge applicator to apply distress ink to die-cut mixed media paper.
- Mist paper lightly with water. Blot with paper towel.
- Die-cut sentiment from gold poster board. Adhere sentiment to banner using foam dots.
- Attach mixed media piece to Banner base with Velcro or foam dots.
- Die-cut Flamingo from pink, white and pink-glittered paper. Assemble and attach to Banner.
- Die-cut Monstera Leaves from various shades of green paper.
- Die-cut Palm Fronds from gold poster board.
- Adhere Fronds and Monstera Leaves onto Banner.
- Attach flowers to Banner.
- Adhere ribbon to back of Banner.
- Adhere Crystal Drops or Pretty Pink Posh Clear droplets if desired.
Supplies
Platinum™ Machine by Spellbinders™ – PL-001
Adhesive of Your Choice
Foam Dots
Glue Gun
Gold Poster Board
Green Ribbon-1/8”
Mat Board
Mister
Paper Towel
Pink Glittered Paper
Pink, White, Green Cardstock
Pretty Pink Posh Clear droplets
Small Paper Flowers
Tool N One-Sponge Applicator
Velcro-Optional
Wood Paper, Birch By Arc Paper
April 2019 Amazing Paper Grace Die of the Month is Here – Elegant Swivel & Sashay Card
March 2023 Quick & Easy Card Kit of the Month Preview & Tutorials – Bee Yourself