It is All in the Detail

Hi all. Seth Apter back on the blog, sharing a recent piece that I have created. One of my mottos when it comes to mixed media is more is more. There is always room for one more layer or a little more texture. But I also have another motto and that is it is all in the details. I have learned that even the smallest detail, perhaps not even noticed at first glance, can elevate your artwork. Put those two mottos together and I bet you can guess that I like a lot of detail.

This piece includes the usual suspects in much of my art: hand painted paper, die cuts, stamping, layering, and text. But as I create, I always ask myself if I can take it to a more interesting place by adding a detail. Remember, more is more.

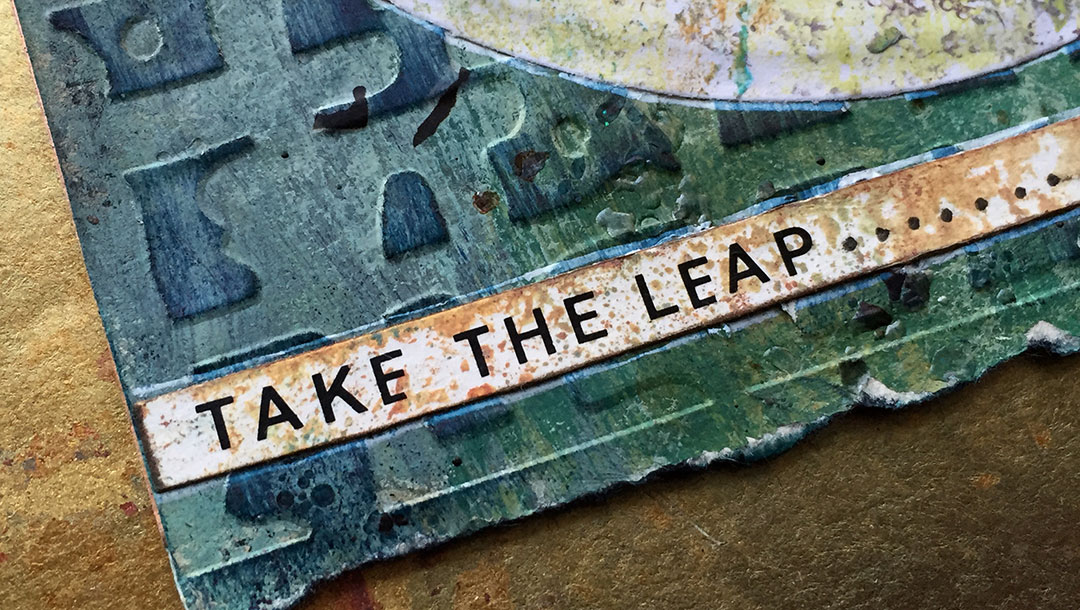
The surface for this artwork is a piece of handpainted paper. The extra detail here is texture, which was added by running the paper through the Spellbinders® Platinum Die Cutting and Embossing Machine in my Gridiron embossing folder. The raised surface was then sponged with ink from an ink pad to add emphasis.

Anytime there are holes or spaces within a die cut, I adhere paper in a contrasting color on the backside rather than just gluing the die cut directly to the background. This adds more depth and interest to the piece. In this case, the circular die cut with the word FLY from my Take Flight die set was backed with a rich burgundy color.
Look again and you will see a second detail. I adhered a metal ring around the same die cut to give the element a more finished look.

Zooming out allows you to see the larger die cut that is from my Shield die set. Three small holes around the perimeter of the circle are part of the die design. Rather than simply leave them as is, I added an eyelet to each one. I love the addition of industrial metal and dimension that this brings. And notice that both the larger die cut as well as the three eyelets are also backed with contrasting paper.

While the top and side edges of this piece are cut smoothly, I decided to tear the bottom edge of the artwork. This detail adds an unexpected contrast and this difference guides the eye from the top of the artwork all the way to the bottom.
Look closely and you will notice another detail. All the elements that are adhered to the surface have been outlined using either a black or a white journal pen. Outlining connects all the pieces to the background while at the same time makes them pop off the surface.

The element at the top of the artwork is the smallest die cut from my Shield die set. It has been cut up and adhered to the top edge of the piece. Rather than adding the die cut as is, I added the additional detail of a designed, stamped using one of the two stamps in my Turnarounds 1 stamp set. Many of my stamps and dies were designed to work together to be better able to add the extra detail.

I would love to know if you have any of your own go-to details that you find yourself adding to your work over and over. Share in the comments and thank you for spending this time with me.
Spellbinders® Supplies:
Spellbinders® Platinum Die Cutting and Embossing Machine
SEL-002 Gridiron Embossing Folder
S4-620 Take Flight Etched Dies Set
SBS-032 Turnarounds 1 Stamp Set
Other Supplies:
Watercolor Paper (Hand Painted), Scissors, Adhesive, Ink Pads, Eyelets and Eyelet Setting Tools, metal Embellishment, Gel Pens, Craft Sponge, Rub On Letters


14 Comments
Debi Adams
As always…every little detail creates a beautiful piece of art, complete in itself. Love this piece Seth. Thanks for sharing your tips and techniques. I didn’t think I had a favorite embellishment for my art but as I look back, I believe I like to use string, particularly with anything mixed media. It extends the focus out to the edge of the canvas and creates a different dimension, element, or design.
Seth Apter
Thanks Debi. String is such a cool detail too.
Deb ~ Paxton Valley Folk Art
Wonderful piece Seth, love the metallic embellishments and contrasting papers under your die cuts. The added detail of the outlines is the perfect finishing touch. Textures and torn edges are two of my favourite details to add and now I have more details to contemplate adding thanks to your post! Deb xo
Seth Apter
Thanks a million Deb. Textures and torn edges…good stuff!
Amanda Pink
Fabulous work of art! Seth and a terrific post to read and indulge and delight in the detail . Thanks for sharing and always inspiring . I too share your love of adding metal pieces (hex nuts , press studs, hitch fasteners , eyelets, brads) to finish up any ‘holes’ and also to use instead of or aswell as gem beads. I’m an outliner fan too, along with defining shadow and light- I’m guessing that comes from my Commercial art studies and a misspent youth doodling 3d Graphics . x
Seth Apter
Many thanks Amanda. Hex nuts , press studs, hitch fasteners , eyelets, brads — you’re speaking my language.
Anne
Love how you outlined the die cuts and the eyelets and metal ring are such great additions to your artwork. I have a slight obsession (well a big one really) with colouring the edges of card and die cuts before adding them to my projects. I really enjoyed reading all your tips today – thank you! x
Seth Apter
Much appreciation Anne. Coloring on the edge is such a great technique that has a big impact.
Amanda Southern
Fabulous make Seth, as always. Love all the touches that you add. I love adding left overs, numbers, there is something about numbers and also bits of wire and mesh.
Thanks for being a fabulous enabler
Love
Amanda x
Seth Apter
Many thanks Amanda. And yes…wire and mesh. Love that touch. And who doesn’t love numbers….
Anne Squire
I keep forgetting about embossing folders – thanks for the reminder.
Seth Apter
LOL Anne. The funny thing is that I do too. But I always love the look when I use them.
Karenann Young
I’m just starting on my little book. It’s been awhile since I’ve done any collage like this and my motto is, more is better. I have the cover done and I just kept working on it until I felt it was done. It included things like dipping a toothpick into copper, or patina paint to add a bit of color around the edge and also a bit of black pen scribble. I also used gold colored photo corners and added a bit of black paint on it and rubbed some of it off. I don’t know where you are getting they words and type like “Take the leap”. I used a tiny part of a definition from an old dictionary. I’m not a big outliner, but I have it in the back of my mind if I need something. Love your work Seth!!!
Seth Apter
Mega thanks Karenann. Cannot wait to see your book if you decide to share. I am with you the color around the edge, a bit of scribble, and both adding and removing colors and layers — all good stuff!