No-Sew Phoenix Pennant Tutorial
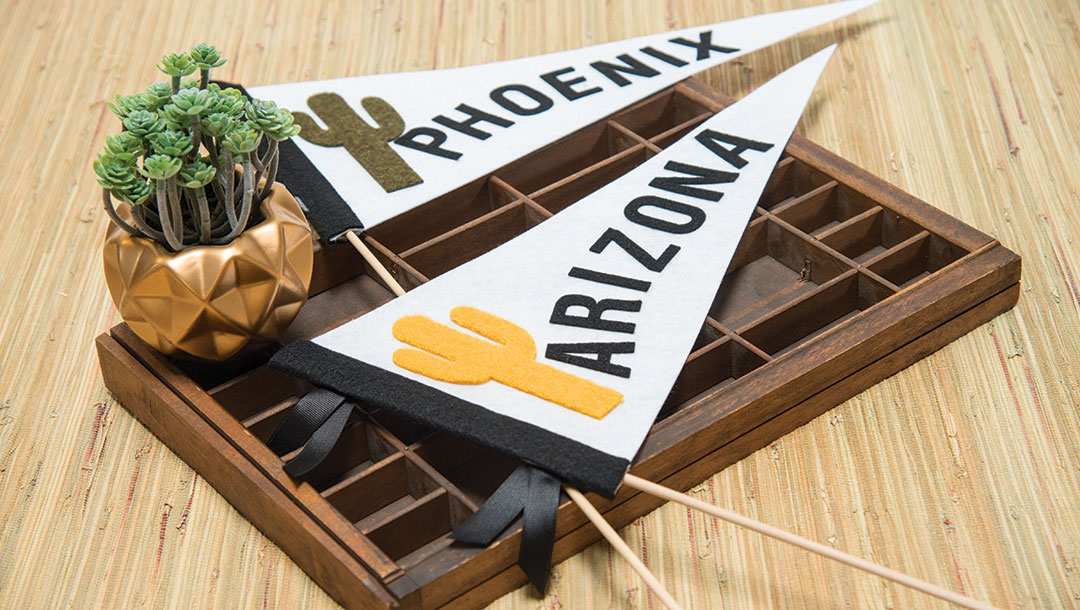
This crowd pleaser project is easy, fun and doesn’t require sewing! All you need is our Contour™ Steel Rule Dies, felt materials, some adhesive (we used Them-O-Web® PeelnStick®) and a pennant!

INSTRUCTIONS:
- Apply 1 strip of PeelnStick adhesive along the edge of the back of 8” side of pennant.
- Adhere half of the strip of black felt to the adhesive, leaving half of the felt to wrap around to the front of the pennant.
- Apply the second strip of PeelnStick along the edge of the front side.
- Fold a piece of ribbon in half, slide the looped end of the ribbon through the top slit in the black felt and lightly press to the edge of the adhesive. Repeat with the second ribbon in the bottom slit.
- Pull remaining black felt to the front of the pennant and press firmly to adhere.
- Trim excess black felt from each end.
- Die-cut the cactus out of the colored adhesive backed felt with SR-092 Cactus Contour™ Steel Rule Die with Spellbinders® Platinum™ Machine.
- Die-cut letters of out black adhesive backed felt with SR-011 Type-Oh! Contour™ Steel Rule Die.
- Arrange the cactus and letters before peeling the backing from the adhesive. NOTE: PeelnStick is SUPER sticky! Once you adhere your cactus and letters you will not be able to peel them off.
- Insert stick into the sleeve of the banner.
SUPPLIES:
SR-092 Cactus Contour™ Steel Rule Die
SR-011 Type-Oh! Contour™ Steel Rule Die
PL-001 Spellbinders® Platinum™ Die Cutting and Embossing Machine
PL-105 Cutting Plates, XL (8-1/2” x 12-1/4”) for the Platinum™ Machine
Therm-O-Web® PeelnStick® Double Sided Adhesive, 11 x 17” 3742 and 8 x 1″ (2)
White Felt Pennant, 8 x 18”, A003, Conde Systems, Inc., dyetrans.com
Pennant Display Stick, 16” A005, Conde Systems, Inc., dyetrans.com
Black Felt Strip with pre-cut slits, 9 x 2”
Black Grosgrain Ribbon, 15mm, 6” (2)
Adhesive Backed Colored Felt (cactus), 4” x 6”
Adhesive Backed Black Felt (letters), 2-1/4” x 11”
Scissors


