Layered Dimensional Die Cutting. Episode #2 – Teacher Card
Hello everyone. This is Yana Smakula and thank you for joining me! This blog post and video is a part of new monthly feature I’m hosting on Spellbinders blog and Youtube channel called “Layered Dimensional Die Cutting”. I hope you’ve enjoyed the first episode, in case you missed it you can find it here!
What is “Layered Dimensional Die Cutting Series”? Once a month I’m sharing a card project along with a detailed video tutorial showcasing traditional Spellbinders style with lots of die-cut layers and dimension!
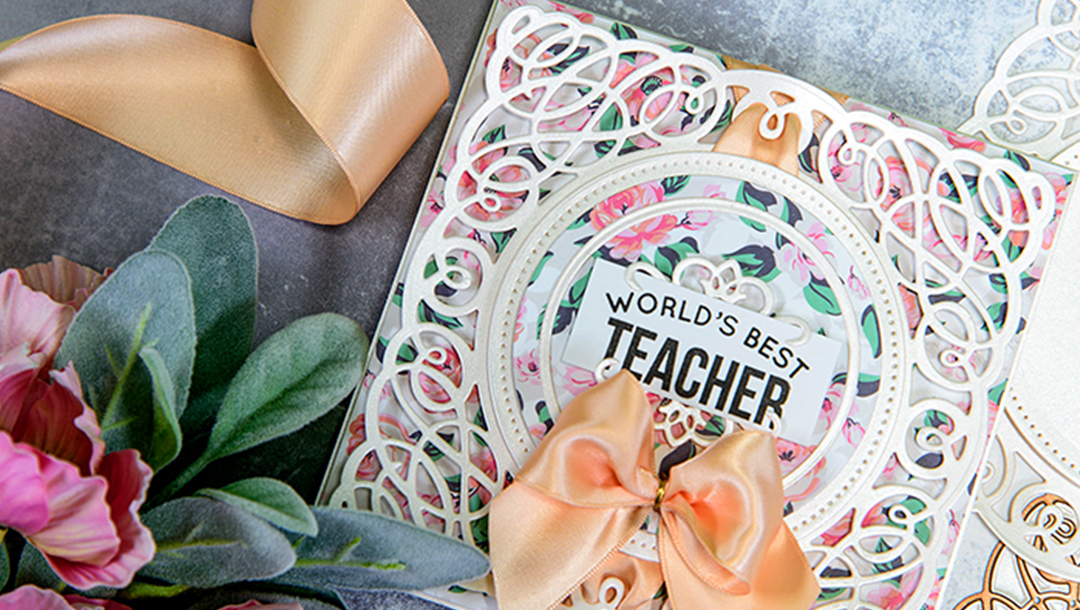
For my today’s blog post, since school starts very soon, I thought it would be appropriate to create a World’s Best Teacher card.
I started working on my project by doing all of my die cutting first. I picked a few days and did a lot of layering with the help of regular circles.

I die-cut the main element for my card using dies from the Intertwined Spirals set out of pearlescent white cardstock. I combined the largest insert and the frame to create this piece.

Whenever there’s an insert and a frame die you can cut these in 3 different ways. You can cut just the insert – this makes up for a great lacy card front or window card. You can combine the insert with the frame like I did for my card and make a beautiful freestanding die cut. And you can also cut just the frame die to maybe create a mat to layer behind the intricate piece. I love versatile dies like this are they offer more options and possibilities when crafting.
I also die cut several additional shapes for my project:
- Pierced circle using Pierced Circles Dies with pearlescent white paper
- Patterned paper circle using Standard Circles SM Etched Dies
- Circle frame using Standard Circles LG Etched Dies and Standard Circles SM Etched Dies
- Several circles out of fun foam to create dimension in the layers.

My today’s card measures 6 x 6” – I made a top folding card base and foam mounted patterned paper panel on top. Next I layered my die cut layers using a mix of fun foam and foam adhesive squares. I also added some beautiful peach colored ribbon from May Arts and embellished my card with a large bow.

Even though I made a “World’s Best Teacher” card you can swap out a sentiment and make this card into any other one – birthday, miss you, anniversary project and so on.

Spellbinders Supplies:
- S4-114 Standard Circles Lg Dies
- S4-116 Standard Circles Sm Dies
- S6-087 Intertwined Spirals Dies
- SCD-009 Pierced Circles Dies
- PE-100 Platinum 6 Die Cutting and Embossing Machine
- T-001 Tool ‘N One™
Other supplies: White Cardstock (WorldWin); Patterned Paper (Sweet Nothings 12 x 12 First Edition); Clear Stamp (Simon Says Stamp – Hey Teacher); Black Ink (Versafine Onyx Black); 1 ½” Satin Ribbon (May Arts Ribbon); Glue; Fun Foam; Tape Runner; Foam Adhesive.
Watch video tutorial below to learn how to make this project:
Thank you so much for stopping by today and have fun die cutting!


6 Comments
Lynda J
Stunning, as always!
I love Spellbinders’ dies but they’re all so large. I’m sure there are lots of people, not just me, who would love to use the dies but make (only) A-2 sized cards. The intertwined spirals would lose so much cut down to fit.
Yana Smakula
thank you, Lynda!
Have looked at the A2 Card Creator dies? These are intended for smaller A2 cards. You can take a look at these here – https://www.spellbinderspaperarts.com/search.php?search_query=A2
Lynda J
Thank you Yana! In all my wandering through Spellbinders I hadn’t noticed they specified A2 card size! Now I’m just hoping they have the some of the same gorgeous ones you used!
Barb Macaskill
They have a great assortment of A2 card creator dies at great prices! Don’t forget to check the clearance section too for even more incredible prices! Hope you find what you are looking for!
Barb Macaskill
Your cards and layouts always leave me breathless and inspired! Thank you for sharing your amazing talent with us!
Yana Smakula
thank you so much, Barb!