The Happy Place Project Kit | Cardmaking Inspiration with Carrie Rhoades | Video
The Happy Place Project Kit is here! This Happy Place Project Kit is the perfect way to get your hands on early products from the upcoming July Collection. This kit comes with an assortment of THREE stamp sets, ONE die set, and a card making project kit to make FOUR cards.
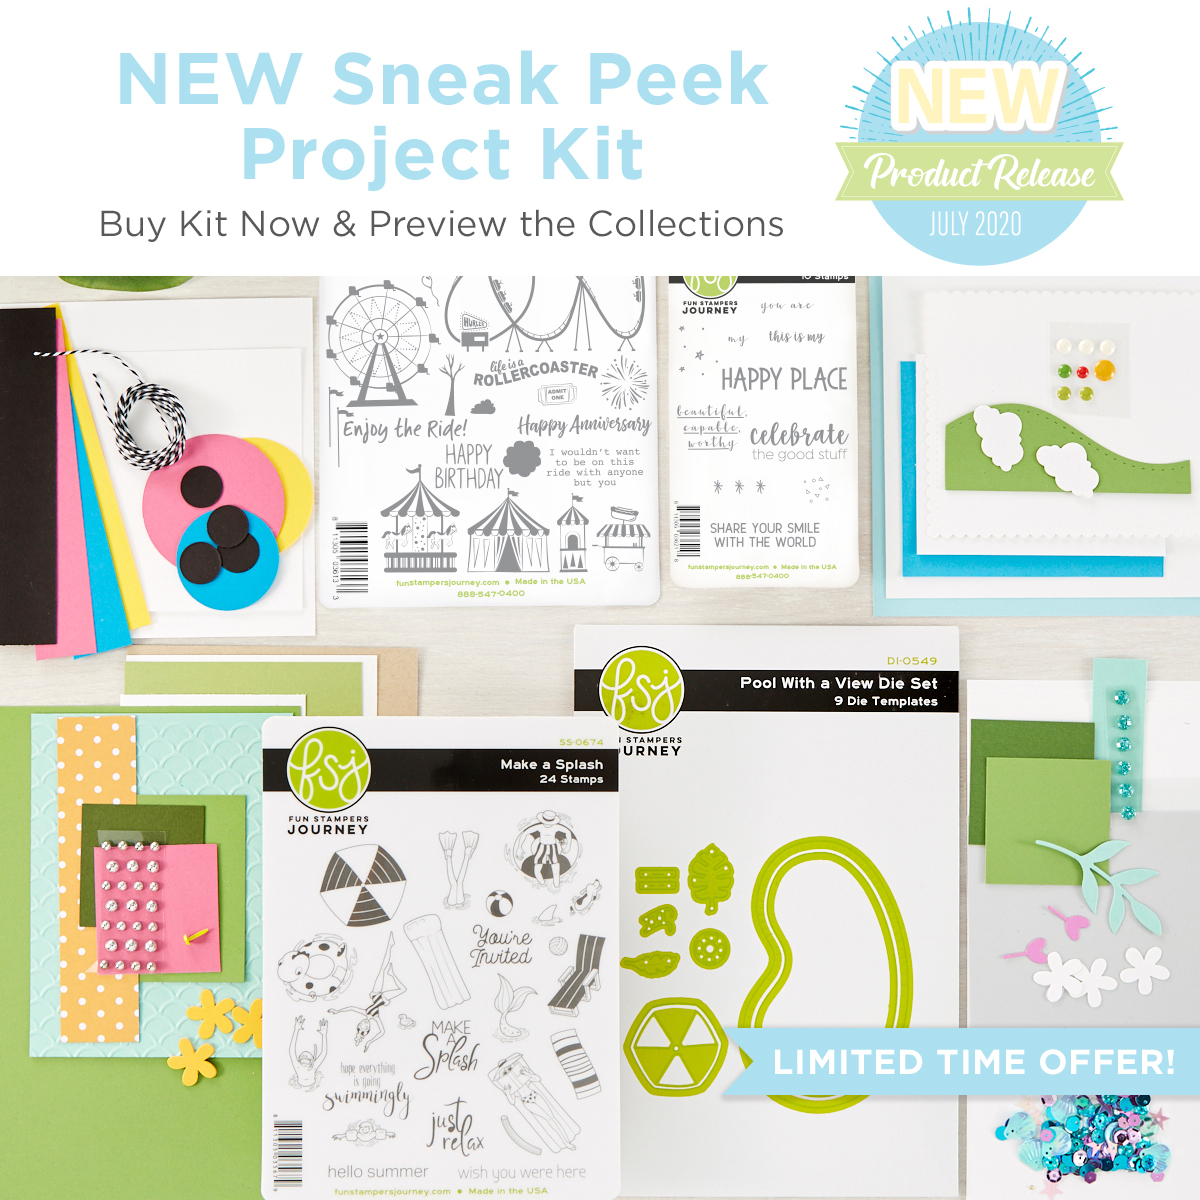
Included in Project Kit:
- Make a Splash Stamp Set SS-0674
- Pool with a View Die Set DI-0549
- Share Your Smile Stamp Set AT-0360
- Enjoy the Ride Stamp Set SS-0692
- Kit Materials to create FOUR Cards
Also included are full color instructions and an online Video Tutorial. You will be guided through every step of the way as your create die cut projects.
Join designer Carrie Rhoades as she shares 3 beautiful projects created using this kit. Watch Carrie’s video below or on Youtube:
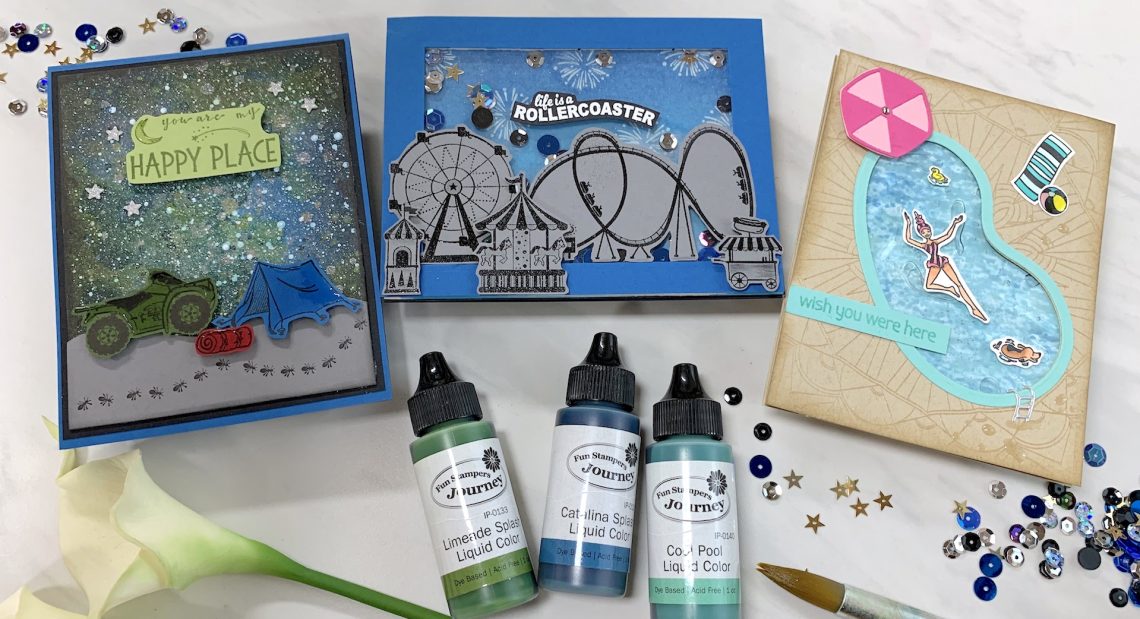
Happy Place Card

Instructions:
- Mix Catalina Splash and Limeade Liquid color with a small amount of water. Drop this onto a slightly wet sheet of watercolor paper.
- Once that is dry splatter over the top with Beach Ball, Electric Lime, Cool Pool and Sparkle silk.
- Mix Whip Cream acrylic paint with water and splatter this over the top of the background creating dots of splatter that vary in size. A fine
mist of white looks great on a galaxy sky. - When all the splatter is dry, use an ink blending tool to apply black in all the way around the outer edge of the panel. The edge should be the darkest with a light layer of black over the center. Cut this panel to the size needed for a card front, 3-⅞” x 5-⅛” for this card.
- Free hand cut out a hill from gray card stock to mount to the bottom of the galaxy background.
- From the Summer Build a Scene stamp set, stamp the tent, 4-Wheeler and sleeping bag on colored card stock; Fresh Forrest, Pomegranate Splash and Catalina Splash, with black ink and cut out. Adhere these to the top of the hill with foam squares.
- With black ink stamp a row of ants across the bottom of the hill.
- Stamp “you are my happy place” from the Share Your Smile stamp set with Fresh Forest Ink on Lemongrass card stock. Stamp the moon and shooting star images from the Summer Build a Scene stamp set around the images and cut this out. Mount it to the card front with foam squares.
- Mount the card front to a Black Licorice card panel that is 5-¼” x 4”. Mount this to a card base that is 4-¼” x 11”, scored at 5-½”.
- Punch out 5 stars with the Star Punch from Silver Glitter Paper. Adhere these around the sentiment with glue.
- Place all the small images from the Summer Build a Scene stamp set on to one long acrylic block and stamp them down the left side of the inside of the card in Denim Days ink.
- Add Journey Glaze the moon, 4-Wheeler, tent and sleeping bag. Allow this to dry for an hour or so.
Roller Coaster Shaker Card
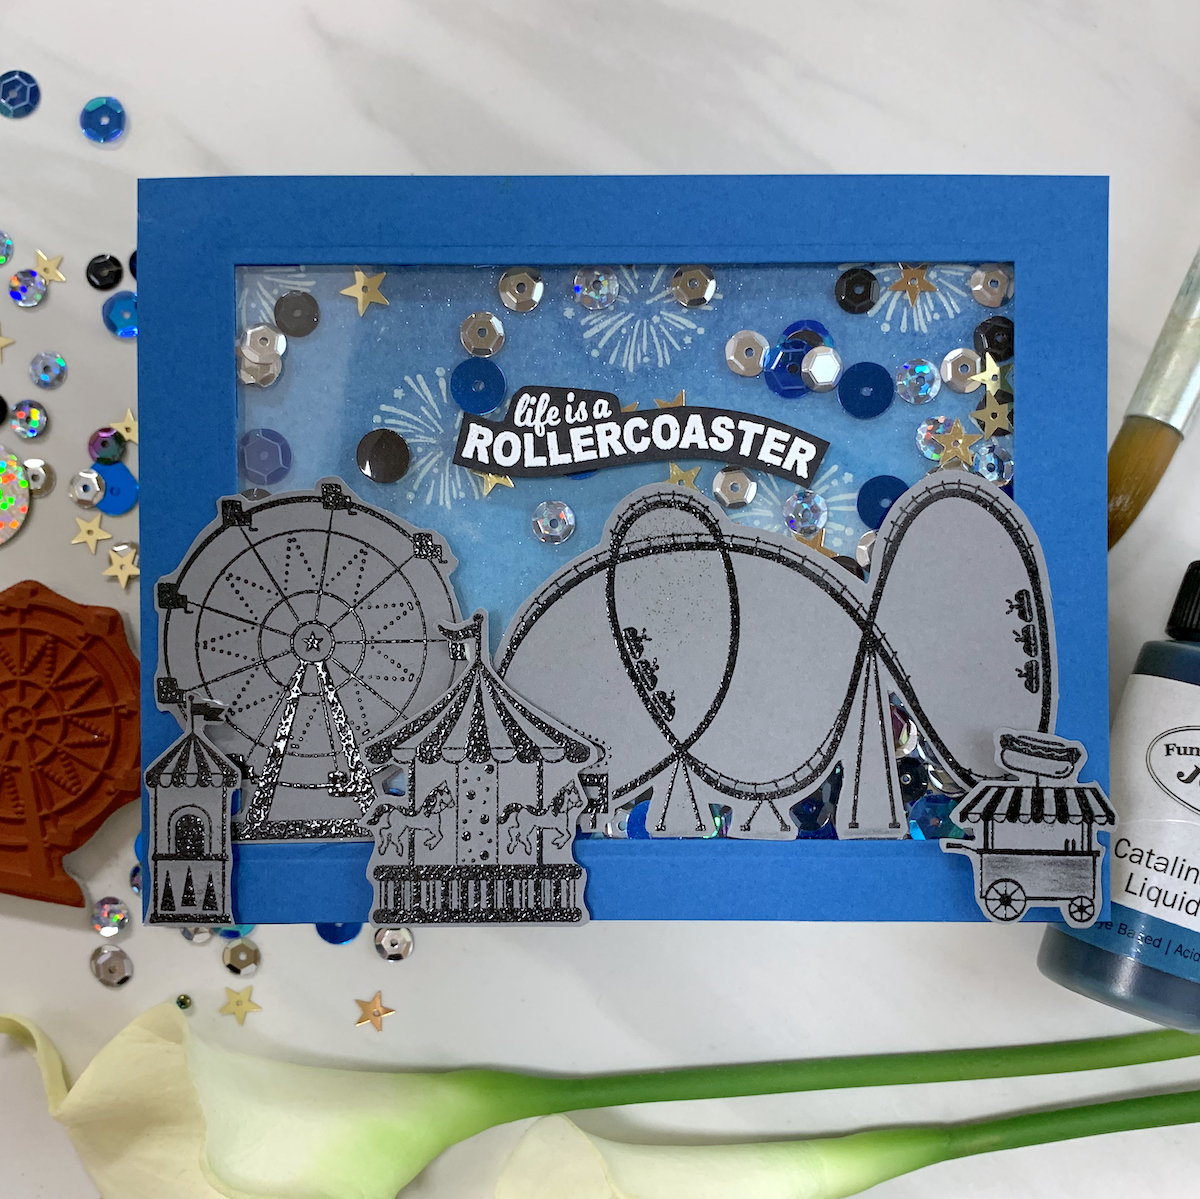
Instructions:
- With Clear Pigment ink, stamp and emboss the fireworks image from the Enjoy the Ride stamp set with Clear Embossing Powder on watercolor paper.
- Mix Catalina Splash with a bit of Sparkle Silk. Mist this with a touch of water. Use this mixture to watercolor over the top of the fireworks. Concentrate the ink more at the top and allow it to get lighter as you move towards the bottom of the panel.
- Use a paper towel to dab up paint in the center of each of the fireworks images, this gives them a bit of a glow. Set this aside to dry.
- Use a rectangle die to cut a window into a Catalina Splash panel that measures 5-½” x 4-¼”. Adhere a window sheet to the back of this frame. Apply foam tape all the way around the frame, so that the ends of the foam tape meet and touch at each corner. Fill this frame ⅓ of the way with Starry Night Sequin Mix. Remove the backing from the foam tape and adhere a second window sheet, trapping the sequins inside.
- Adhere this to the embossed fireworks panel with White Liner Tape.
- Ink up the Roller coaster and other images from the Enjoy the Ride stamp set first with Clear Pigment ink and then with Black Licorice ink. Emboss these images with Clear Powder and Cut them out.
- Adhere these images to the front of the shaker. Two image will be adhered with glue and the remaining three that go in front will get mounted on with foam squares.
- Stamp and emboss the sentiment “life is a rollercoaster” from the Enjoy the Ride stamp set with clear ink and white powder on Black Licorice card stock. Cut this out and glue it to the card on the window sheet just above the roller coaster image.
- Adhere this to a card base that measures 5-½” x 8*½”, scored at 4-¼”. Stamp the inside of the card as you wish.
Gel Pool Card

Instructions:
- Add drops of Catalina Splash and Cool Pook Liquid color to a Gel press, spritz with water and brayer the ink around. Lay a piece of Whip Cream Card Stock over this and press it into place. Peel up the paper to pick up the print. Repeat this but instead of spritzing on water try splattering on Sparkle Silk before
brayering the ink around. One of these prints will become the background for the pool on this card, cut the one down that you like to 4” x 5-¼”. - Stamp the Kaleidoscope Art background stamp onto a Oatmeal Cookie piece of cardstock with clear ink and emboss it with clear powder.
- Use the Pool with a View die set to cut out a pool shape from the center of this panel.
- Trim down a clear envelope, removing about 2” from the top. Put about 1T. Of clear hair gel into the envelope, more is less here. Spread this gel around inside the bag, creating a thin layer. Fold the top of the bag over twice and use packing tape to seal the back shut. Adhere this bag to the back of the pool panel with White Liner tape. Then adhere the Gel Press background to the back of the bag with White Liner tape. Adhere this to a top folding Oatmeal Cookie card that measures 4-¼” x 11”, scored at 5-½”.
- Stamp, color and cut out the images you want for your pool scene from the Make a Splash stamp set and Pool with a view Die set. Adhere the images to the gel filled bag using glue dots.
- Stamp “wish you were here” in pigment ink and then Cool Pool ink onto Cool Pool card stock. Emboss with clear powder. Cut this into a strip and add to the card front.
- Finish off this card with a bit of Journey Glaze. Add it around the pool for the look of water splashing out of the pool. Allow this to dry for at least an hour before trying to send it.
Gift Bag
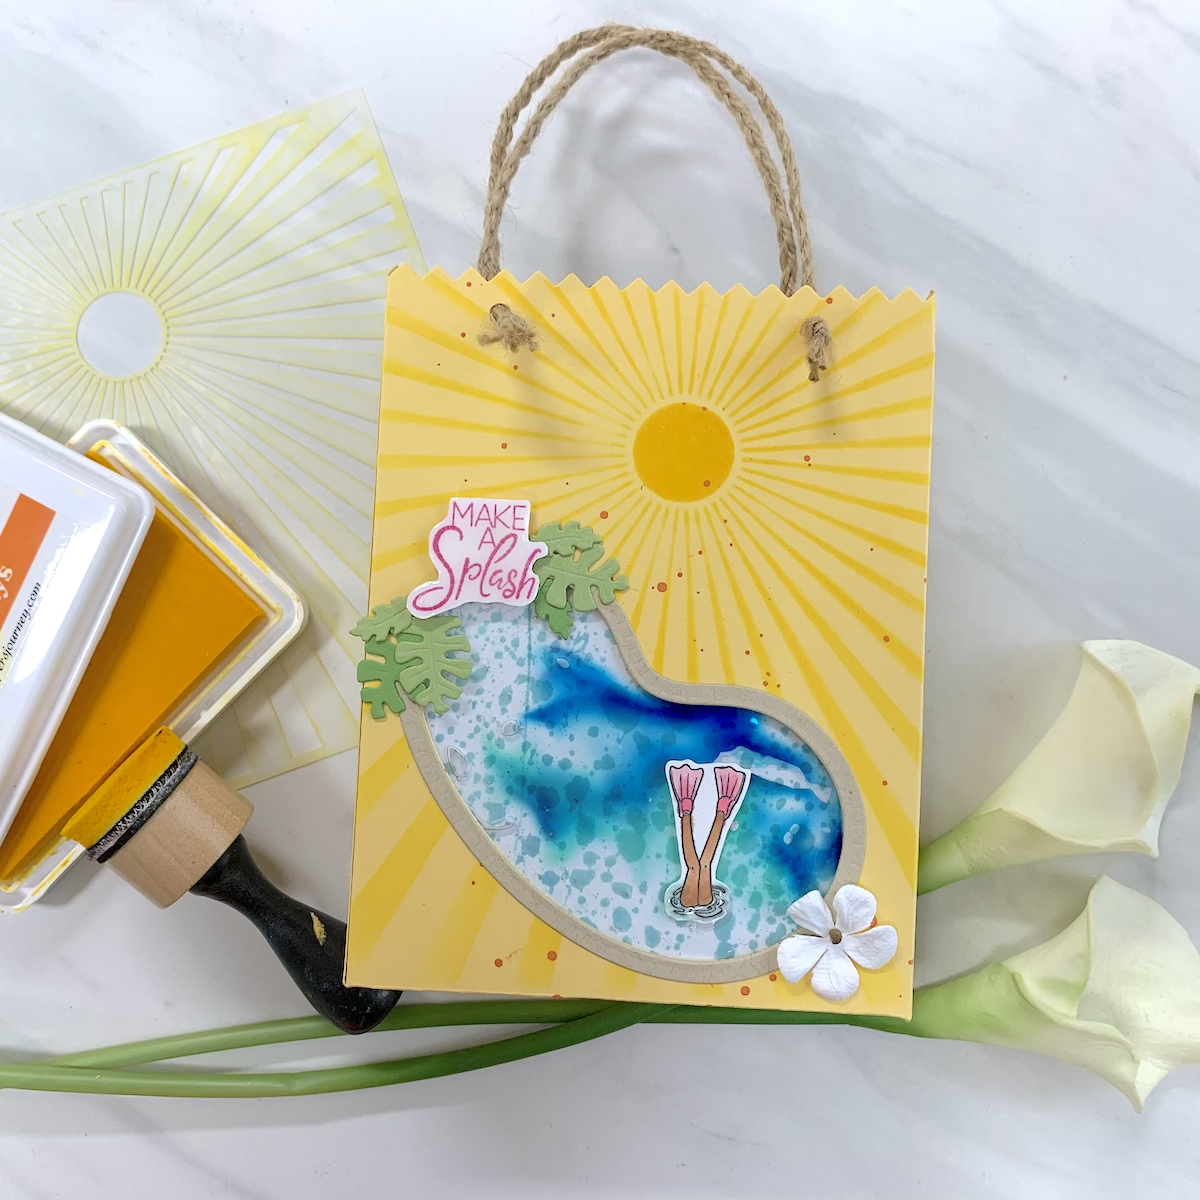
Instructions:
- Die cut two panels with the Card Carrier die set from Pineapple Smoothie cardstock. Sponge both panels with the Sunny Day Stencil and Summer Days ink. Splatter these panels with Citrus Cooler Silk.
- When this is dry, die cut one of these panels with the pool die. Die cut the pool edge from Oatmeal Cookie card stock and adhere that to the panel.
- Repeat the process of filling a cut off clear envelope with clear hair gel, as in the previous project. This time add a drop of Catalina Splash Liquid Color and Cool Pool Liquid color before sealing the bag closed with packing tape. Adhere this to the back of the bag panel with White Liner tape. Then adhere another of the Gel Press backgrounds made for the last project behind the hair gel bag with White Liner tape.
- Adhere the bag pieces together with White Liner tape. Punch hole for the handles while squeezing the top of the bag closed.
- Braid three strands of twine together to make one handle. Repeat this for the second handle.
- Stamp a sentiment and images for the pool from the Make a Splash stamp set, color and cut them out. Images adhered to the plastic bag can be stuck on with glue dots.
- Add die cut leaves and sentiment to the top corner of the pool and a flower embellishment to the bottom corner of the pool
- The recipient of this bag and press the gel around in the bag and watch the colors move and mix inside the gel.
2 Comments
Carrie Rhoades
Such a fun kit! I love this summery release, playing with this stamps brings happy memories even if we can’t do all of these things this summer we can create them and remember how much fun it is going camping, swimming and to the fair!
susieprovince
I especially like the gift bag. Very nice. Thanks and God bless.