
The Glimmering Christmas Project Kit | Cardmaking Inspiration with Amanda Korotkova | Video
Hello Spellbinders’ and FSJ fans! Our Glimmering Christmas Project Kit is here!
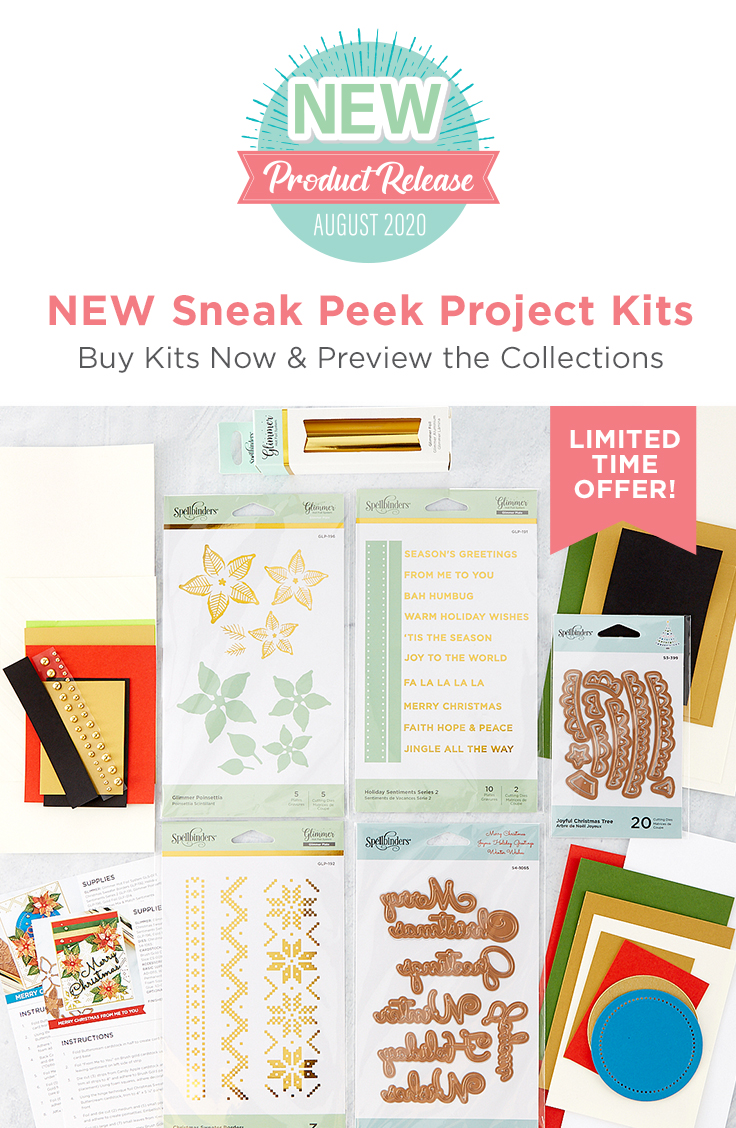
This Glimmering Christmas Project Kit is the perfect way to get your hands on early products from one of the upcoming August Holiday Collections. This kit comes with an assortment of THREE, Hot Foil Plate sets, TWO die sets, ONE roll of foil, and a card making project kit to make THREE cards.
Also included are full color instructions and an online Video Tutorial. You will be guided through every step of the way as your create die cut projects.
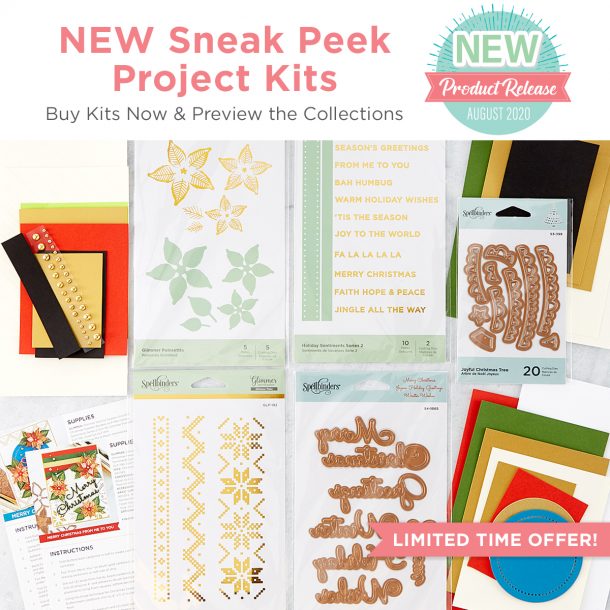
Included in Project Kit:
- Christmas Sweater Borders Glimmer Hot Foil Plate GLP-192
- Holiday Sentiments Series 2 Glimmer Hot Foil Plate GLP-191
- Glimmer Poinsettia Glimmer Hot Foil Plate GLP-196
- Christmas Mix & Match Sentiments Die Set S4-1065
- Joyful Christmas Tree Die Set S3-399
- Foil – Gold GLF-014
- Kit Materials to create THREE Cards
Join designer Amanda Korotkova as she shares 3 beautiful cards created using this kit. Watch video below or on Youtube:
Christmas Greetings Card

- Cut mustard cardstock to a 4 ¼ by 5 ½” piece.
- Take the “Christmas Sweater Borders” plates and foil the piece of cardstock using Gold Glimmer Foil.
- Die cut cardstock using a Rectangle Stitched Die.
- Die cut the sentiment “Christmas” from the “Christmas Mix and Match Sentiments” on White Cardstock.
- Attach Sentiment to the card.
- Foil the sentiment “CHRISTMAS GREETINGS” from the “ Holiday Sentiments Series 2”. Use gold glimmer foil and white cardstock.
- Cut out the word “GREETINGS” from the sentiment and attach it to the card with foam squares, right below “Christmas”.
- Add Fashion Gold Embellishments.
- Glue panel to a white card base using craft foam.
Greetings Card

- Ink up a 4 ¼ by 5 ½ piece of teal cardstock starting at the bottom and moving towards the top to create an “ombré” effect. Use an ink slightly darker than the cardstock color.
- Die cut panel to a smaller rectangle to allow a border around the card.
- Die cut the smaller poinsettia from the set “Glimmer Poinsettia” four times to create a “stripe” of flowers on the bottom part of the card.
- Foil and die cut 4 small poinsettias and 10 to 12 leaves. Use teal cardstock and gold glimmer foil.
- Take a 4 ¼ by 5 ½” card base and adhere a piece of Blush Gold Cardstock to the front part.
- Adhere the teal panel to the gold piece.
- Embed poinsettias sticking them only from the central part to allow petals to stand up.
- Arrange and stick the leaves around the flowers.
- Die cut the word “Greetings” from Blush Gold Cardstock and stick it to the card with liquid glue.
- Add jewels as a final touch.
Merry Chrismas Card

- Foil and die cut a bunch of Poinsettias and leaves from the “Glimmer Poinsettia” set. Use gold foil on white and salmon cardstock.
- Prepare your card base sticking a piece of salmon cardstock to the front part. Add a smaller white rectangle using craft foam.
- Take all the flowers and leaves and arrange them on the card creating a wreath.
- Use Press’n Seal plastic to keep everything in place. Turn it around, add liquid glue and stick the wreath to the card.
- Die cut the die “Merry” on Blush Gold Cardstock and use the word “CHRISTMAS” from one of the foiled stripe sentiments to complete the sentiment. Stick them to centre of the wreath.
- Add Fashion Gold Embellishments as a final touch.
Spellbinders Supplies:
Beautiful Sentiment Vignettes Inspiration with Karen Brown

A Sweet Christmas Inspiration | Santa & Presents Card with Elena Salo