Halloween Collection by Becca Feeken – Inspiration with Yasmin
Hello, Spellbinders and FSJ friends! Yasmin here, today I’m back with a fabulous Halloween season project so, I’ll be sharing with you 2 inspiration projects showcasing the new: Halloween Collection by Becca Feeken.
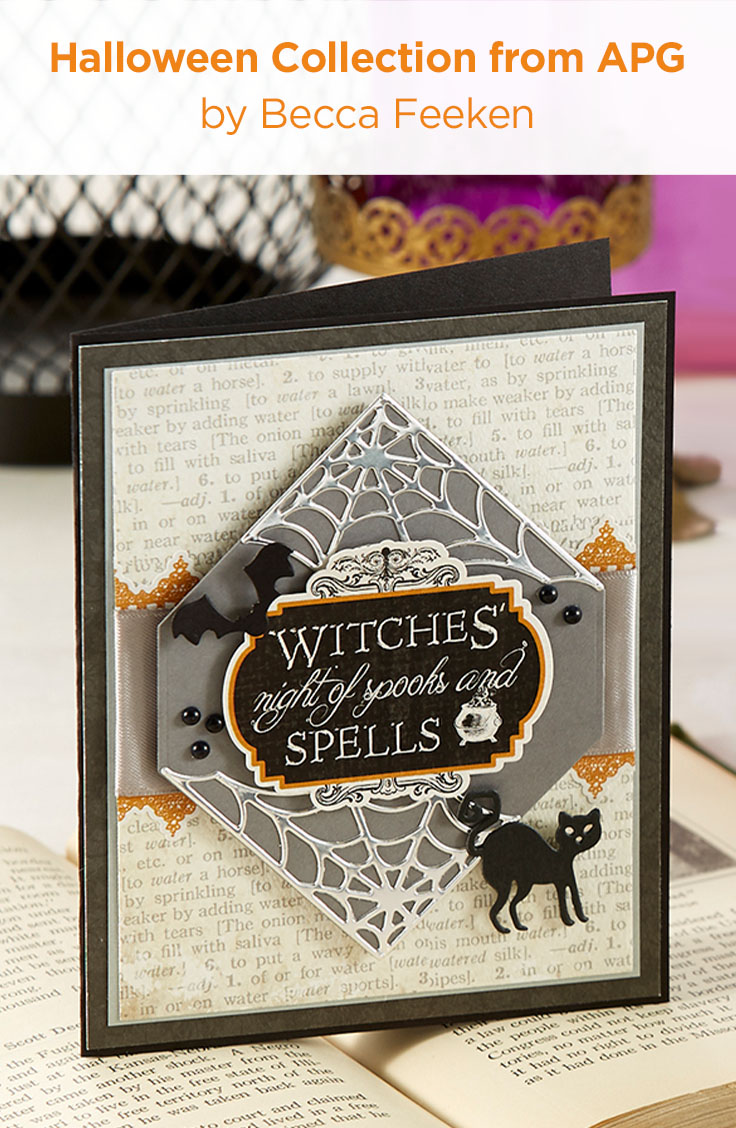
. What’s New | Halloween 2020 Collection by Becca Feeken for Spellbinders #Spellbinders #NeverStopMaking #DieCutting #Cardmaking #Halloween #AmazingPaperGrace")
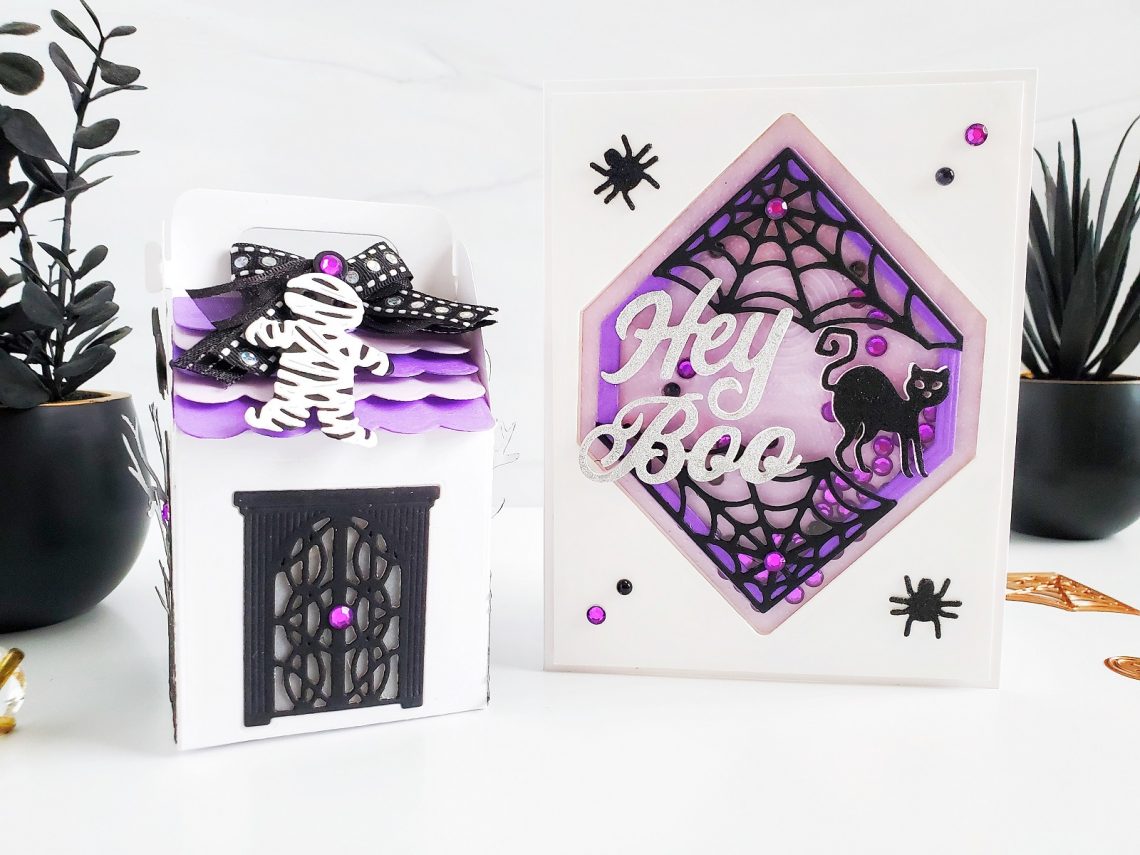
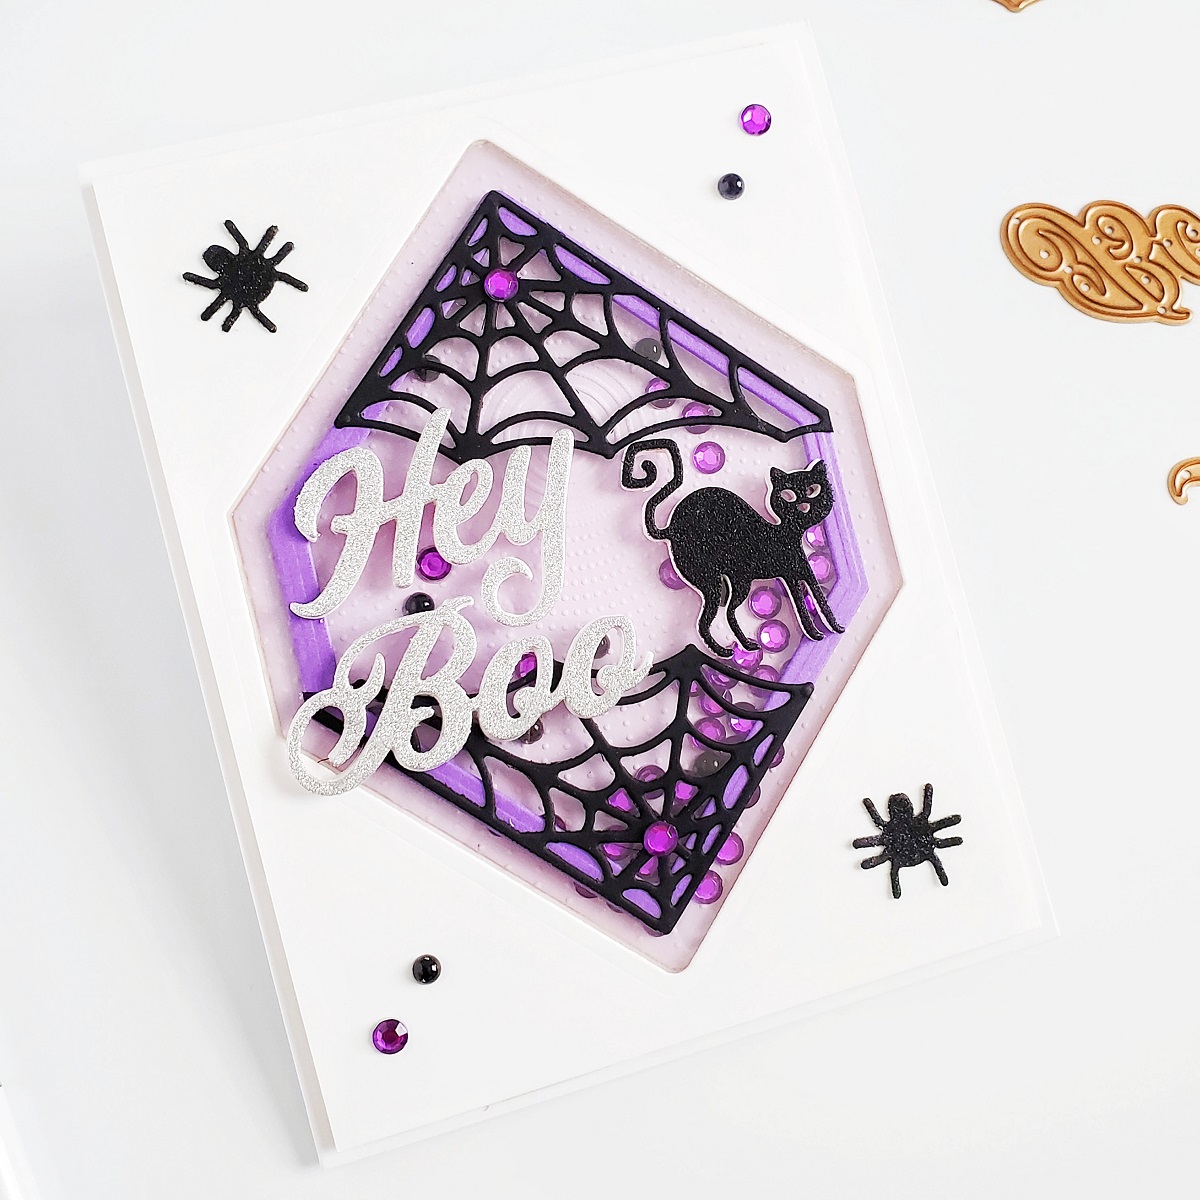
Hey Boo Halloween Shaker Card
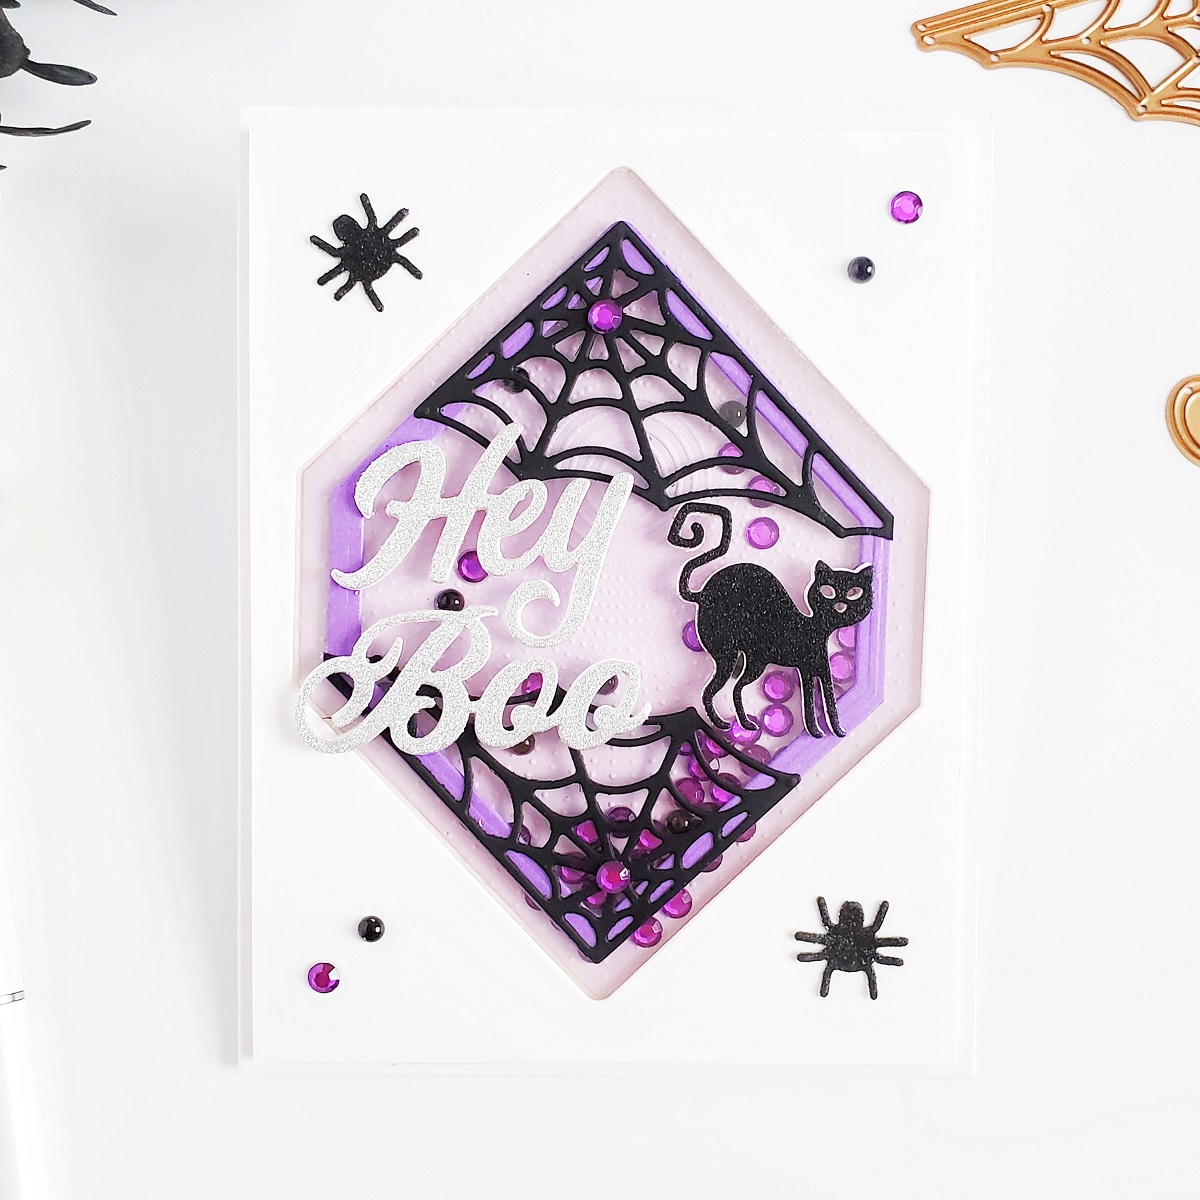
For the shaker Halloween card, start by creating the die-cut pieces so
- Line up the largest die from the Nested Clipped Squares by Becca Feeken Die Set over an A2 size white card panel and I run them through the die-cut machine.
- Lined up the same die over a light purple card panel and I also run them through the die-cut machine.
- Lined up the fifth and sixth-to-last dies from the same die set and run them through to die-cut a frame out of dark purple cardstock.
- Add texture to the light purple die-cutting frame by using the Bright Days Embossing Folder.
Therefore, to assemble the shaker base start by:
- Gluing down with liquid glue the textured frame over an A2 side-folding white card base.
- Adhered an acetate panel to the backing of the white panel with the large window.
- Adhere craft foam tape to add dimension to the backing of the white card panel.
- Add purple and black jewels to the light purple frame.
- Peel the backing of the craft foam tape and mount the white card panel to the card base to close the shaker window.
- Lastly, glue down with liquid glue the dark purple frame over the acetate.
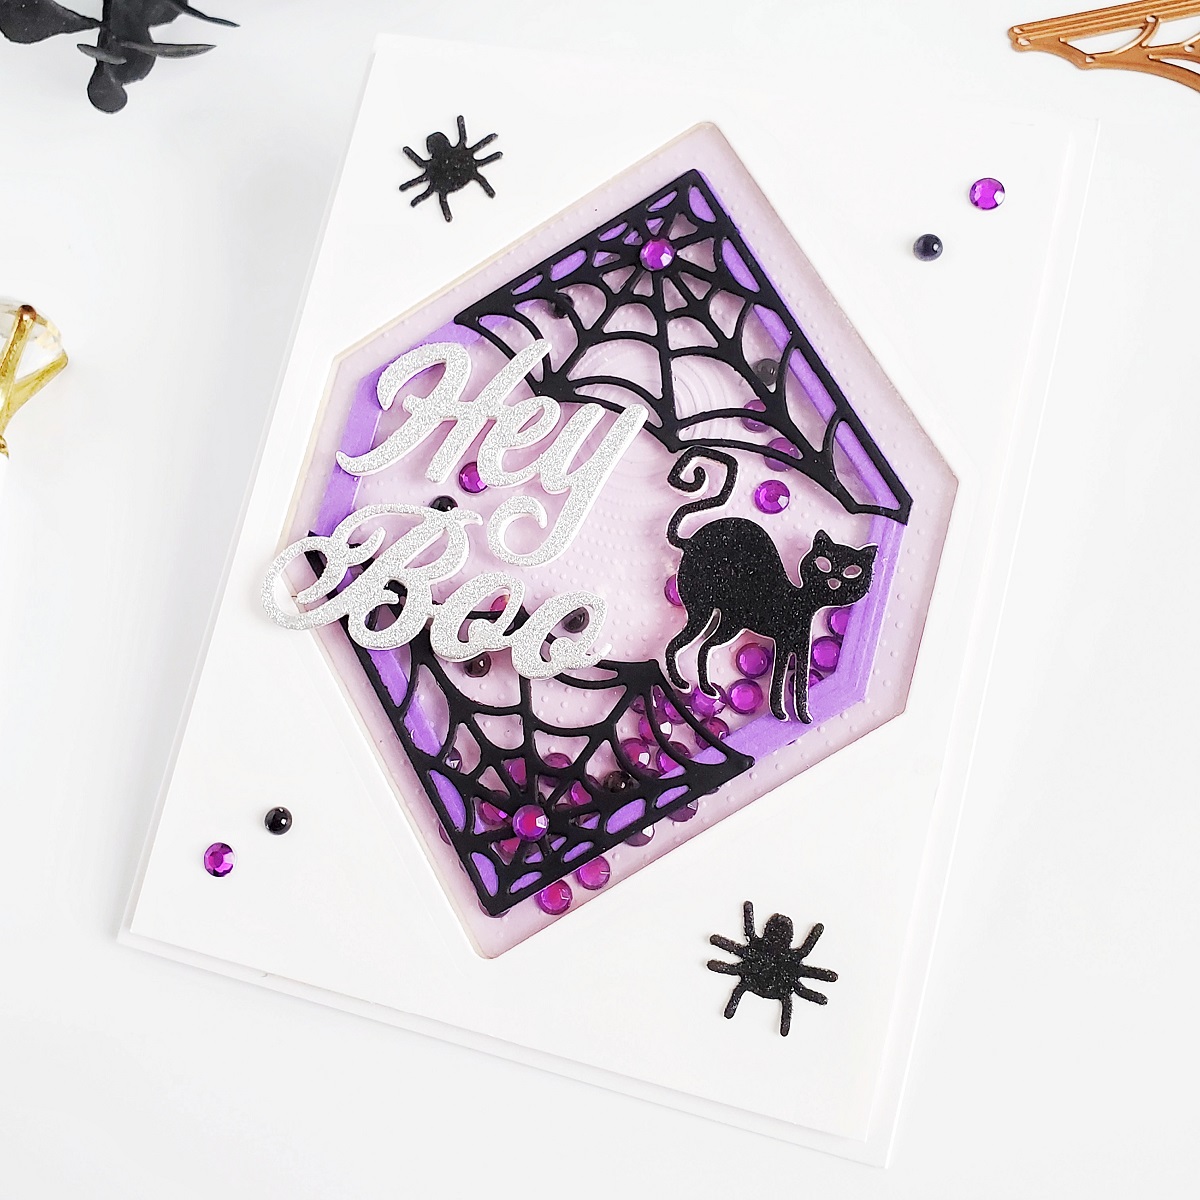
So, to embellish the card:
- Run through the die-cut machine the spider and cat from the Spooky Boo by Becca Feeken Die Set to die-cut them out of glitter black cardstock.
- Then, run through the die-cut machine once again the cat and the 2 word dies included in the set to die-cut them 3X each out of white cardstock.
- Then after that, run through the die-cut machine the word dies to die cut them out from silver glitter cardstock.
- Lastly, run through the die-cut machine the spider web die to die-cut it 2X out of black cardstock.
Therefore, after you’re done die-cutting the embellishment pieces:
- Glue down the spider web die-cutting pieces to the dark purple frame (as seen in the image above)
- Stack the Hey Boo die-cutting words and glue them down to the left side of the frame.
- Stack the cat die-cutting pieces and glue the cat down with liquid glue to the right side of the frame.
- Glue the spiders and glue more purple and black jewels to add balance and more sparkle.
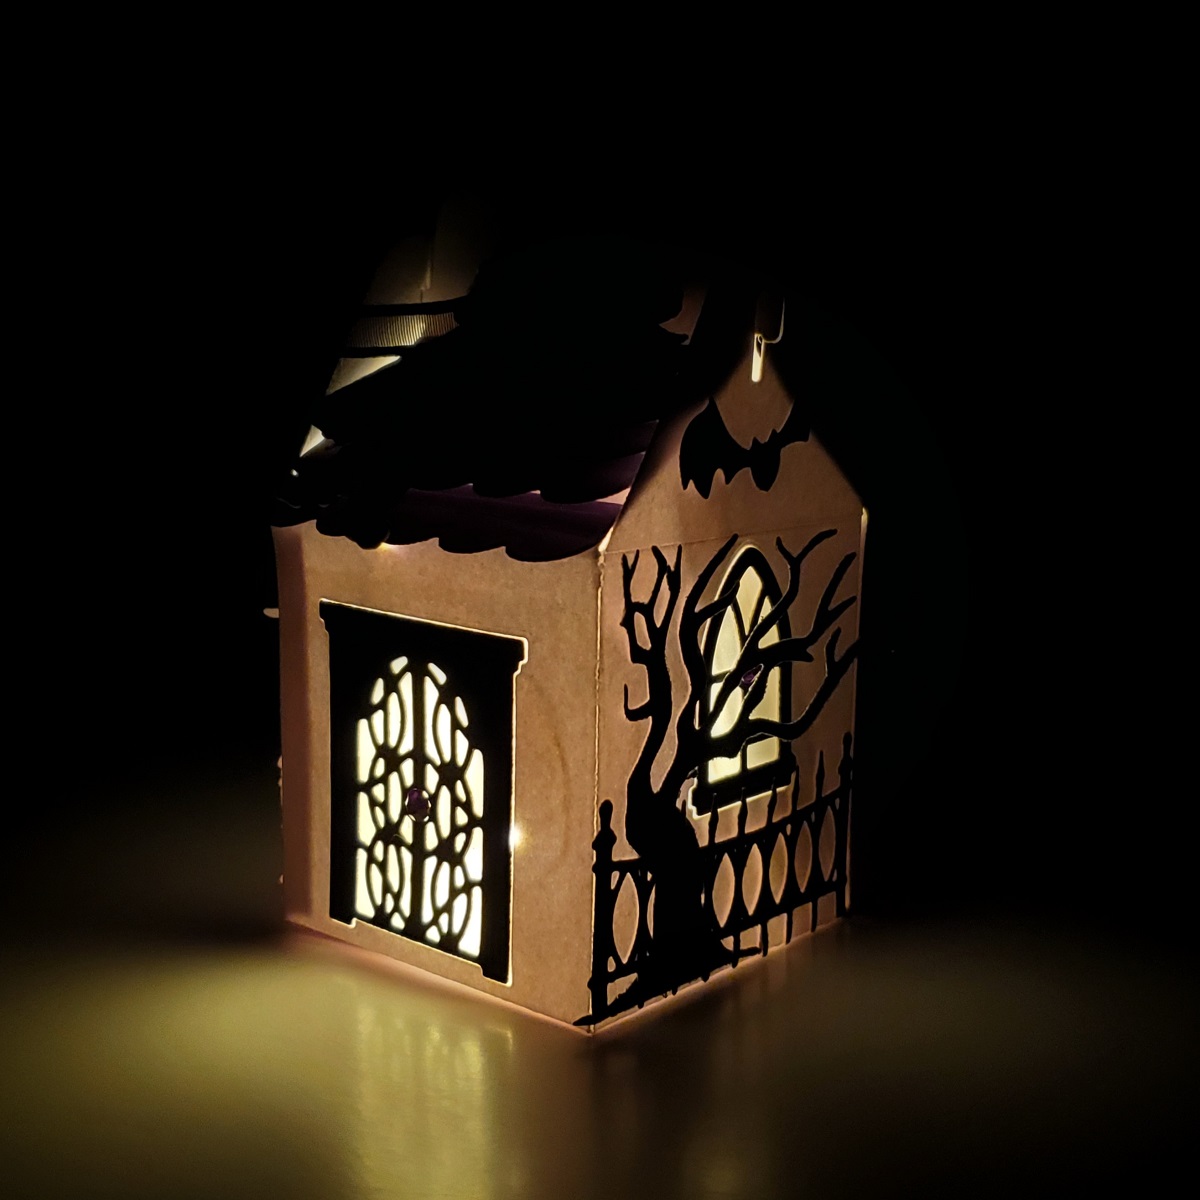
Spooky Cottage Box
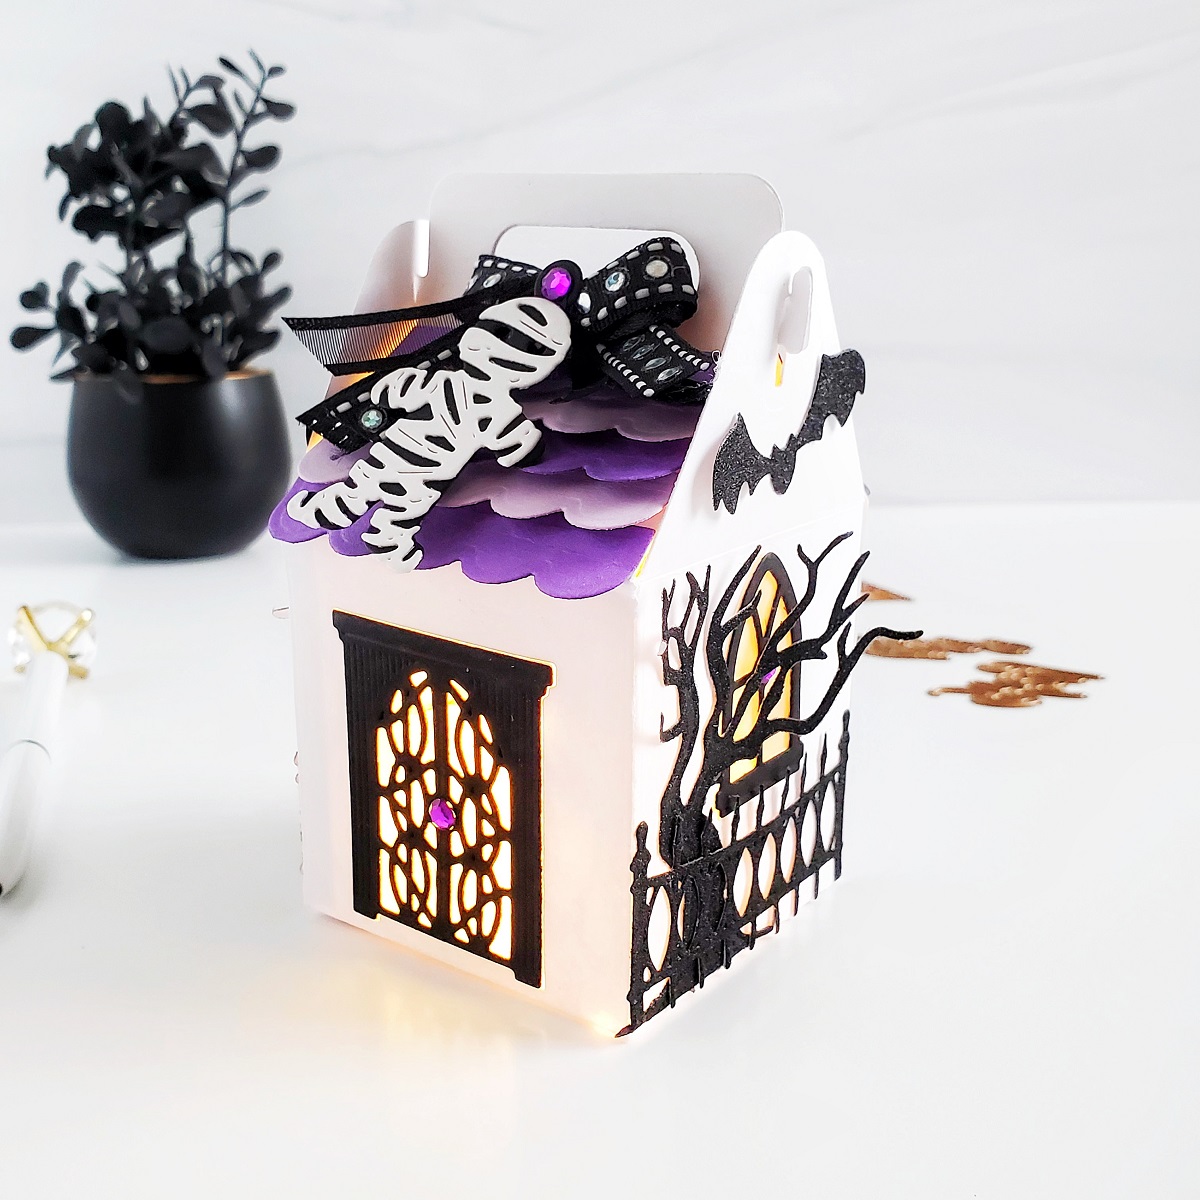
For this Spooky Cottage Box
- Line up over a large piece of white cardstock the largest die from the Charming Cottage Box by Becca Feeken Die Set and run them through the die-cut machine 2X to die cut the sides for the box.
- Once, the die-cutting sides are done line up the door die included in the Spooky Cottage by Becca Feeken Die Set to one of the sides of the box, and run them through the die-cut machine to die-cut the front door.
- Then, line up the window die included in the set over one side of the box and repeat the same step to the other side to die-cut 2 windows for the box base.

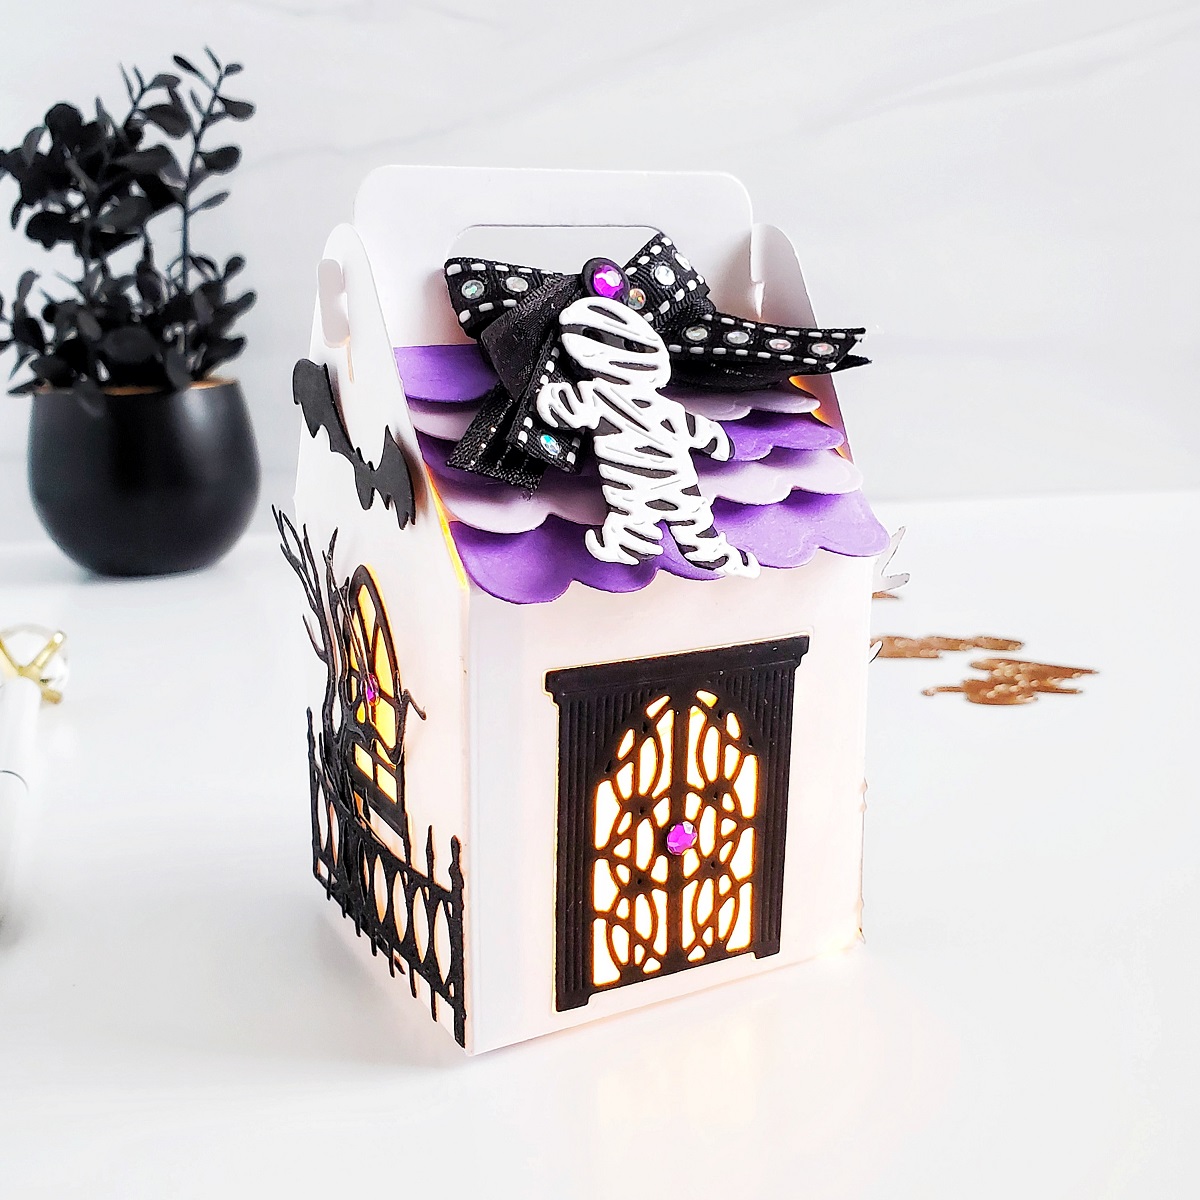
Right after when the box base die-cutting pieces are done close the box up and embellish it, to do that:
- Adhere pieces of translucent vellum to the windows and from door but from the inside of the box.
- Then, fold the scoring lines created by the die and add pieces of double-sided tape to the edges and bottom part to close the box up.
- Once the box is closed, run through the die-cut machine the following dies; bat, window frame, door frame and the base for the mummy to die-cut them out from plain black cardstock.
- Then, run through the die-cut machine the spooky tree and widow’s walk to die cut each of them 2X out glittery black cardstock.
- Lastly, adhere the front door to the front of the box, and adhere the window frame, bat, spooky tree and widow’s walk to one side of the box and repeat the same step for the other side.
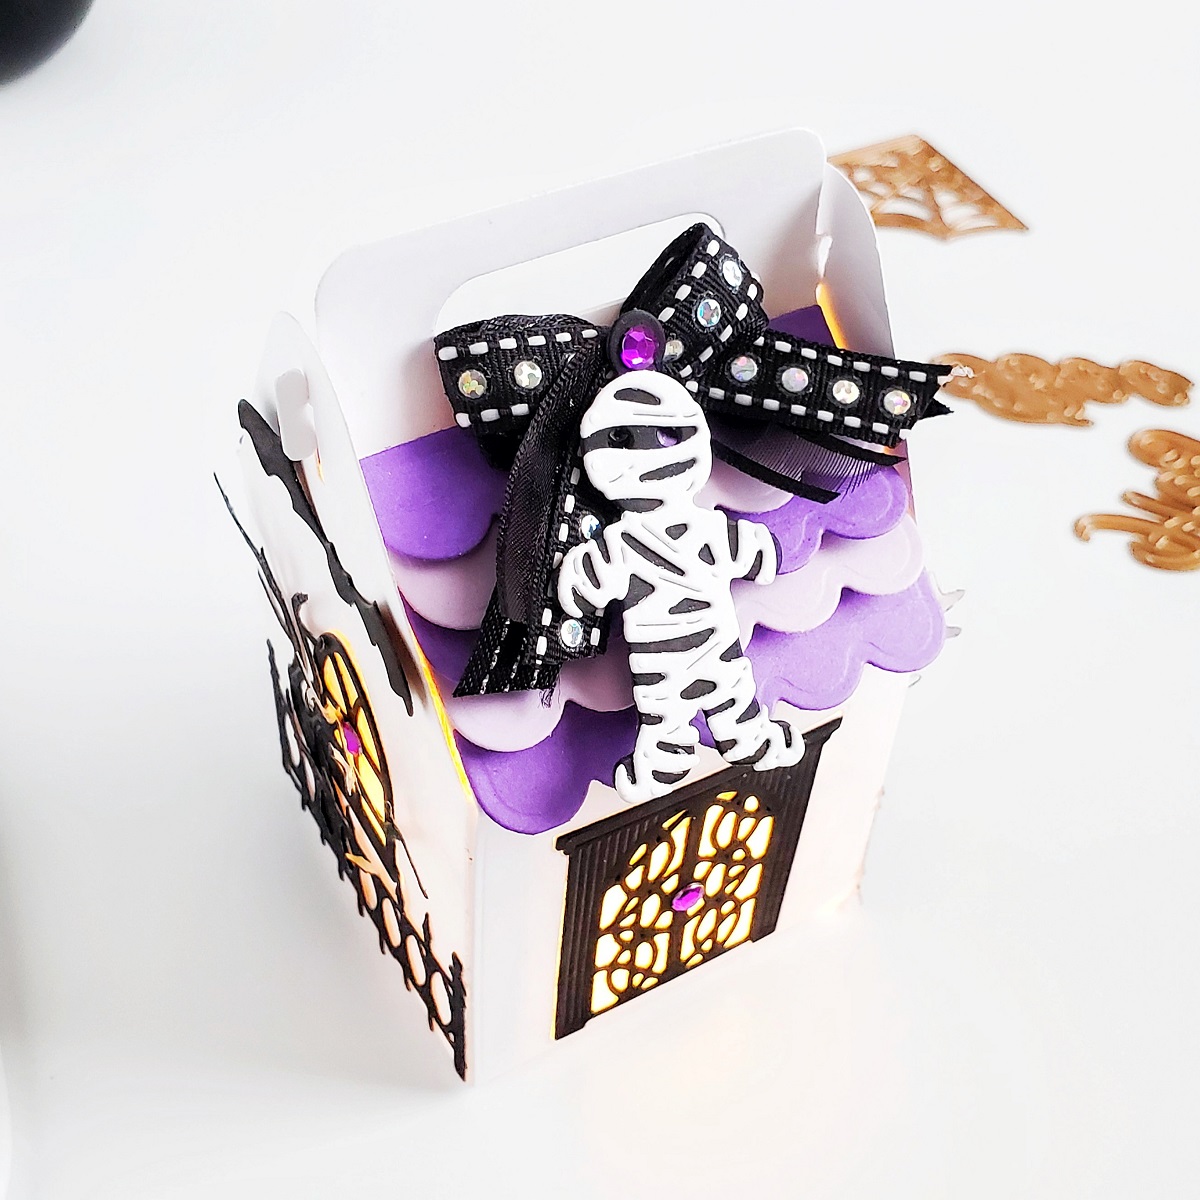
Once the front and each sides of the box are embellished:
- Run through the die-cut machine the scallop trim to die cut it 6X out of dark purple cardstock and 4X out light purple cardstock.
- Also, run the top layer of the mummy die to die-cut it out of white cardstock.
Then, last but not least:
- Glue down with liquid glue the die-cutting trims to create the roof on each side of the box.
- Glue down the top layer to the bottom layer to finish the mummy off.
- Finish the card off by gluing down purple jewels, the mummy and a tied bow create with any ribbon of your choice.
Once your cottage box is done, feel free to add candy for a Halloween gift treat box or LED lights for a spooky decorative gift box. (See the image above for a glow-in-the-dark decorative look)
With that being said, I hope that you’ve enjoyed learning about how, I’ve created these 2 projects featuring the new: Halloween Collection by Becca Feeken. If you get inspired be sure to tag us in your social medias using the hashtags #Spellbinders #NeverStopMaking and #GlimmerHotFoilSystem when sharing your creations so, we can see what you are creating with these beautiful sets.
Spellbinders Supplies:
Thanks for stopping by we hope to see you soon but most of all, we hope you and your family to stay healthy and safe.
With love,
Moon Flower Cool Vibes Cards with Erum
Open House Collection – Card Inspiration with Annie Williams