Layered Fleur Bouquet Slimlines with Karen Yagel
Hello crafty friends! My name is Karen Yagel from Yes Please Papercrafts. I’m excited to be on the Spellbinders blog for the first time and I am so honored to be a Guest Designer with the gorgeous Layered Fleur Bouquet Slimline collection by Becca Feeken.
Let me quickly introduce myself … I live in Louisiana, USA with my two little Yorkies, Bella & LilyBelle. I’m a retired Business Systems Analyst aka “computer geek” with a love of all things paper. I absolutely adore cardmaking and scrapbooking … creating with paper just makes me happy!!! You can visit my blog or Instagram and I also have a YouTube channel where I share my love of paper crafting.
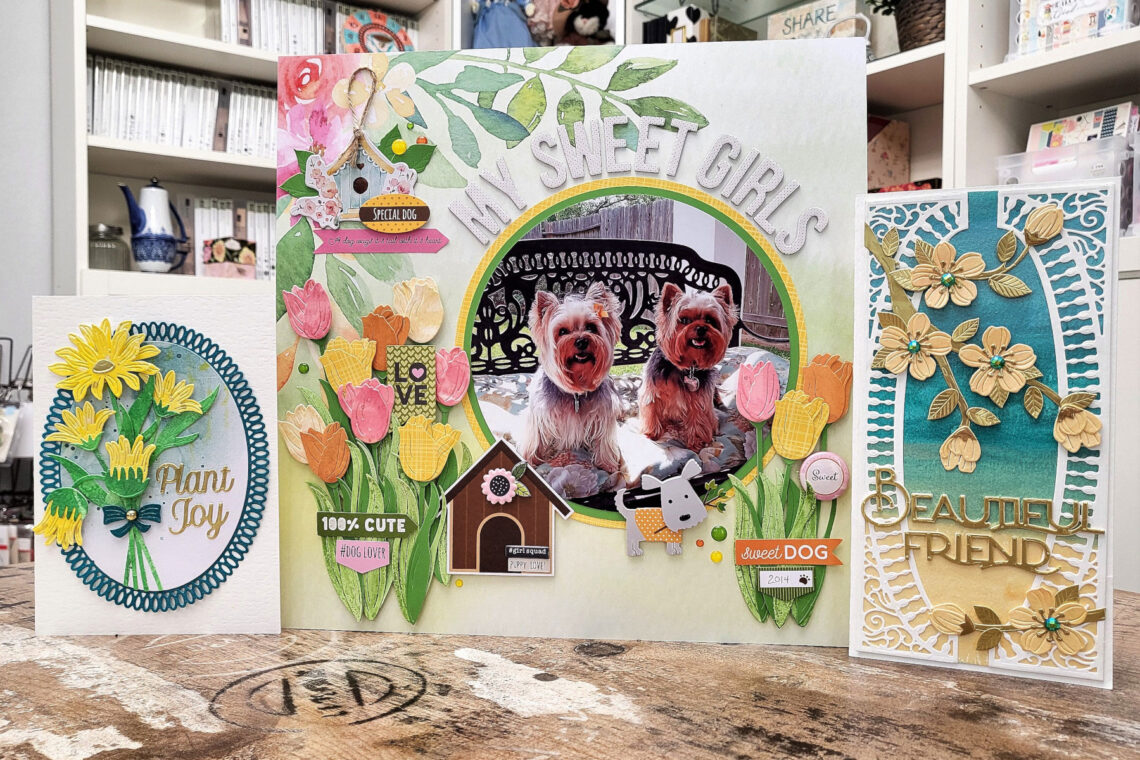
Today I’m sharing three projects that I created with the new Layered Fleur Bouquet Slimlines collection by Becca Feeken. This collection has so many beautiful florals and the sentiment dies pair perfectly with all the beautiful, layered flowers!

I love all of the layered flowers in this collection, and it was really hard to choose which ones to use, but I decided to go with my favorite flowers … Daisies, Cherry Blossoms, and Tulips (which are also my mom’s favorite).
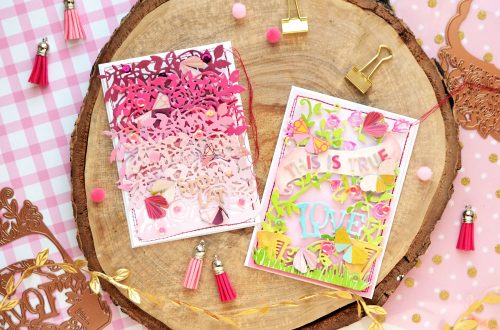
My first project is a 5”x7” card and it was inspired by the Layered Daisies.
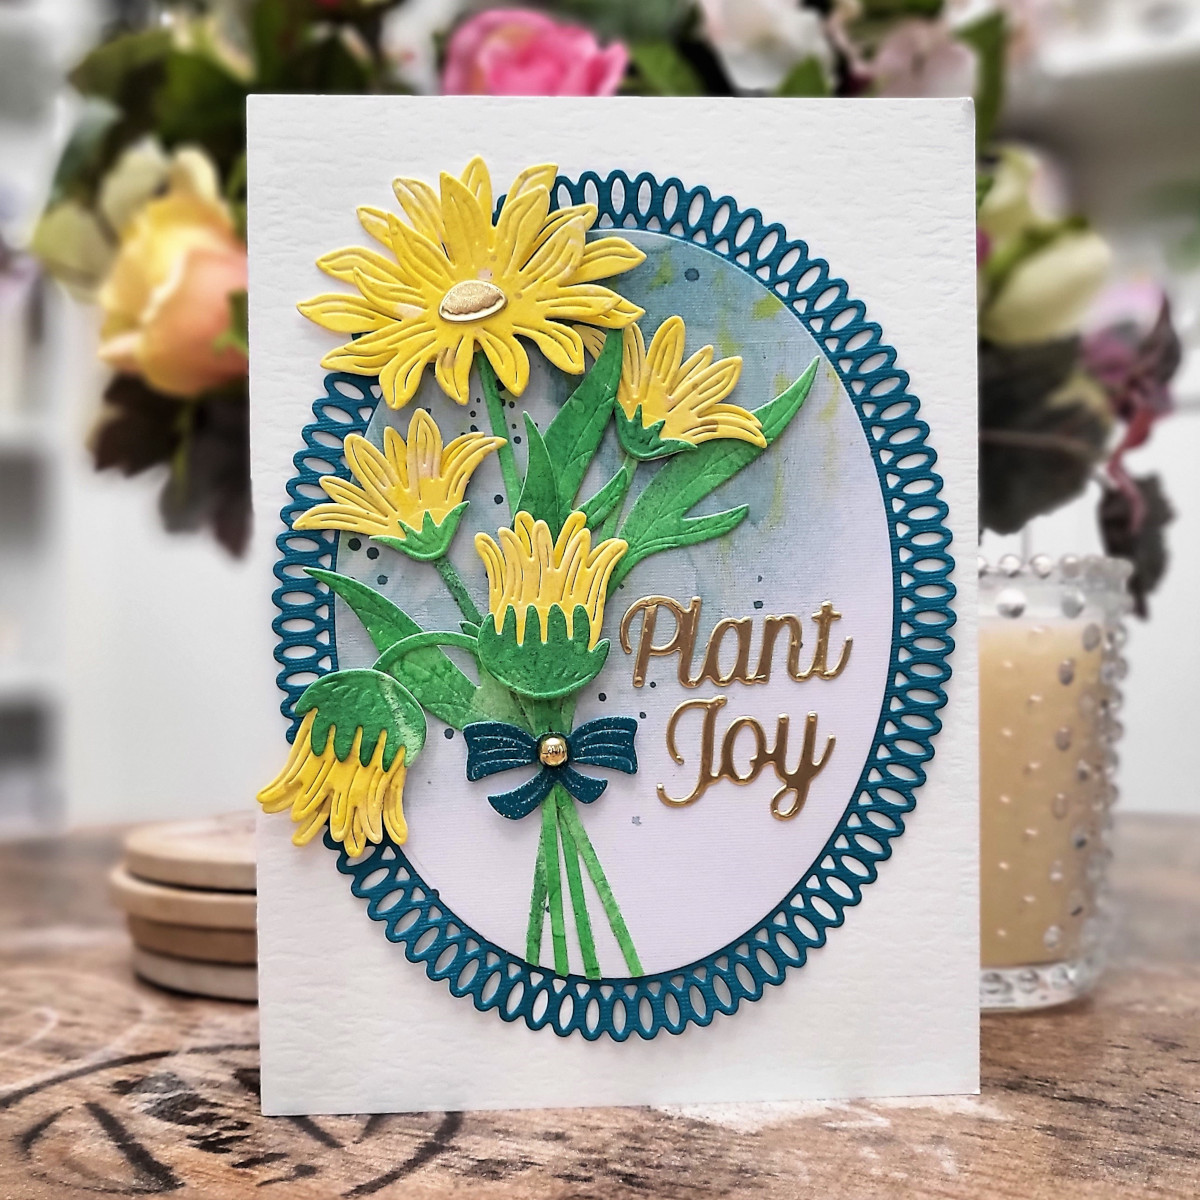
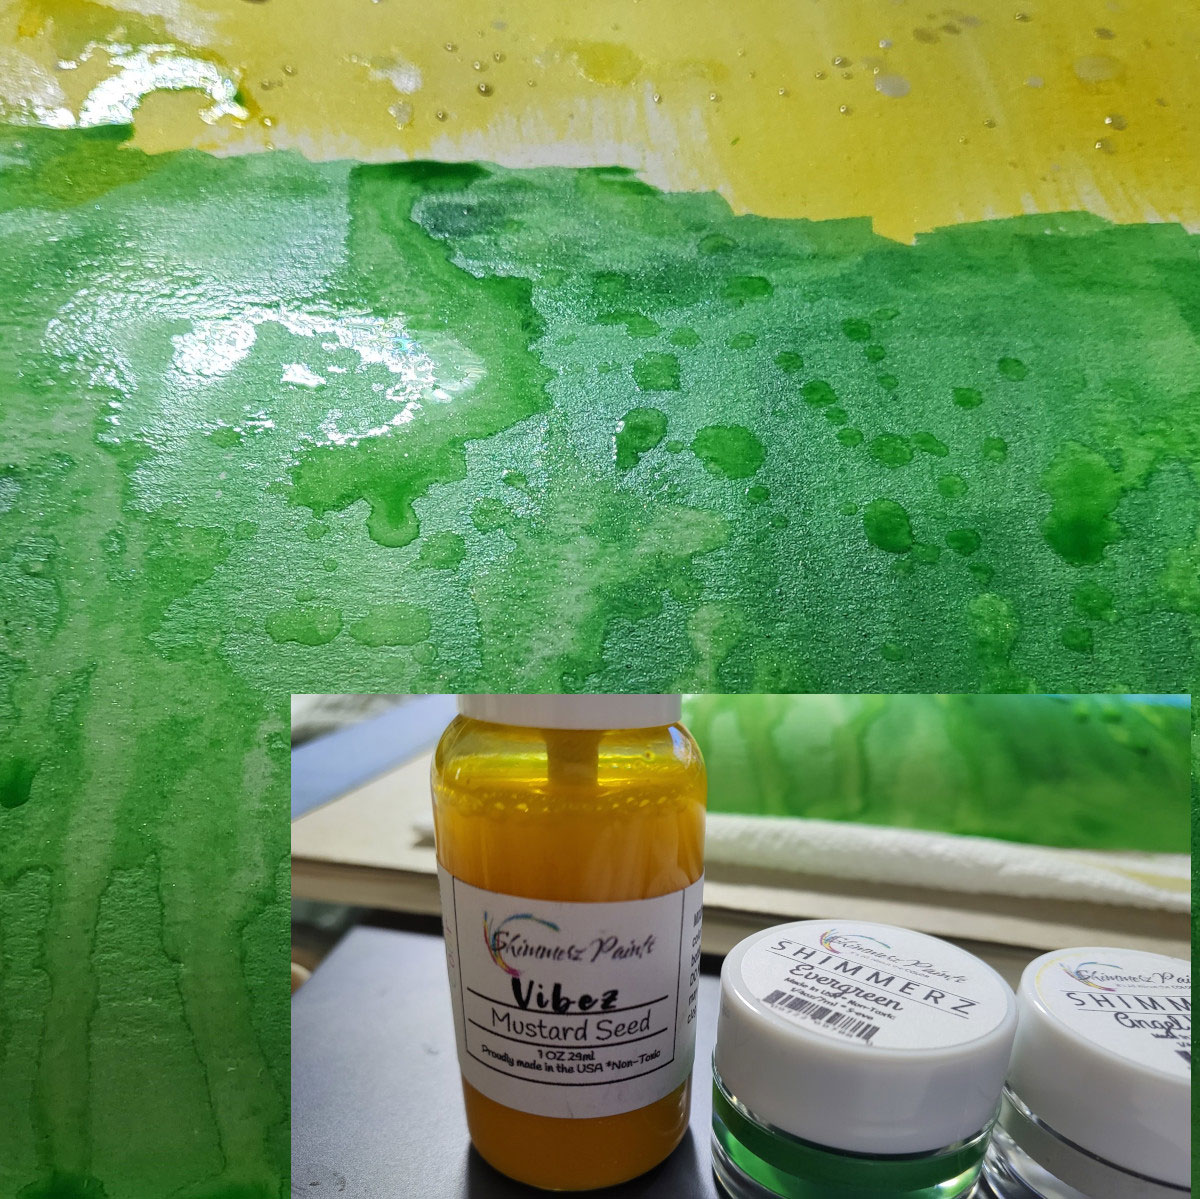
Daisies always remind me of summertime, I wanted to create something bright and sparkly and so I decided to create colorful watercolor paper. I used Shimmerz watercolors to create a watercolor wash of bright yellow for the flowers and bright green for the leaves. I just love the shimmer and shine from the watercolors and how it adds so much variation and texture to the paper.
Next, I layered two ovals to create a base for my floral arrangement. The larger Spellbinders Picot Petite oval die cut from teal cardstock and the inner basic oval die cut from a patterned paper.
I cut out the layered daisies and combined all the pieces together to create the dimensional flowers arranging them into a bouquet on the front of the card.
For my sentiment, I die cut the “Plant Joy” from gold mirror cardstock. To finish off this card and add just a bit more sparkle, I added a bow that I created with the bow die from the Spellbinders “Have a Springy Day” March Card Kit using teal glitter paper and then popped a Spellbinders Fashion Gold Embellishment on to the center of my bow.
My second card is a slimline card featuring the Half Slimline Oval die set. I was inspired by the “Beautiful Friend” sentiment die as well as the Layered Cherry Blossoms dies.

I created a color wash background using Shimmerz watercolors in blue, teal, and coral. I then cut out two of the Half Slimline Ovals from white cardstock and added the panels to either side of the watercolor background.

I die cut the cherry blossom flower pieces from more watercolor paper that was color washed with a soft coral and shimmery white. Next, I die-cut the branches and leaves from gold mirror cardstock. I love the shine that the gold adds to this card.
For my sentiment, I used the “Beautiful Friend” dies. I cut out the sentiment three times … twice from white cardstock and once from gold mirror cardstock. I glued the sentiments one on top of each other to create faux chipboard. I love the added dimension that layering the dies creates. It really makes the sentiment stand out.
I added the sentiment to the card and then created a floral scene with the cherry blossoms. To finish this card, I added teal gems to the centers of all the flowers.
The last project that I created is a 12”x12” scrapbook layout. I thought it would be fun to use the tulips to create a floral scene to showcase the photo of my two Yorkies, Bella and LilyBelle.
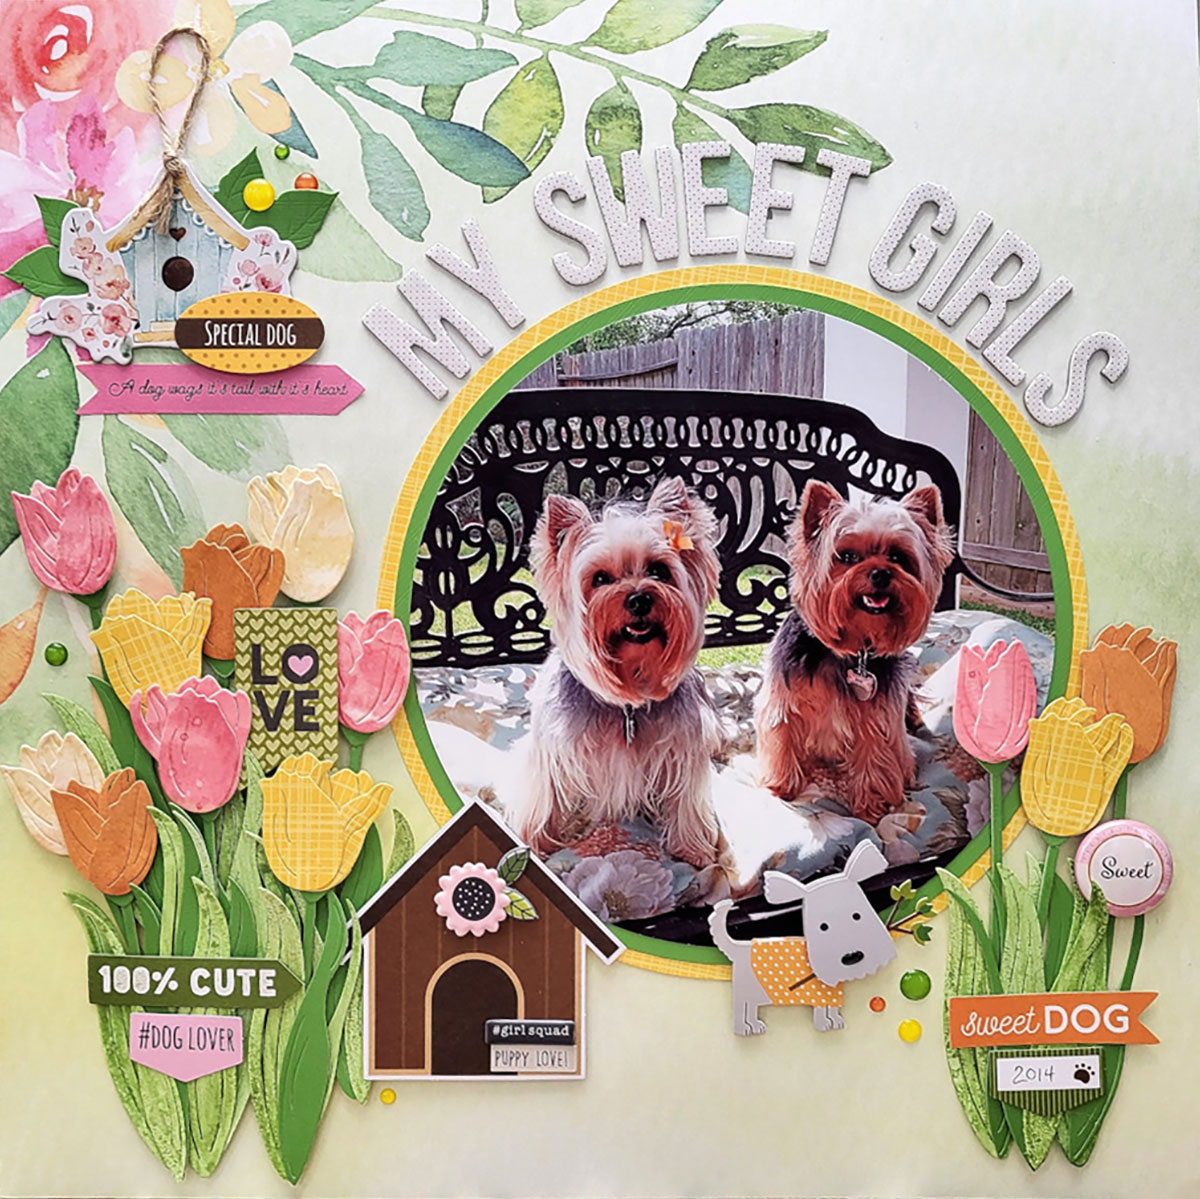
I wanted the photo to be a large element on the layout and I printed it on an 8 ½”x11” photo paper and then cropped it into a 6 ½” circle. I added two circle mats as layers under the photo in green and yellow which really draws your eyes towards the photo.
The tulips were so much fun to create. I used a combination of cardstock, patterned paper, and some watercolor paper that I created using a watercolor wash in pink and gold. By using the mixture of papers and adding the watercolor, it gives the tulips a nice variation in texture and colors that mimics nature. For the leaves and stems, I also wanted to have a lot of variation, so I used three different green cardstocks. I then added watercolor to the lighter green cardstocks with Shimmerz Bamboo Leaf spritz and Palm Reader vibez to create some fun texture and add even more color variation to the leaves.
My girls are super sweet and I decided to use the title “My Sweet Girls” which I added around the edge of a circle using a fun black and white polka dot chipboard alpha.
I wanted the tulips to be the star of my layout, but I did add a few additional embellishments including a chipboard birdhouse from the Stamperia “Circle of Life” collection and a doghouse and a little
Bella Pop” dog from the Bella Blvd “Cooper” collection. To add a bit of dimension and interest to the birdhouse, I created a few leaves from some green cardstock using the leaves from the Layered Lilies dies and tucked them behind the birdhouse. I also added a bit of twine to the top of the birdhouse to give the appearance that the birdhouse was hanging from the tree. How super cute is that birdhouse???
I also added a few finishing touches to my layout with a “Sweet” flair button from the Yes Please PaperCrafts Button Shop and some Gina Marie Designs enamel dots in yellow, orange, and green which all adds a bit of texture and shine to this colorful layout.
Spellbinders Supplies:

Other supplies
Canson Cold Press 140lb watercolor paper, Create and Craft hammered white cardstock, Shimmerz watercolors (Mustard Seed, Angel Wings, Miner Miner 49er, Evergreen, Can’t Elope Inklingz, Lover’s Lip, Peacock’s Plume, Blue Lagoon, Bamboo Leaf, Palm Reader), Stamperia Circle of Love 12×12 Paper Pad and Ephemera, Bella Blvd Cooper ephemera, Gina Marie Designs enamel dots, gems, tape runner, foam adhesive.
I hope that you enjoyed seeing the projects that I created featuring the new Becca Feeken Layered Fleur Bouquet Slimlines collection and I hope that I’ve inspired you to create something beautiful using this gorgeous collection. Thanks so much for stopping by! If you would like to see more of my cards and projects, please join me over at Yes Please Papercrafts blog, YouTube channel and Instagram.
4 Comments
Raquel
So stunning. Your puppies put the icing on the cake!! Beautiful work. Thank you for sharing.
Kathy
Is there a close-up view of the cherry blossom card?
Yana Smakula
Yes! We updated the post to include that image 🙂
Debbie T
Your scrapbook page is amazing. I love that you used different textures and colors to create this exquisite page for your 2 girls.