Just Wanted To Say Hi Cards with Marie Nicole Designs
Hello, crafty friends! Marie here from Marie Nicole Designs. I’m thrilled to be sharing some of my creations from the “Just Wanted To Say” Collection from Spellbinders. The die sets, sentiment stamps, and glimmer sentiments in this collection are so much fun to play with. I absolutely love this collection.
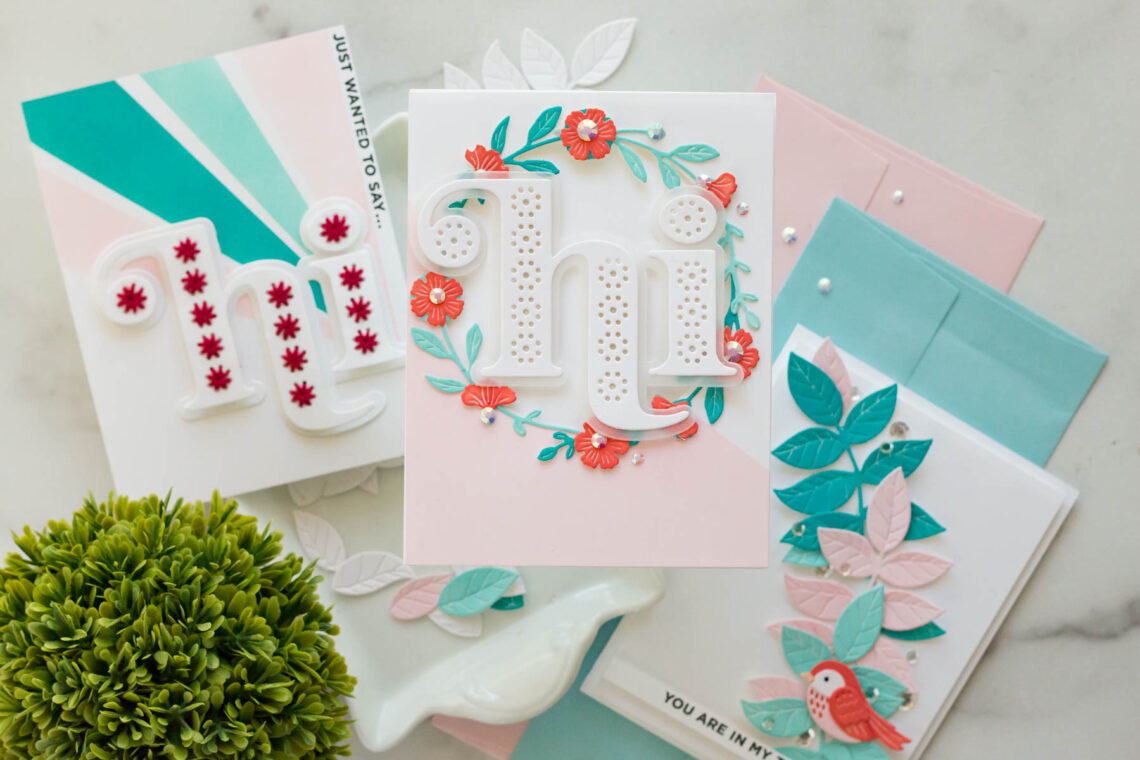
I created three cards using the same color palette. This is an easy way to create cards that look like a set when you are finished. You can box them up and give them as a gift, if you’d like!
STITCHED HI
For my first card, I wanted to try the Stitched Hi die right away! I’ve never tried the embroidered technique on cards before, and I was so excited to be able to do so on this one. I grabbed some dark red thread, and took my time to add stitching to all the holes that the die cuts out for you. It was relaxing to be able to sit back, listen to some music, and just stitch! I’m sure there are many color combinations of thread that would be possible with this die.

After the stitching was finished, I adhered the top layer to the shadow layer with some foam adhesive. Then, I set aside the “hi” to work on the background. I kept the background simple by just masking off some stripes and ink blending with a few shades of blue-green and a light pink. I ended up using the color palette of pink, red, light mint, and a dark mint.

For the sentiment on this card, I actually trimmed off the side of the card front and stamped the sentiment along the side of the inside of the card. I like that when you open the card, the sentiment will still be visible!
LEAFY SPRIG AND SWEET BIRDIE
My second card is created with the Leafy Sprig and Sweet Birdie die sets. I kept this card pretty simple, as well. I cut and ink blended the sprigs, using my color palette. I arranged them on the front of the card from one corner to the other. I also used a few of the leaves from the set to add some fullness to the sprigs.

My little birdie is die-cut and colored with ink blending, as well. I assembled her and adhered her right over the sprigs. I finished this card with a few clear sequins and then the simple sentiment was adhered on foam adhesive along the bottom.

WREATH BUILDER
My third card again follows the same color palette. I took a card front and die cut a circle out of it. I also added some color to the bottom of the card front by masking off half of it at an angle, and ink blending the light pink onto it.

I then added the Wreath Builder pieces around the circle using liquid glue. For some more sparkle, I also added some shiny gems. I added the card front to a card base using foam adhesive. That propped up the circle window a bit to add some dimension behind it.

I then added the Stitched Hi over the window with some more foam adhesive. The shadow layer on the Stitched Hi is cut from vellum, so it’s a little bit of a softer look.
I hope you enjoyed some inspiration featuring the Just To Say collection from Spellbinders!
Until next time,
Marie Nicole
Spellbinders Supplies:

Other Supplies
White cardstock, foam adhesive, ink and ink blending tools, scissors, gems, black ink, stamp blocks, thread and needle, vellum, washi tape for masking

A Sweet Christmas Inspiration | Merry Christmas Card with Virginia

Tiered Tray Three Ways with Jyoti Adhikari