Delicate & Feminine Handmade Cards with Hussena Calcuttawala
Hello, crafty friends! This is Hussena from Quill and Punch Works and I’m excited and honored to be guest designing on the Spellbinders blog today to share a couple of projects using the new The Right Words Collection by Amazing Paper Grace. The fabulous sentiments, sweet embellishments to accent, and unique motifs in this collection inspired me to create three cards perfect for a variety of occasions.
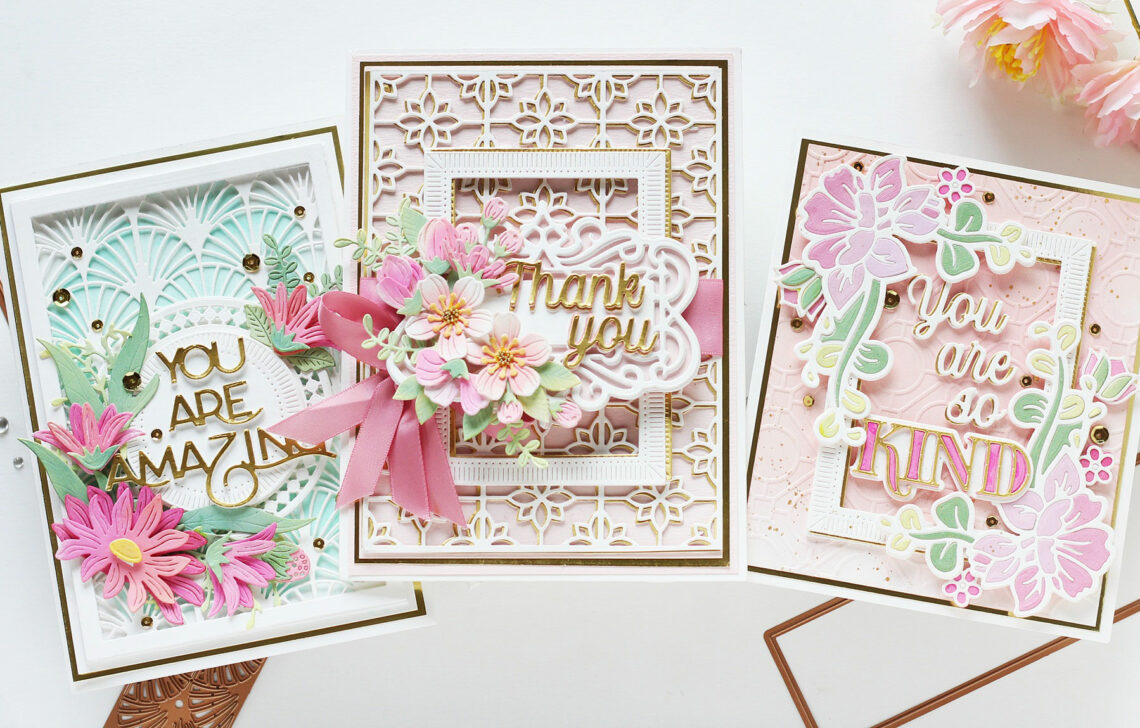
Thank You for Your Kindness
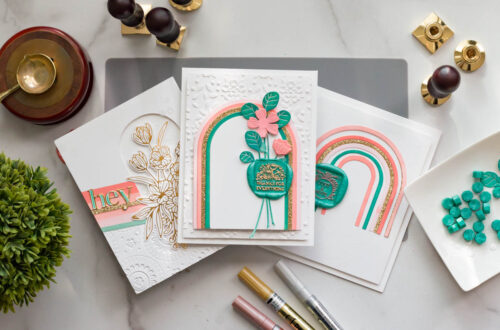
The Thank You for Your Kindness Etched Dies makes it so easy to create eye-catching cards fast. Here I’ve used the Layered Cherry Blossoms Etched Dies along with a simple greeting for this ornate thank-you card.
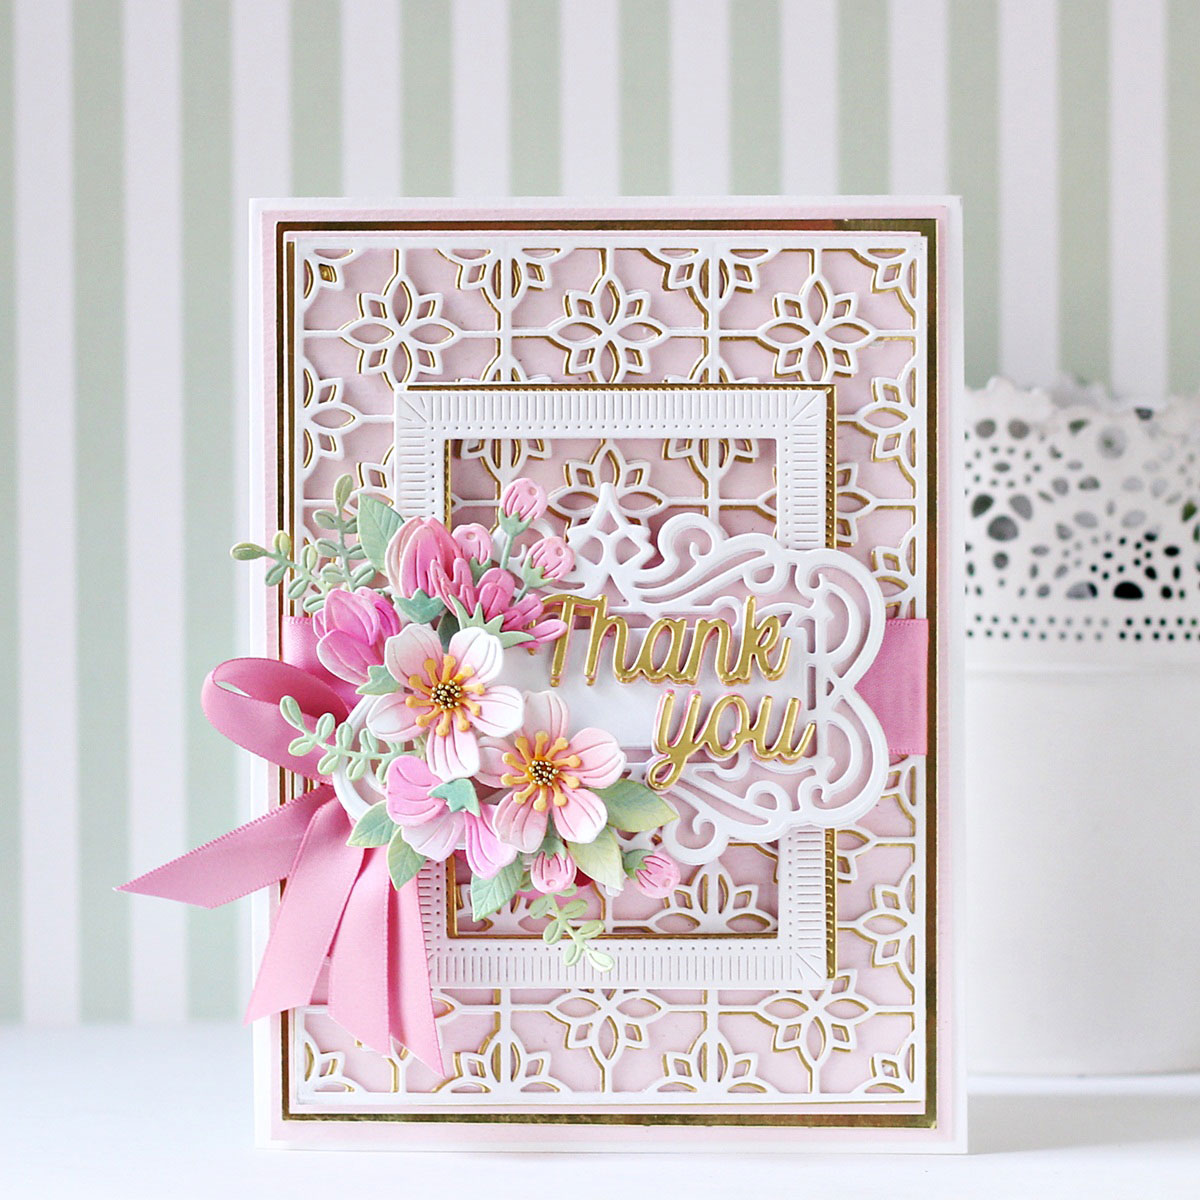
To begin, I die-cut Snowdrift Cardstock, Mirror Gold Cardstock, and White Foam twice using the Panel Outline and Insert Dies from the Thank You for Your Kindness Etched Die Set, and adhered the layers together with liquid glue, allowing the gold layer to peek out from behind like a shadow. Next, I die-cut Snowdrift Cardstock, Mirror Gold Cardstock using the Medium Rectangle Rim and Insert dies from the Fluted Classics Rectangles Etched Dies. I adhered the layers together with liquid glue, then added the gold layer to the back so that it peeks out a bit as a shadow.
Then, to create the centerpiece for my card, I die-cut Pink Sand Cardstock, Snowdrift Cardstock, and White Foam using the Outer Frame and Frame Pattern dies from the All Occasion Sentiments Stamp and Die Set, and adhered the layers together with liquid glue. I adore the exquisite design of this frame and have been intending to use it on one of my projects for quite some time. It looks intricate and majestic, and it was the perfect setting for my sentiment piece. Once that was done, I die-cut Brush Gold Cardstock, Wild Berry Cardstock, and Pink Sand Cardstock thrice using the ‘Thank You’ dies from the Thank You for Your Kindness Etched Die Set and adhered the layers together with liquid glue, allowing the pink layers to peek out from behind like a shadow.
Next, to embellish my card, I die-cut Snowdrift Cardstock several times using all of the components of the Layered Cherry Blossoms Etched Dies. Then, I used a bit of Cotton Candy, Coral Berry, and Rubellite watercolor half-pans to color the flowers, Bundled Sage and Twisted Citron for the leaves and foliage, and Warm Sunshine for the flower centers to add shading, and assembled the pieces with liquid glue. I added a few green micro glitter balls to the flower centers to make them look more natural.
To finish the card, I took some wonderful pink satin ribbon from my stash and wound it around the card panel to make a nice, fluffy double-layered bow. I mat the card panel with layers of Mirror Gold Cardstock and Pink Sand Cardstock before adhering it to a side-folding white card base measuring 5” x 7” with tape runner to complete.
You’re Amazing
I love how versatile the You’re Amazing Etched Dies is. Here I’ve used the beautiful art-deco style border with the Layered Daisies Etched Dies for a clean and simple greeting card.
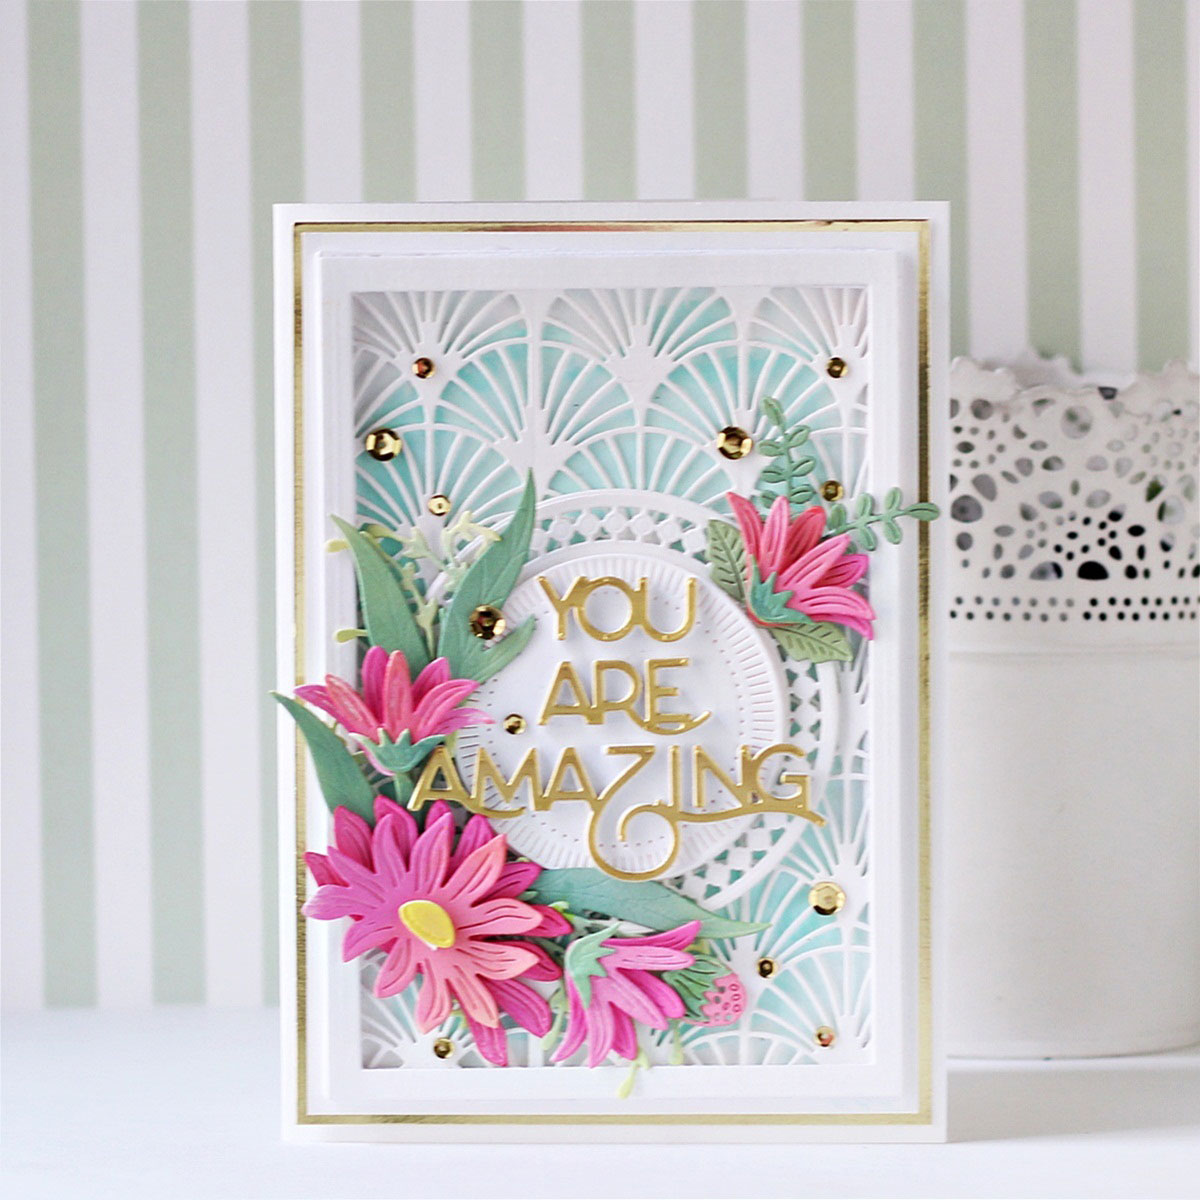
To start off, I die-cut Snowdrift Cardstock twice using the Panel Outline and Insert Dies from the You’re Amazing Etched Die Set. Next, I trimmed a panel of Neenah Classic Crest Solar White Cardstock, then blended Mountain Mist and Lagoon watercolor half-pans on the top of the panel, tapering off as it made its way down the panel with an Aqua Brush. Once that was dry, I adhered down the panel with liquid glue.
Next, I die-cut Snowdrift Cardstock and White Foam using the Circle 3 die from the Candlewick Circles Etched Dies, and layered the pieces together using liquid adhesive. Then, I die-cut Snowdrift Cardstock and White Foam using the Small Circle Outer Rim and Insert dies from the Fluted Classics Circles Etched Die Set. Then, for my greeting, I die-cut Brush Gold Cardstock and White Foam using the ‘You are Amazing’ dies from the You’re Amazing Etched Die Set and adhered the layers together with liquid glue.
Once that was done, I die-cut Snowdrift Cardstock several times using all of the components of the Layered Daisies Die Set. Then, I added a bit of Picked Raspberry, Worn Lipstick, Kitsch Flamingo, and Abandoned Coral Distress Oxide Inks to the petals, Peeled Paint, and Shabby Shutters to the and leaves, and Mustard Seed ink to the flower center with a sponge dauber to give them lots of color and a bit of shading and assembled the pieces with liquid glue.
Then, to complete, I die-cut Snowdrift Cardstock and White Foam using the Rectangle 1 and 2 Dies from the A2 Matting Basics A Card Creator Etched Dies to create an outline frame for my card front and adhered the layers together with the liquid adhesive. I mat the card panel with layers of Snowdrift Cardstock and Mirror Gold Cardstock before adhering it to a side-folding white card base with tape runner to complete. I added a few Antique Gold-Sequins to help add some sparkle to the card front.
You are a Blessing
I thought the You are a Blessing Etched Dies was so gorgeous, I had to use this set next. I piled up the layers and added some bright pops of color for this easy and simple card perfect for giving to friends or family members.
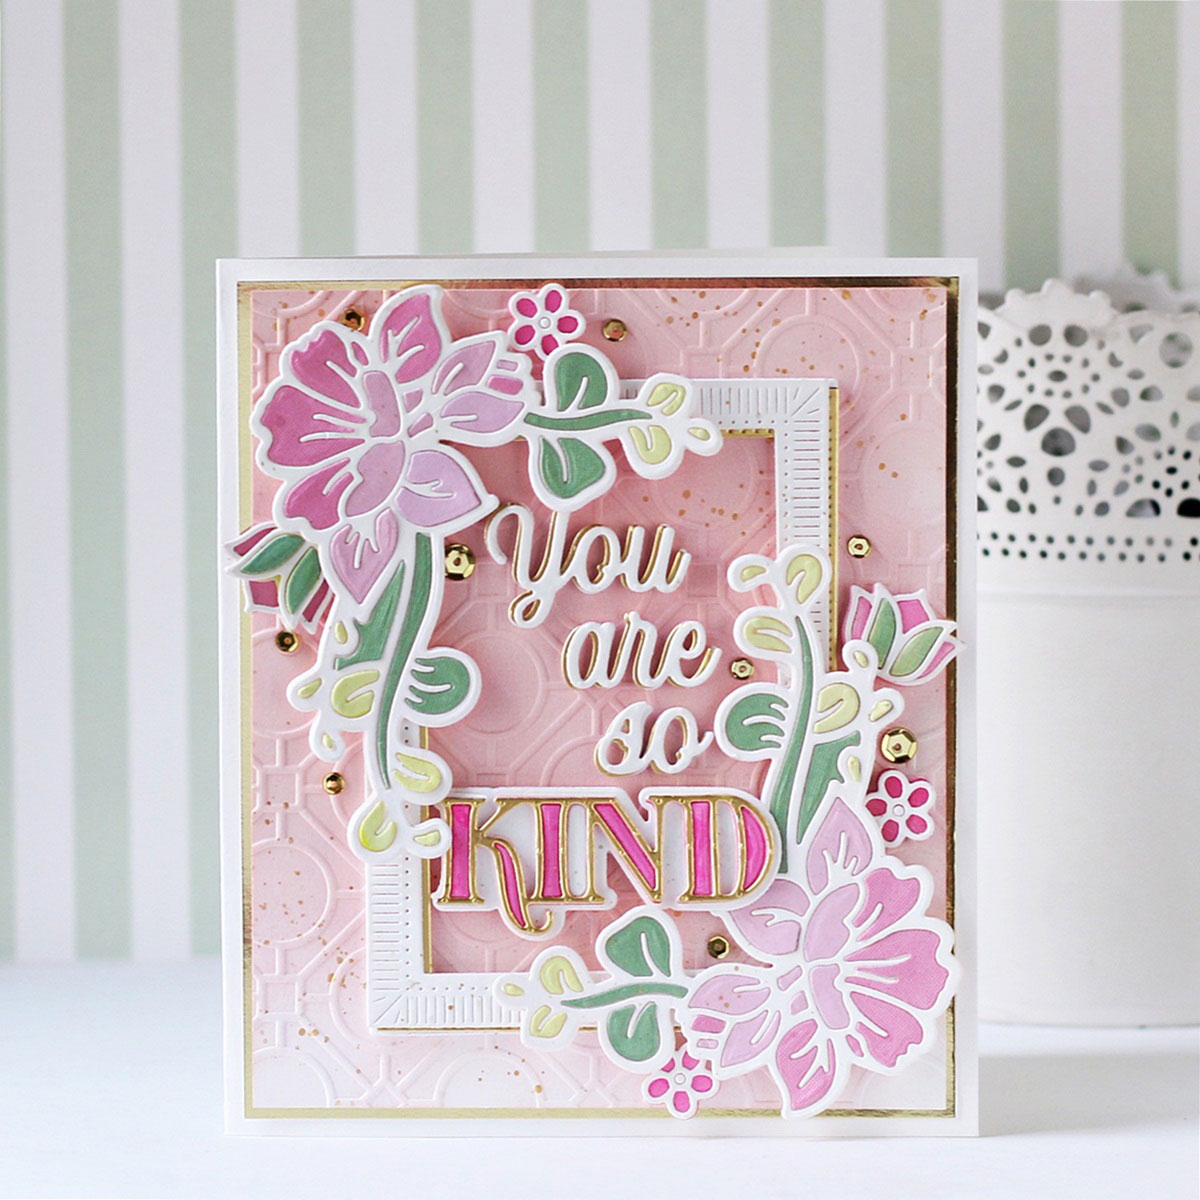
To create my card, I die-cut Snowdrift, Pink Sand, Dahlia, Wild Berry, and Fern Cardstock using the floral swag rim and insert dies from the You are a Blessing Etched Dies. Die-cut scrap cardstock using the oval and floral swag rim dies. Next, I die-cut White Cardstock using the floral swag rim dies and adhered the outline die-cuts to their scrap cardstock backer die-cuts with liquid glue. I pieced the colored cardstock insert pieces into the white outlines until I had reassembled the shapes. Once that was done, I blended Twisted Citron ink over the reassembled die-cuts with a blending brush to color the white cardstock.
Next, I trimmed a piece of Snowdrift Cardstock to 5.25” x 5.25” and embossed it using the Geo Screen Embossing Folder. Next, I used my blending tool to blend Worn Lipstick Distress ink in a pretty ombré down the front of the card. Once that was done, I spritzed the card front with Enchanted Gold Paint from the Metallic Watercolor Set to create an artsy look. I adhered the embossed panel to a layer of Mirror Gold Cardstock before adhering it to a top-folding white card base measuring 5.5” square with a tape runner.
Next, I die-cut Snowdrift Cardstock, Brush Gold Cardstock, and White Foam using the Medium Rectangle Outer Rim & Insert dies from the Fluted Classics Rectangles Etched Dies, and layered the pieces together using liquid adhesive, then added the gold layer to the back so that it peeks out a bit as a shadow.
Then, to create my sentiment, I die-cut Snowdrift Cardstock, Brush Gold Cardstock, and White Foam using the You are a Blessing Etched Dies and the Thank You for Your Kindness Die Sets. I mixed and matched the different phrases to create my own custom sentiment. I layered the pieces together using liquid adhesive, then added the gold layer to the back so that it peeks out a bit as a shadow. I also popped the word ‘Kind’ up on top of the coordinating shadow layer cut out of Snowdrift Cardstock. I then blended Picked Raspberry Distress ink over the white inlay die-cut pieces using a blending brush to give the sentiment a pop of color. Then, to finish, I added a few Antique Gold-Sequins to help add some sparkle to the card front.
Spellbinders Supplies:

Other Supplies
Neenah Solar White Cardstock, Picked Raspberry, Worn Lipstick, Abandoned Coral, Twisted Citron, Peeled Paint, Shabby Shutters, Mustard Seed Distress Oxide inks, Sponge Daubers, Blending Brushes, Watercolor 36 Pan Set, Antique Metallic Watercolor Set, Pink Satin Ribbons, Tape Runner.
I hope you enjoyed this trio of cards and thanks so much for stopping by today. You can shop The Right Words Collection now and add these gorgeous dies to your stash for loads of cardmaking projects.
Hussena Calcuttawala
'Hello! My name is Hussena, and I live in Kolkata, India. I am a stay at home mum of two kids and have been crafting for over five years now. I started my creative journey with paper quilling and since then have dabbled in various paper crafting forms like punch craft, die cutting, and more recently stamping. I am an ardent floral fan and you will find me using florals on almost all my creations. I love working with dies, especially floral and intricate ones, as they offer me various possibilities. I also love to create my own handmade flowers, and this is one of the reasons why I am drawn to Spellbinders dies. You can find my work on my blog: Quill and Punch Works
One Comment
Pat S
These are all absolutely beautiful. Picked up some good ideas to use on my much simpler cards.