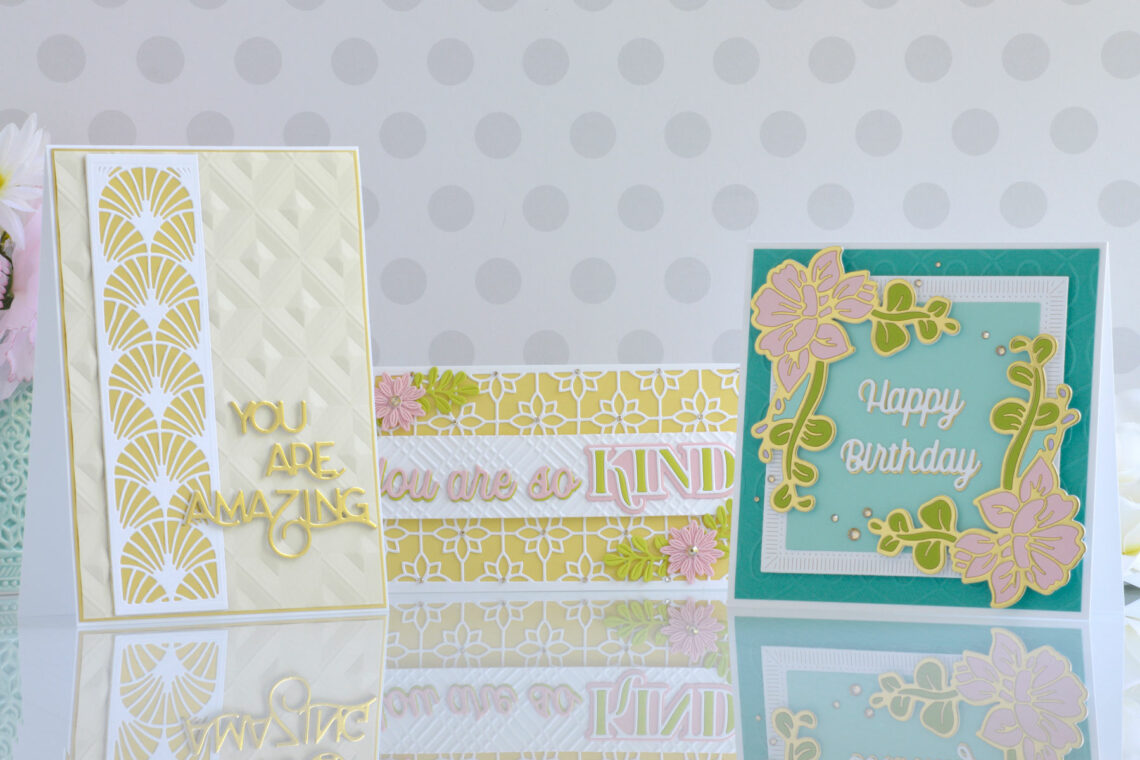
The Right Words Collection by Becca Feeken – Card Inspiration with Annie Williams
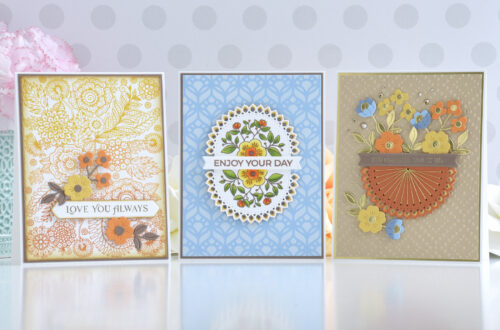
Hi there, this is Annie Williams and I’m excited to be back on the blog today to share a couple of projects using The Right Words Collection by Becca Feeken. The beautiful sentiments and gorgeous accent designs in this collection inspired me to create three pretty cards with all the right words for a variety of occasions.
Happy Birthday Card
The beautiful floral corner in the You’re A Blessing Die Set forms the perfect frame for any of the sentiments in the collection. Here I added lots of color and texture to a simple greeting for this fun square birthday card.
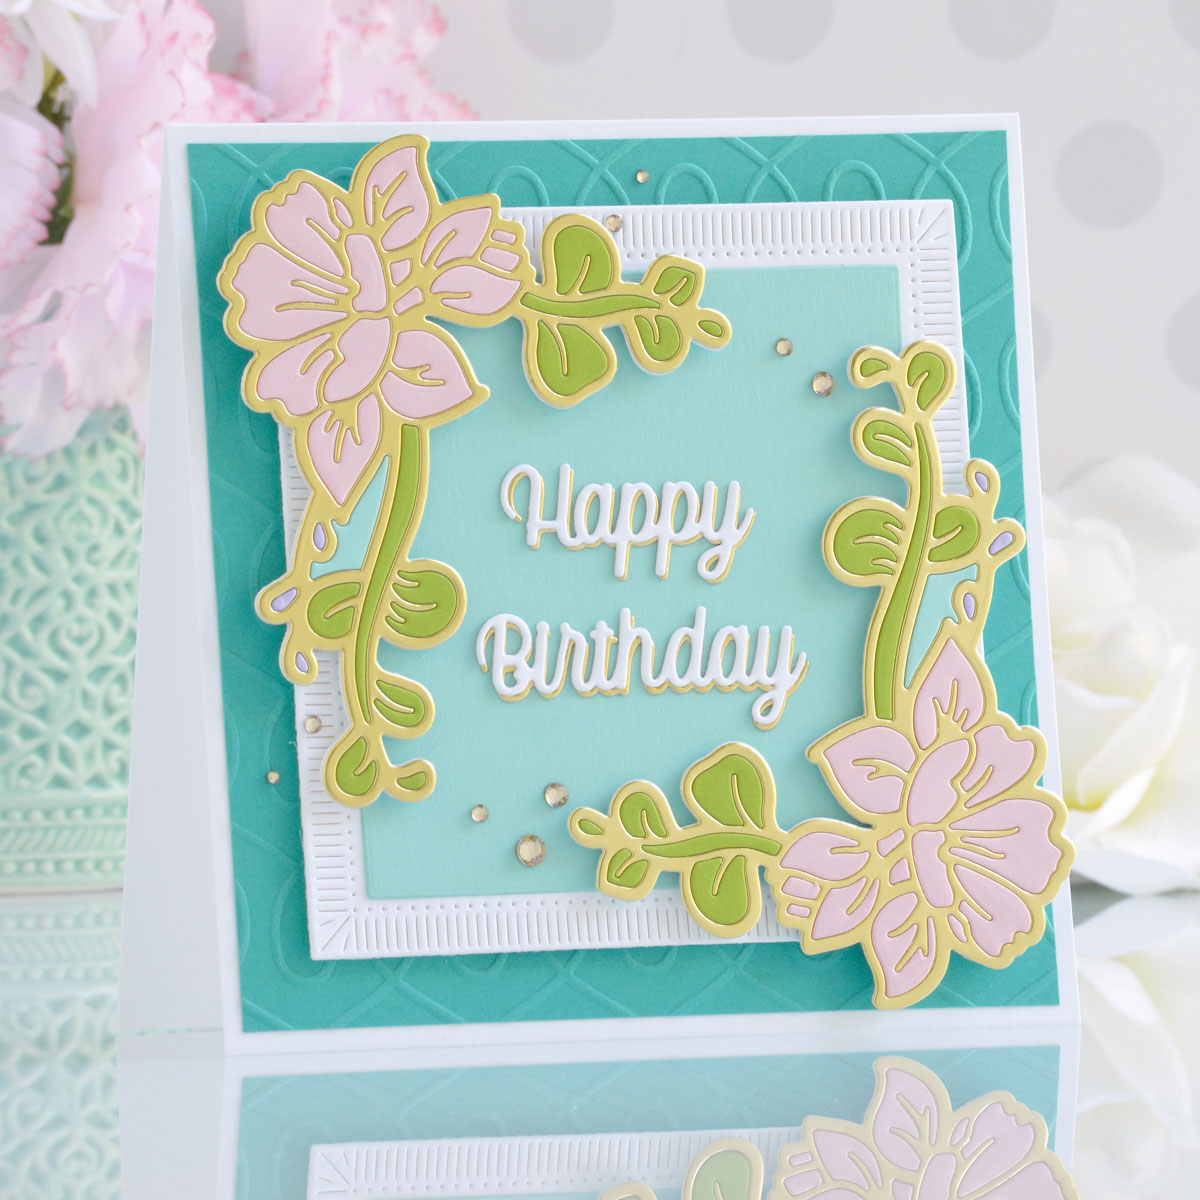
- Die-cut Mirror Gold, Pink Sand, Rainforest, Purple Mist, and Waterfall Cardstock using the Floral Corner Outline and Insert from the You’re A Blessing Die Set.
- Die-cut scrap cardstock using the outline die and then assemble the floral design on top, piecing the colored die-cuts back into the gold outline with liquid glue. Repeat to create two fully-assembled floral corners.
- Die-cut white and Mirror Gold Cardstock with one of the sentiments from the Happy Occasion Words Die Set. Adhere the layers together with liquid glue, allowing the gold layer to peek out from behind like a shadow.
- Trim a piece of Teal Topaz Cardstock to 5.25” square and emboss it using the Loops Embossing Folder. Adhere it to a top-folding 5.5” square white card base with tape runner.
- Die-cut white cardstock using the largest outer rim and insert dies from the Fluted Classics Squares Die Set.
- Die-cut Waterfall Cardstock using the Large Inner Rim die from the set and adhere on top of the white die-cut with tape runner, then pop it up on top of the card front with foam adhesive.
- Add the floral corner designs to the card front with foam adhesive and then adhere the sentiment in the center of the frame with liquid adhesive.
- Embellish with Gold Mix Gems.
You Are So Kind Card
Next, I wanted to create a bright and pretty mini slimline card to thank a friend for their kindness.
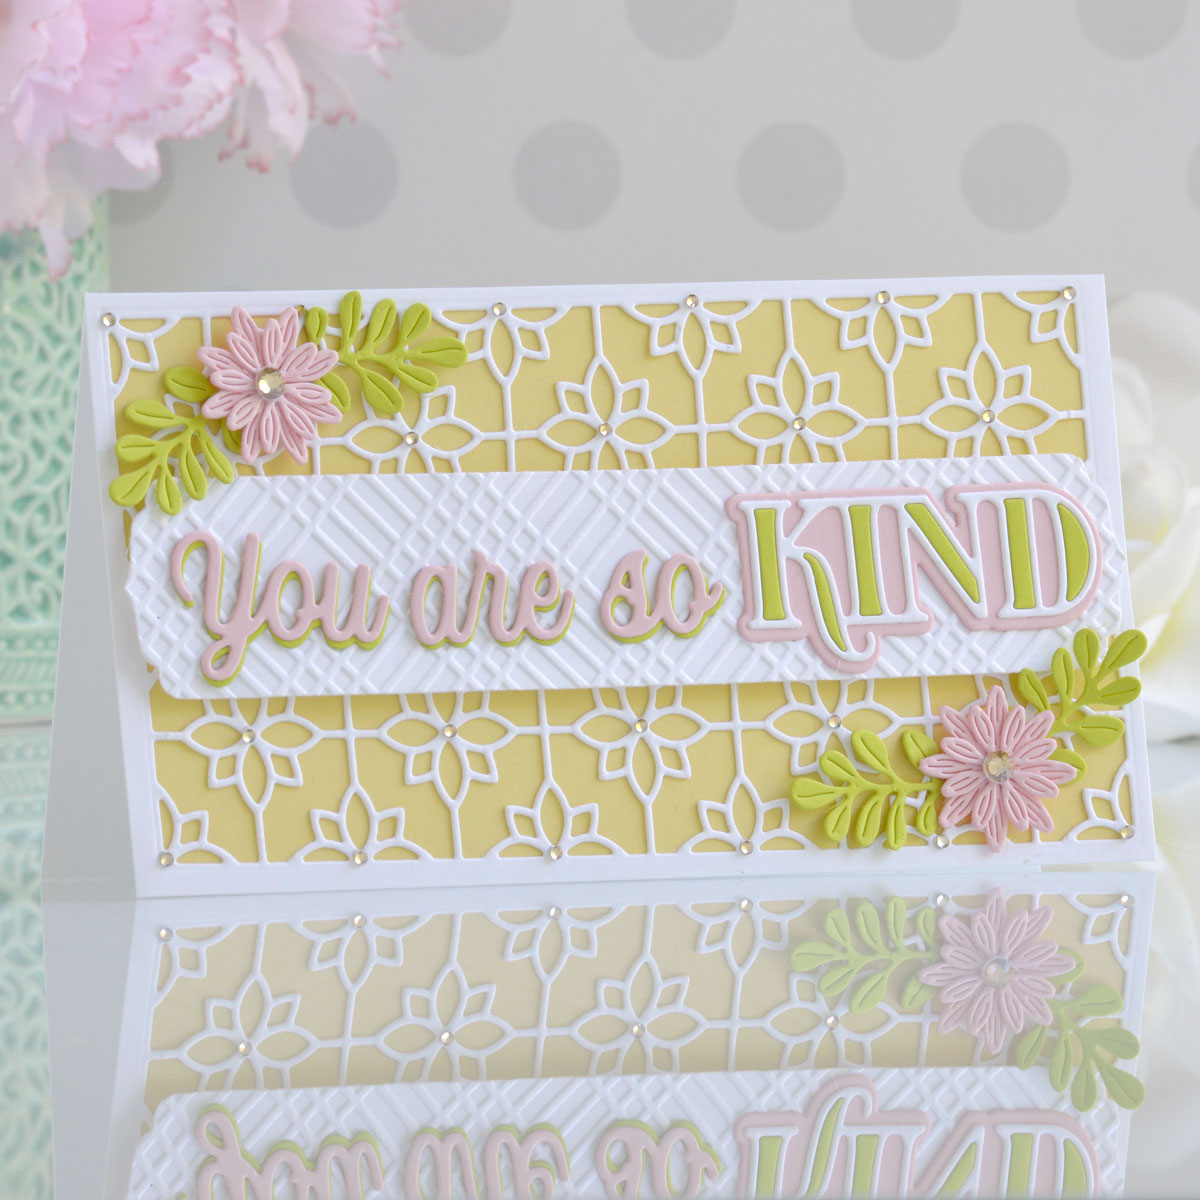
- Trim a piece of white cardstock to 3.5” x 6.5” and die cut the top and bottom of the panel using the panel insert die from the Thank You For Your Kindness Die Set.
- Trim a piece of Chamomile Cardstock to the same size and adhere behind the white die-cut with liquid glue, then add it to the front of a top-folding white card base with a tape runner.
- Die-cut white cardstock using the tag die from the Merry Everything Words Die Set, emboss it using the Diamond Plaid Embossing Folder and adhere it across the middle of the card front with foam adhesive.
- Die-cut white, Pink Sand, and Peridot Cardstock using the sentiment dies from the Thank You For Your Kindness Die Set and adhere together with liquid glue.
- Die-cut Pink Sand and Peridot Cardstock using the Mini Blooms & Sprigs Die Set.
- Add the sentiment to the tag on the card front with liquid glue.
- Adhere the flowers and leaves to the corner of the card with foam adhesive and liquid glue.
- Embellish with Gold Mix Gems.
You Are Amazing Card
Lastly, I wanted to create a simple and elegant card for a friend using the gorgeous elements from the You’re Amazing Die Set.
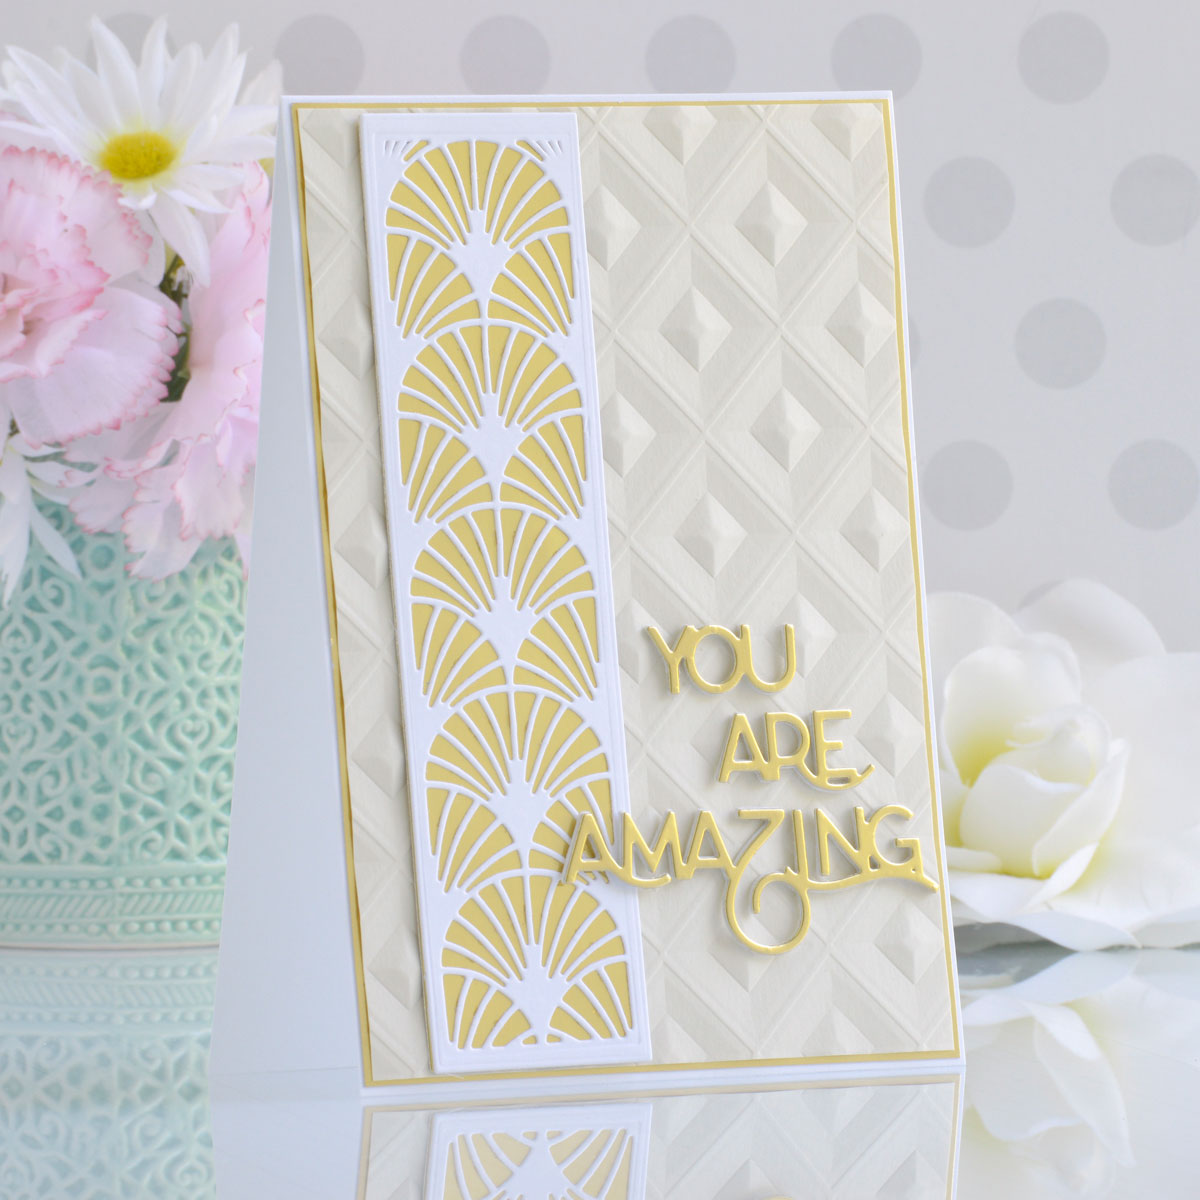
- Trim a piece of Alabaster Cardstock to 4.75” x 6.75” and emboss it using the Beveled Diamonds 3D Embossing Folder.
- Mat the embossed panel with Mirror Gold Cardstock and adhere it to a top-folding A7-sized white card base with a tape runner.
- Die-cut white cardstock using the panel outline and insert dies from the You’re Amazing Die Set.
- Die-cut Mirror Gold Cardstock using the panel outline die and adhere it behind the white die-cut with liquid glue.
- Add the panel to the left side of the card front with a tape runner.
- Die-cut Mirror Gold Cardstock once and white cardstock twice using the sentiment dies from the You’re Amazing Die Set.
- Adhere the layers together and add the sentiment to the card front with liquid glue.
Spellbinders Supplies:

Other supplies
White heavyweight cardstock, tape runner, foam adhesive.
I hope you enjoyed these pretty cards and thanks so much for stopping by today. You can find more inspiration over at my blog AnnieBWills.com.
One Comment
Cindy
Beautiful cards. Simple designs but so elegant.