Celebrate the Season Inspiration with Michelle Short
Hello there, Michelle Short here to share some inspiration using the new Celebrate the Season Collection. This is a wonderful collection of dies, stamps, hot foil plates, and embossing folders perfect for the holiday season.
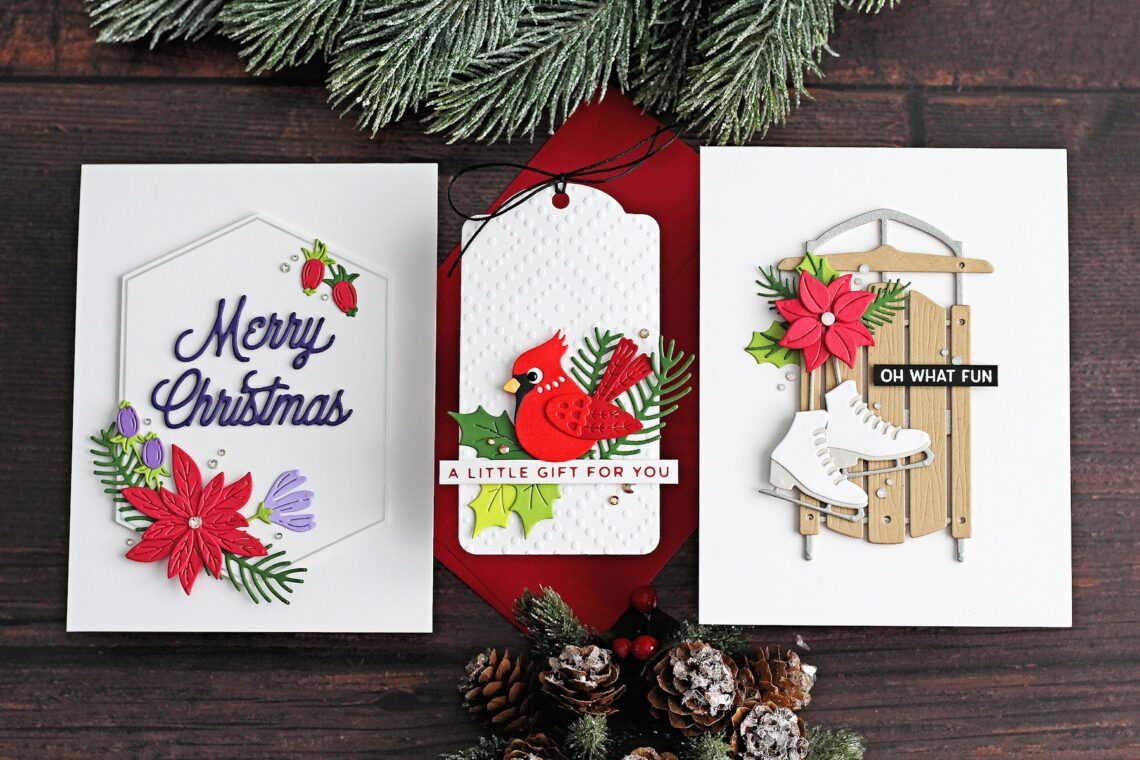
WINTER SLED CARD
For my first card, I started off by die-cutting the elements from Winter Welcome Sled. This set is so fun to put together! The sled can be used on its own but paired with the ice skates it makes for a fun winter card. I adhered the pieces of the sled and ice skates, first and adhered them together using Bearly Art Glue.

The sled adhered to an A2 white card base with Bearly Art Glue and the skates adhered on top with thin foam tape. I then die-cut the floral and foliage pieces from the set to add as an accent at the top left of the sled. The foliage was adhered first with Bearly Art Glue, popping a few branches behind the sled.

The poinsettia then adhered on top with more thin foam tape. I took the sentiment from the Many Merry Christmas Sentiments Clear Stamp & Die Set and stamped it onto Onyx Cardstock with Clear Embossing & Watermark Ink. I applied White Embossing Powder and heat set. It was cut into a strip and added to the card with foam tape. To finish off, I added Crystal Mix Color Essentials Gems.
TWEET CARDINAL GIFT FOR YOU TAG
I thought it would be fun to create a gift tag for my next project using the adorable Tweet Cardinal, which was die cut and adhered together with Bearly Art Glue. I then added a black pearl gem for his eye. I also die-cut foliage using the Holiday Blooms Etched Dies.

I die-cut a tag from Snowdrift Cardstock and then embossed it using the Dazzling Dots Embossing Folder. The foliage was adhered on top using Bearly Art Glue. I foiled a sentiment from Glitter Wishes Glimmer Hot Foil Plate & Die Set using Red Foil.

It was cut into a strip and added to the tag with foam tape. The cardinal has then adhered on top with more foam tape. To finish off, I added black twine through the top of the tag and tied it in a bow. I also added a few Gold Mix Color Essentials Gems to embellish.
CHRISTMAS BLOOMS
My last project today uses the Holiday Blooms Etched Dies again, but this time with more of the flowers. I did not want traditional red and green for my flowers, so I used pink and purple tones and I think it worked quite well!

I foiled the frame from Geo Foliage onto white cardstock with Matte Silver Foil. It was adhered to an A2 white card base using foam tape. I then adhered the foliage and flowers on top with a combination of Bearly Art Glue and thin foam tape.

I die cut the sentiment from Mix & Match Holiday Greetings three times each using Royal Amethyst Cardstock. They were adhered one on top of another and then adhered to the card. To finish off, I added Silver Mix Color Essentials Gems.
Spellbinders Supplies:

Other Supplies
Kraft cardstock, Thin foam tape, Black pearl gem, double-sided adhesive sheet.
I hope you have enjoyed seeing my projects today and I have inspired you with some ideas using the Celebrate the Season Collection. Thank you so much for stopping by, have a great day!
2 Comments
Dee Wilkes
These are beautiful Michelle. You always make such amazing cards and tags. I have all of dies apart from the Cardinal (bought the other two birdies and might try to crest a little robin). Thank you for the amazing inspiration. The sledge and ice skates is my favourite 🤩
Nancy Carroll
Wow, I LOVE the inspiration, the sled card is especially cute!