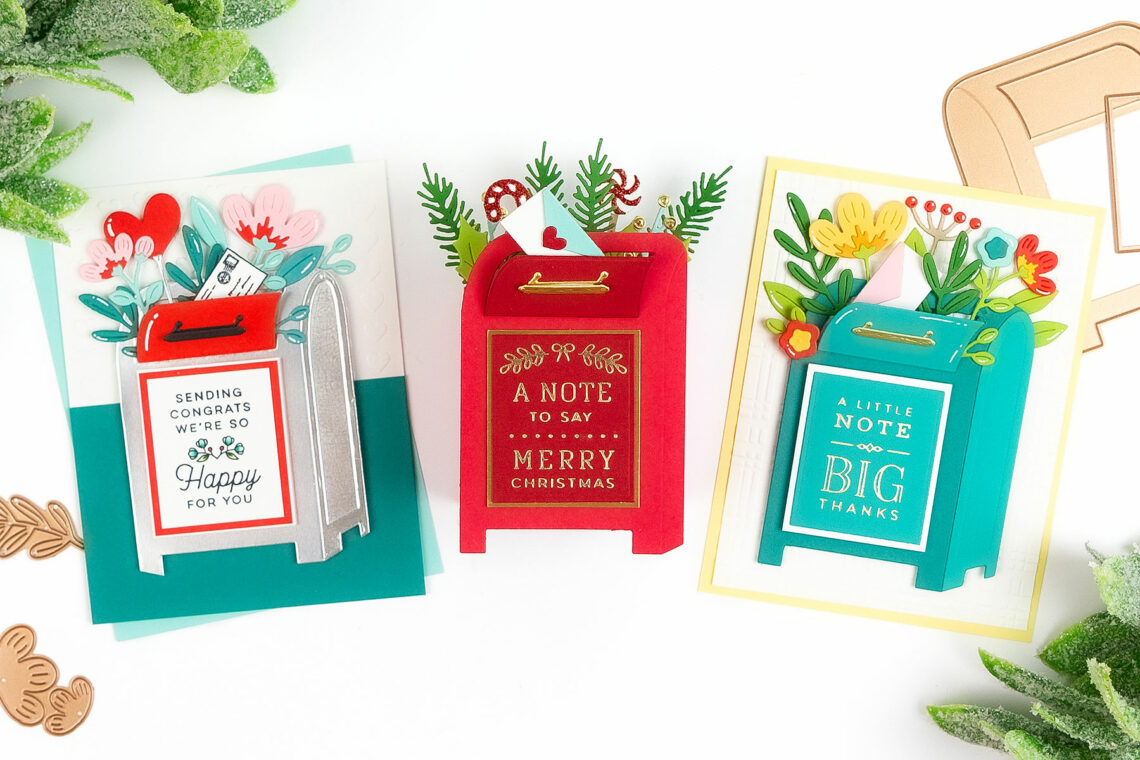
Dimensional Mailbox Card & More Parcel & Post Inspiration with Rachel Alvarado
Hello crafty friends! This is Rachel Alvarado from rachelalvaradodesigns.com and @theunpamperedstamper. I am thrilled to be guest designing on the Spellbinders Blog today and am so excited to share three fun projects with you featuring products from the new Parcel & Post Collection.
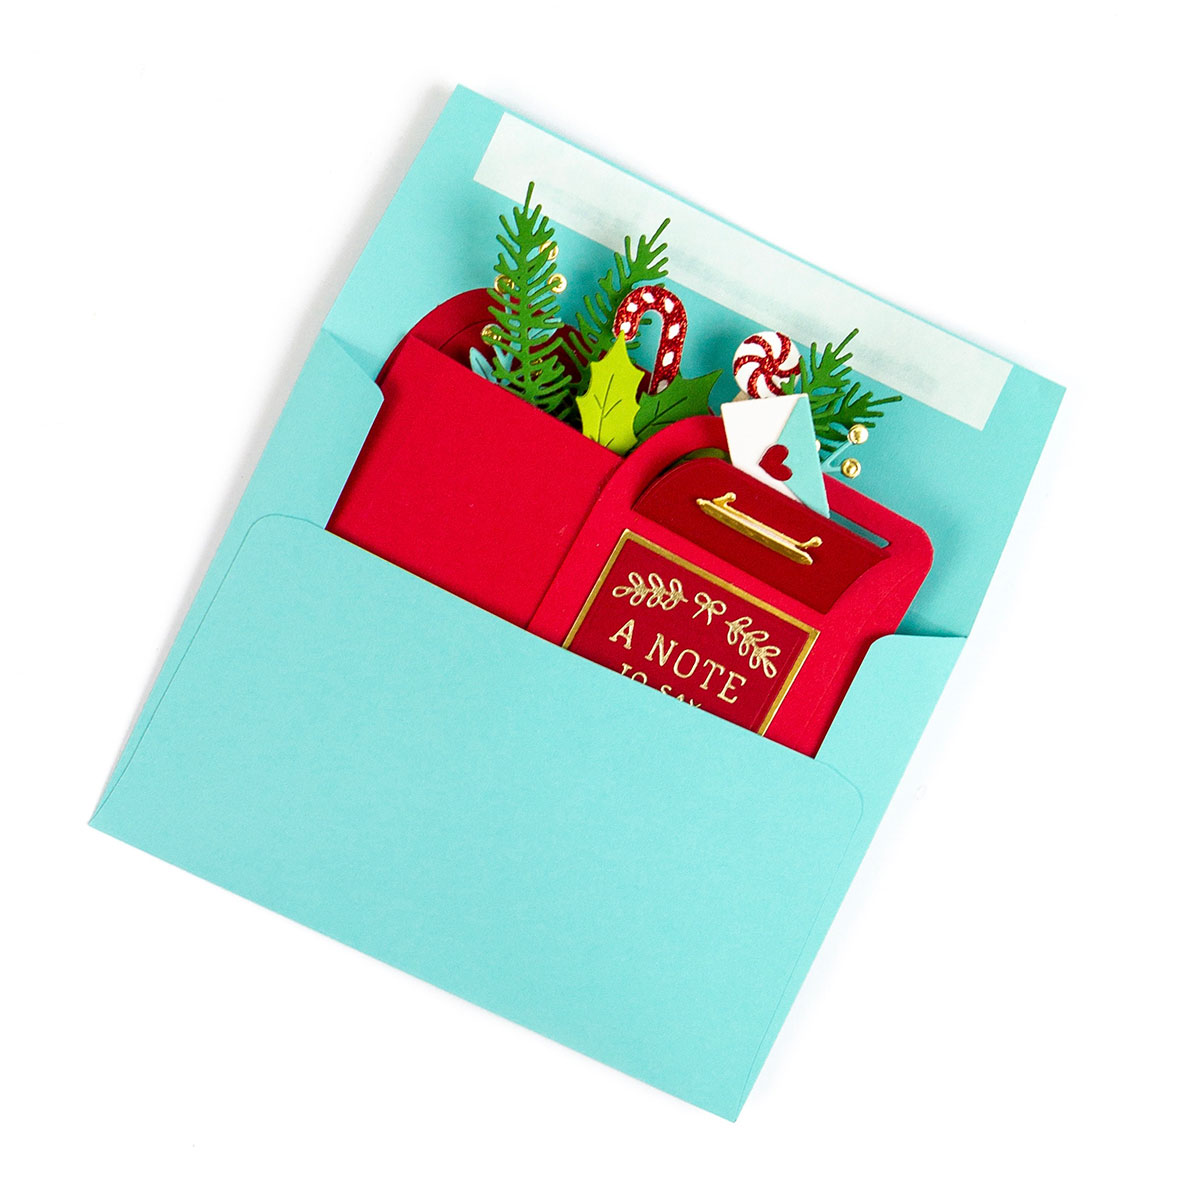
Fun 3D Mail Box Pop-up Card
For my first card, I created a 3D mailbox using the Parcel & Post Mailbox Die Set combined with both the Parcel & Post Christmas Decorations Die Set and Christmas Mailbox Greetings Hot Foil Set.

I love creating 3D cards and this mailbox is perfect for making fun pop-up cards to send to your recipients. Depending on how high you place your decorations inside the mailbox, this card can fold perfectly to fit into a standard A2-sized envelope or a larger one if necessary.
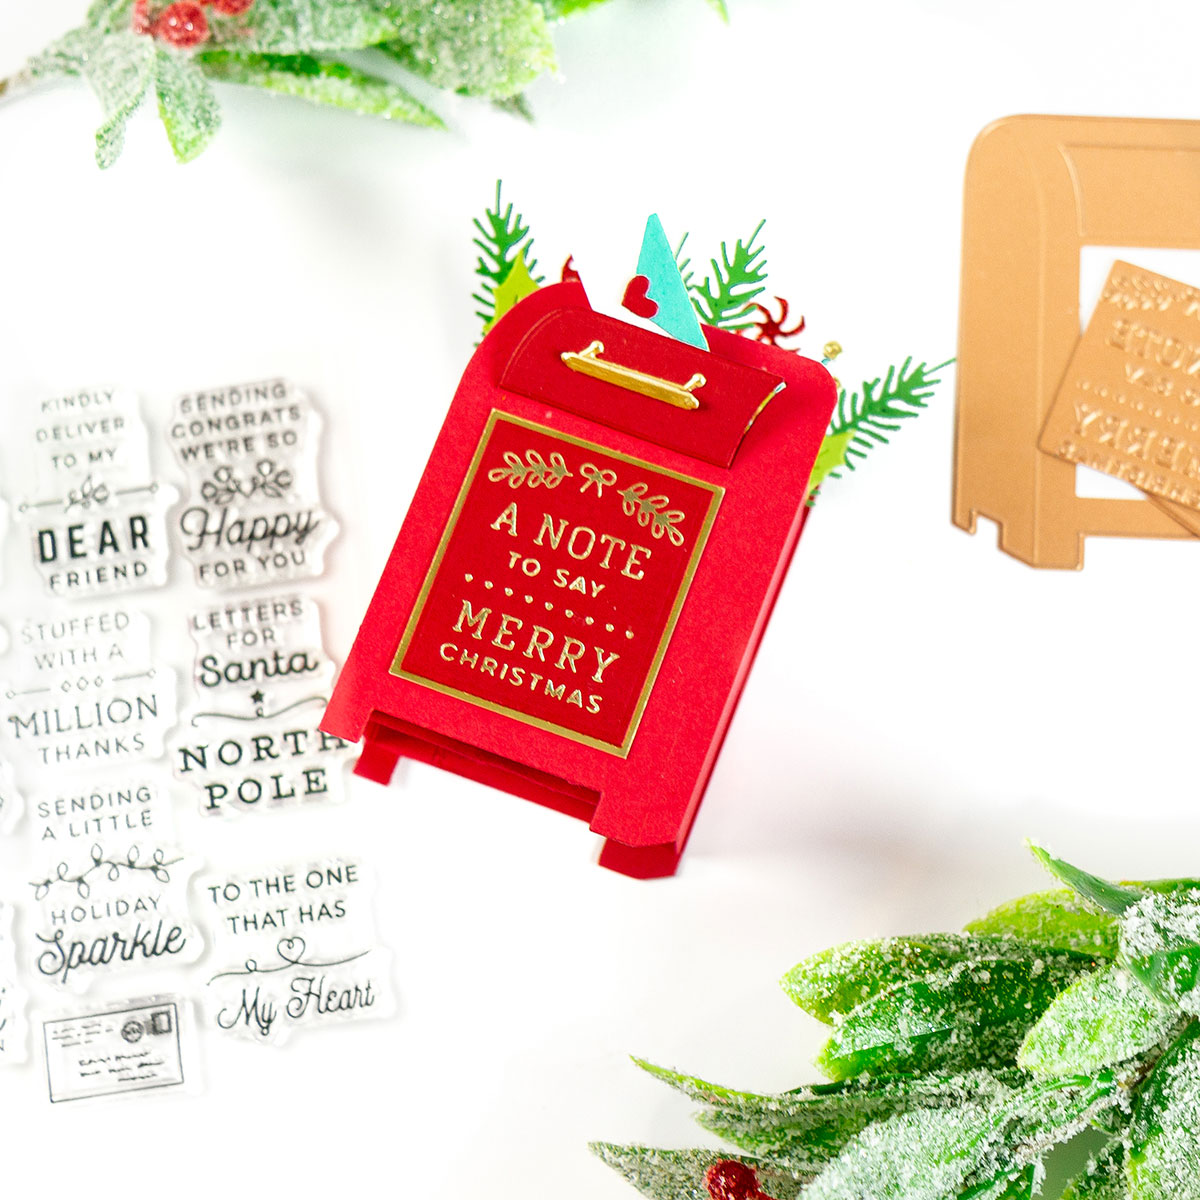
This design is actually pretty simple to make. To start, I first die-cut two mailboxes from some Phone Booth Card Stock. I trimmed off about 1/8” from each edge on the right side of my die cut (to get rid of the rear foot of the mailbox) and then used a rounded corner punch to round the top right corner of my mailbox again.

Next, I created the sides of my mailbox by cutting two pieces of the same colored card stock to 3” x 2 ¾” and then used a scoring board to score each piece at ½’ and 2 ½” on the 3” side of the card stock. I folded (in the same direction) one of the card stock pieces along each score line to create two tabs and added some liquid adhesive to each tab. I then attached the back mailbox piece to one tab and the front mailbox piece to the other one. Next, I repeated the process on the other side. I then added four strips of red card stock inside my mailbox so that I could attach my decorations. I cut each strip to 3 ¼” x 2” and scored each piece at 3/8” from each end of the card stock along the 3 ¼” side. I used more liquid adhesive to adhere these pieces on the inside of the box. Lastly, I die-cut festive Christmas decorations from the Parcel & Post Christmas Decorations Die Set and glued them to the inside shelves of the box.
To add my sentiment, I used the Spellbinders Glimmer Hot Foil System and Platinum 6 Die Cutting and Embossing Machines along with the Christmas Mailbox Greetings Hot Foil Set.
Floral Mailbox Card
For my next card, I used the Parcel & Post Mailbox Die Set and combined it with the All-Occasion Mailbox Greetings Hot Foil Set and Plaid Company Embossing Folder. To start, I first trimmed a piece of Chamomile Card Stock to 11” x 4.25” and scored along the long side of the card stock at 5.5” to create a top-folding A2-sized card. I then added a 4” x 5.25” piece of Snowdrift Card Stock that I had dry embossed with the Plaid Company Embossing Folder.
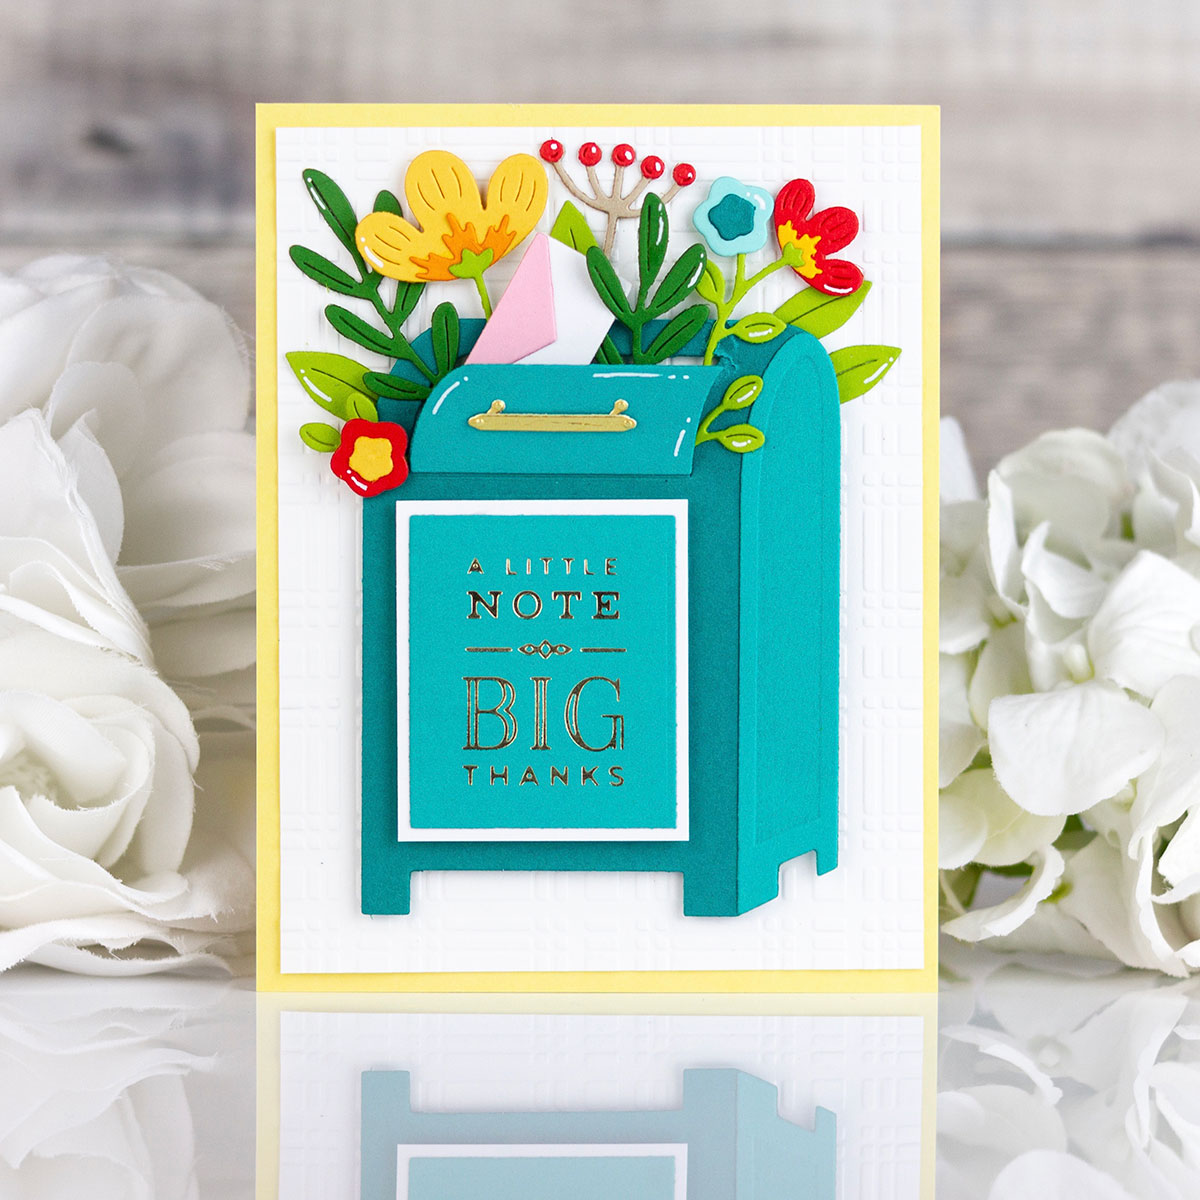
Next, I die cut my mailbox pieces from both Blue Spruce and Lagoon Card Stock. I used the floral dies that come with the mailbox set and adhered them to the inside of my mailbox. I used the same colored foil as above (Champagne) to heat foil my sentiment using the All-Occasion Mailbox Greetings Hot Foil Set. To add a pop of dimension, I adhered all of my die-cut images to my card base with some 3D Foam Adhesive Tape.
Love-Themed Mailbox Card
For my last project, I created a love-themed card using the Parcel & Post Mailbox Set combined with the Parcel & Post Heart Decorations and Parcel & Post Sentiments Clear Stamp Set. The Parcel & Post Heart Decorations Set is super versatile and can be used for so many different occasions!

For my color scheme, I used a mix of Blue Spruce, Waterfall, and Pink Sand Card Stock. I also added some bright red card stock that I had lying around. For my mailbox itself, I used some Silver Mirror Card Stock. I stamped my sentiment onto a piece of white card stock and quickly colored in the flowers with some Copic Markers (BG11, BG13; G40, G46; R35).
Instead of using the cute little envelope die that comes with the Parcel & Post Mailbox Set, I stamped the envelope stamp that comes with the Parcel & Post Sentiments Clear Stamp Set onto a piece of white card stock and fussy cut it with some scissors. I love how detailed this envelope is and I think it looks so cute sticking out from the mailbox flap!

I hope you all enjoyed my cards today! You can check out the entire amazing Parcel & Post Collection HERE!
Wishing you all a lovely day!
Spellbinders Supplies:

2 Comments
Liz E
These are all so cute! I especially like the 3D version
MaryH
So adorable and you did a splendid job on selecting colors and the embellishments. They all are so festive! Thanks for the inspiration and now I want those sayings so fingers crossed there is a sale.