Gnome for Christmas with Rachel Alvarado – 3D Cardmaking & Coloring
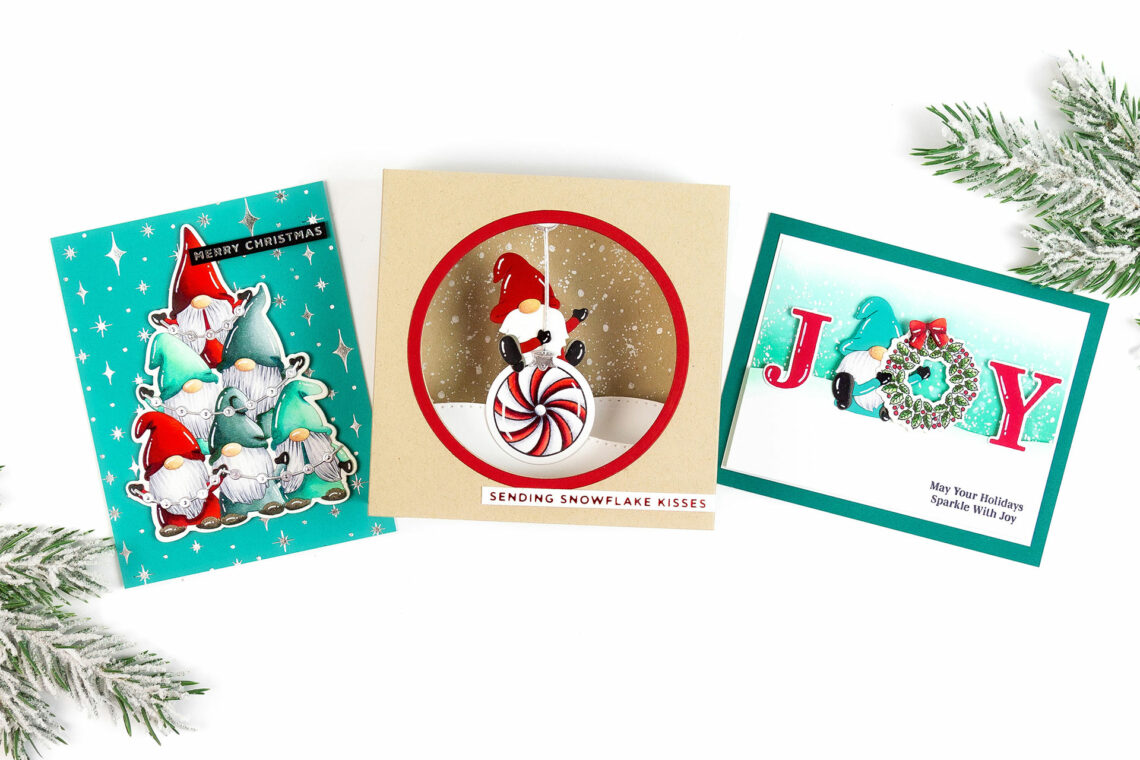
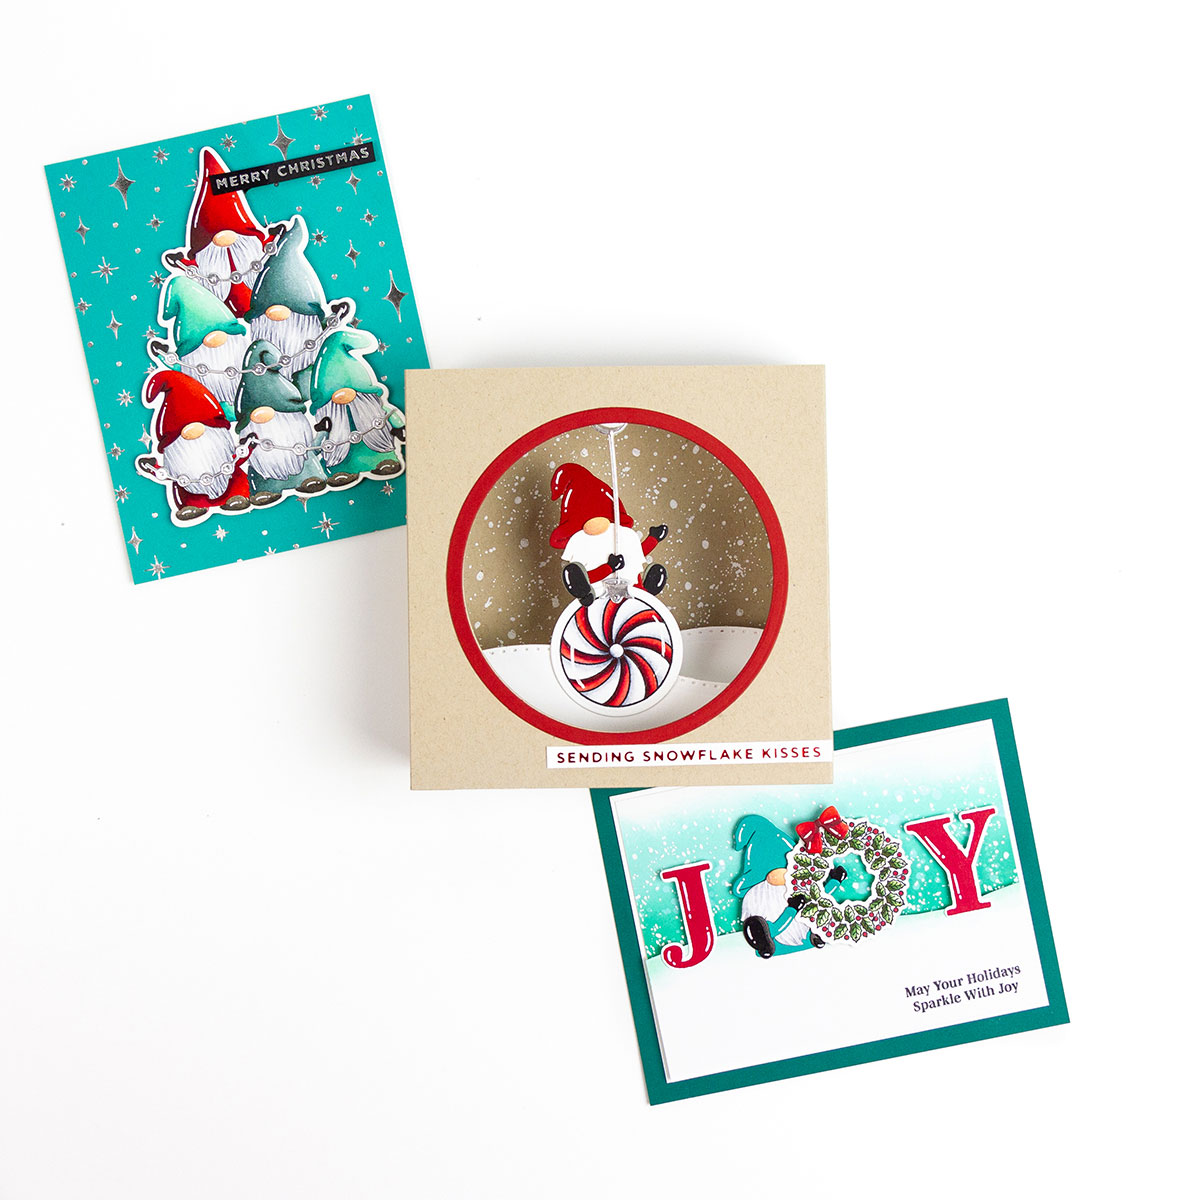
Hello crafty friends! It’s Rachel Alvarado from RachelAlvaradoDesigns.com and @theunpamperedstamper. I’m thrilled to share with you some fun projects featuring items from the new Gnome for Christmas Collection. I love to make a variety of cards with lots of color and/or 3D elements and am always looking for ways to stretch the use of my stamps and dies.
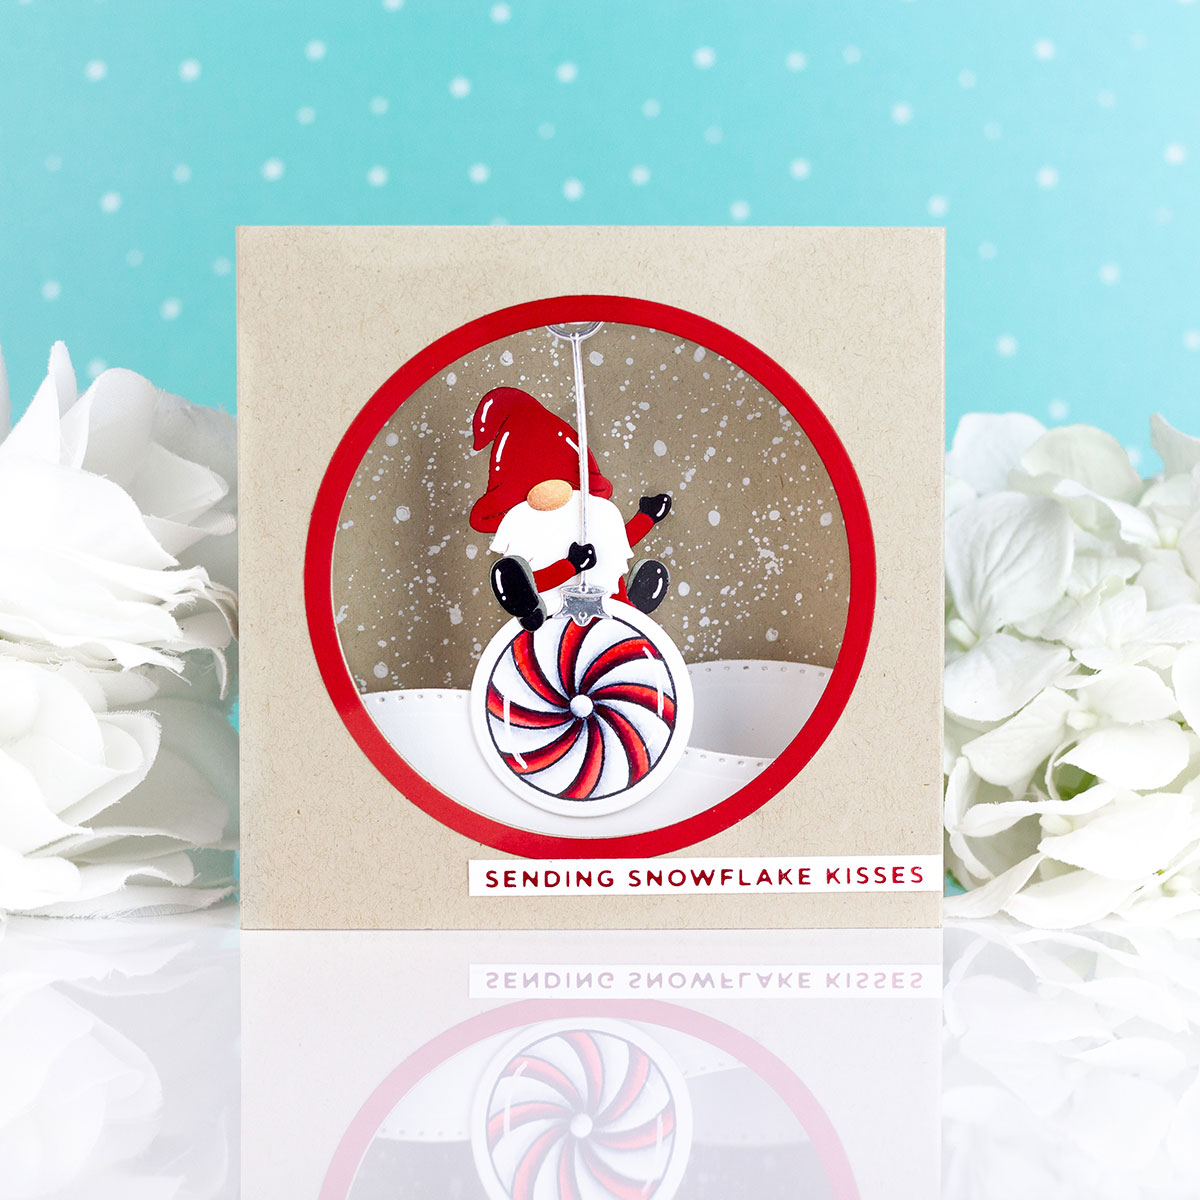
3D Shadow Box
For my first project, I created a 3D Shadow Box Card showcasing the Holly Jolly Gnome Etched Die Set combined with the Big Holiday Words Clear Stamp & Die Set.
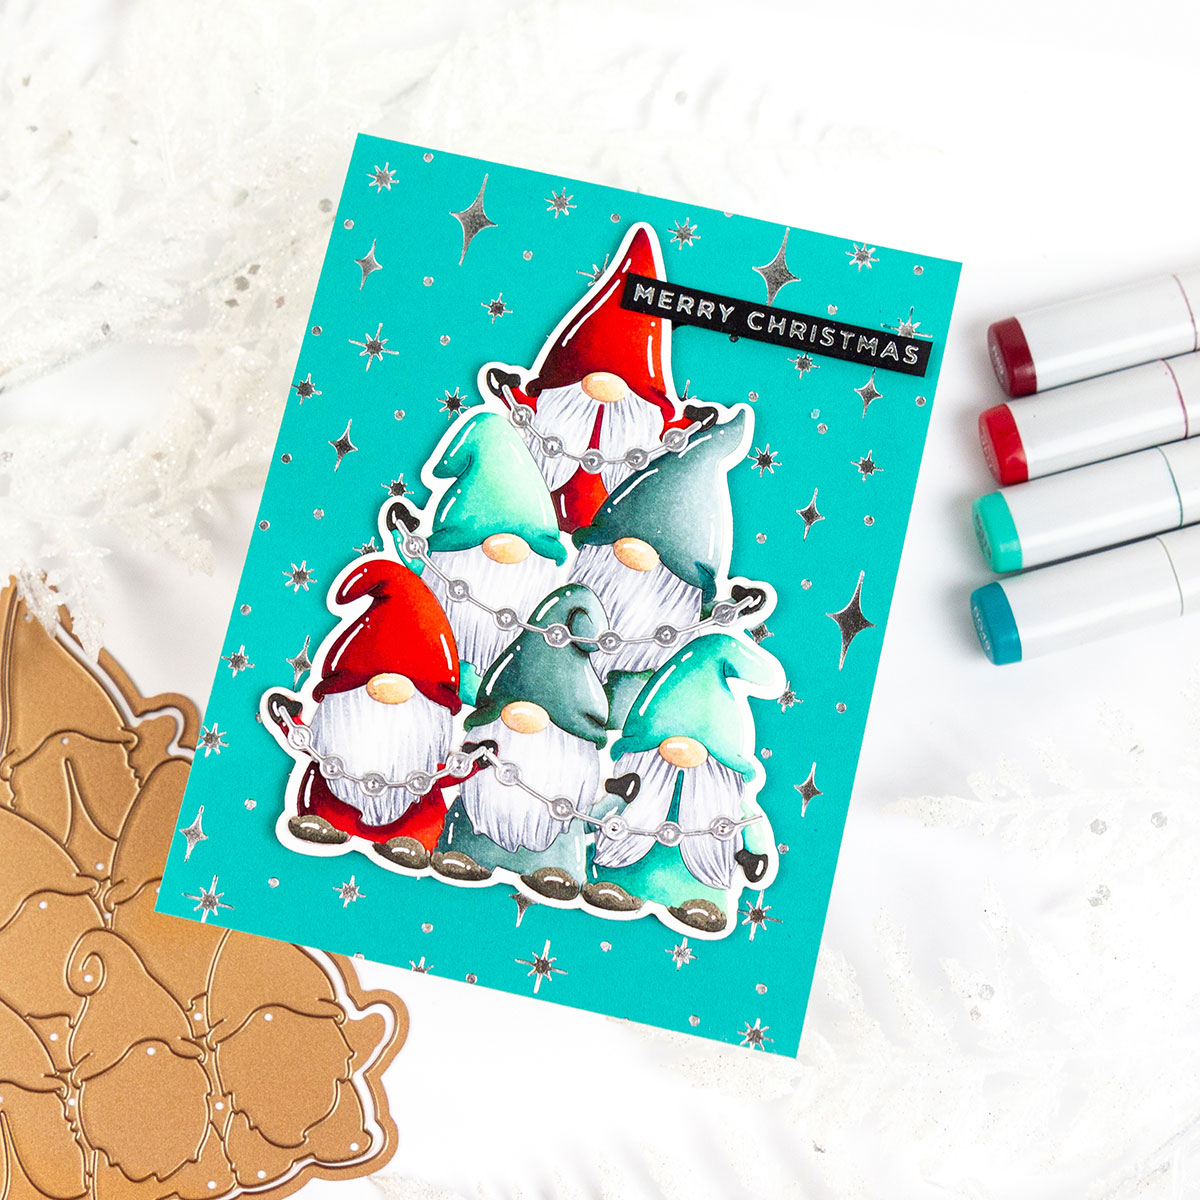
Shadowbox cards are actually pretty simple to create and I made mine from scratch. I’ve included some quick and easy steps below to help you create one of your own if you wanted to give it a try!
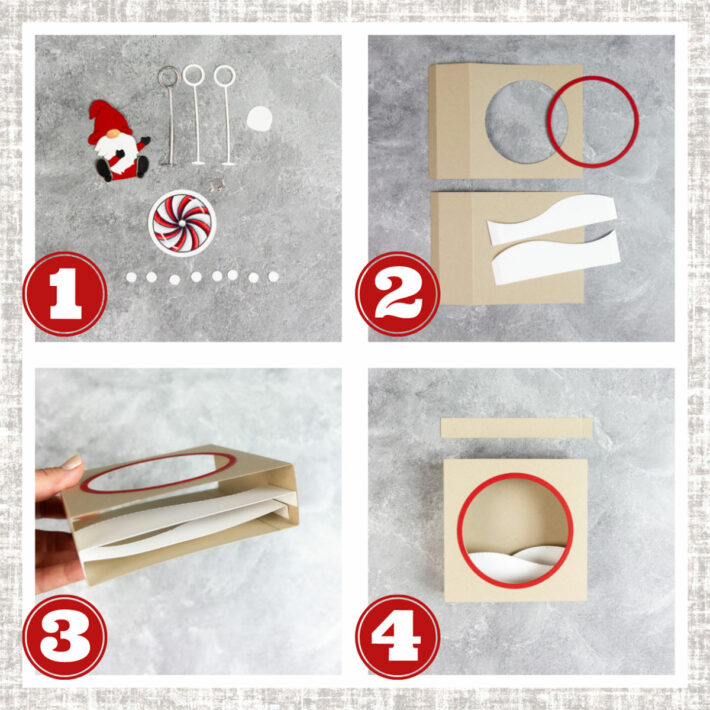
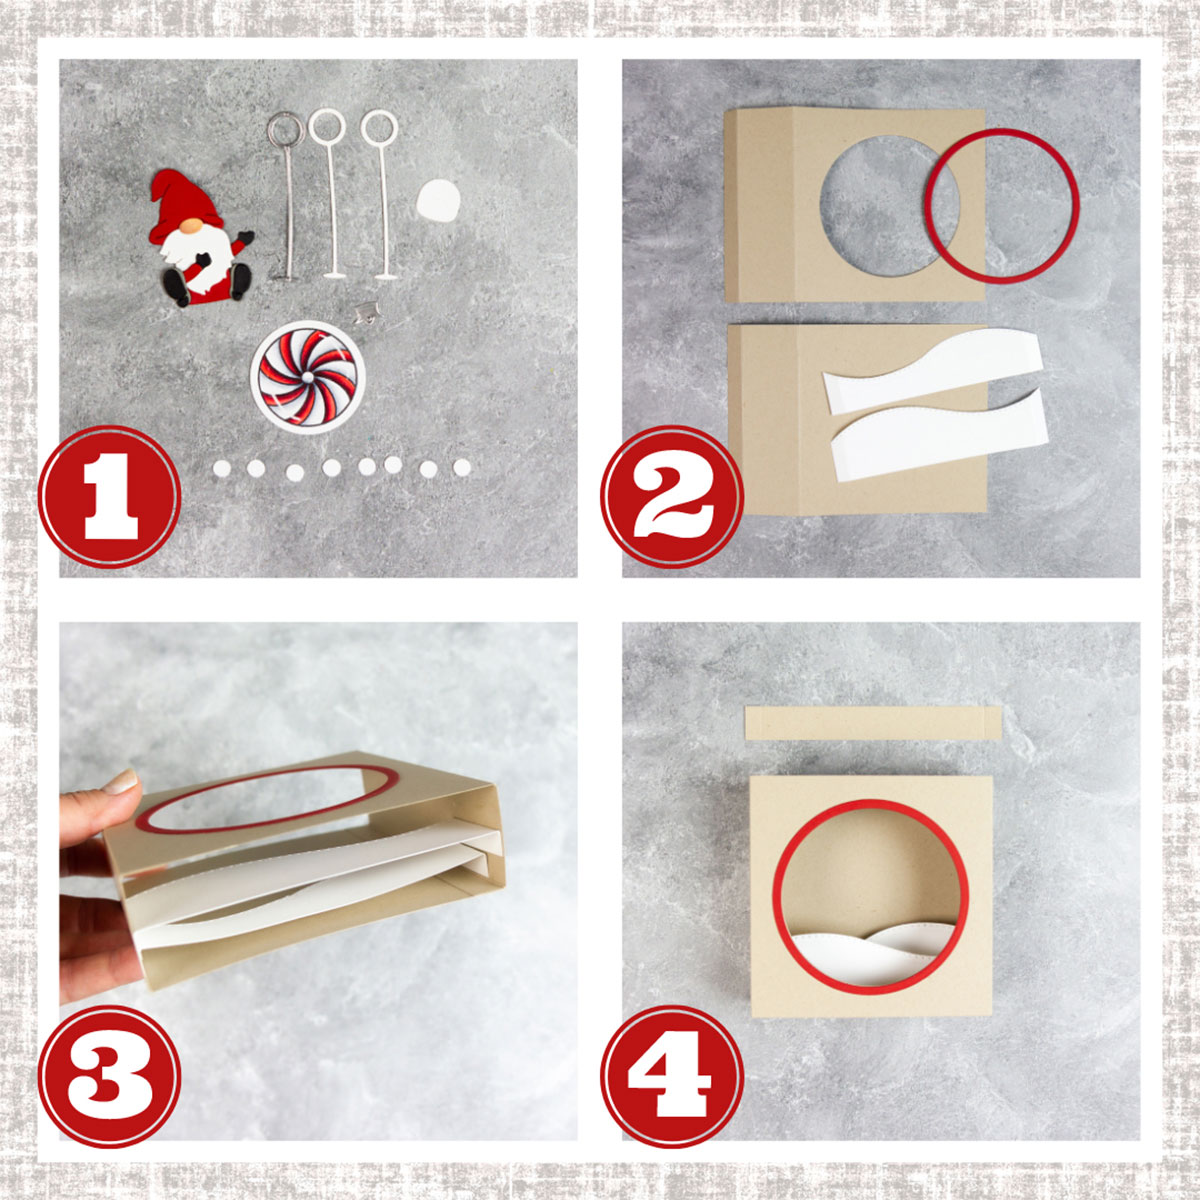
- Die cut and assemble gnome, 3 pieces of the ornament “string” to glue together for sturdiness, and 1 extra gnome body piece (a white piece in the top right of photo #1).
- Stamp the peppermint ornament from the Big Holiday Words Stamp Set, color it, and cut it out with a circle die (or use the circular ornament that comes with the Holly Jolly Gnome Set instead).
- Hole punch 8 small circles from 100lb card stock and glue them together
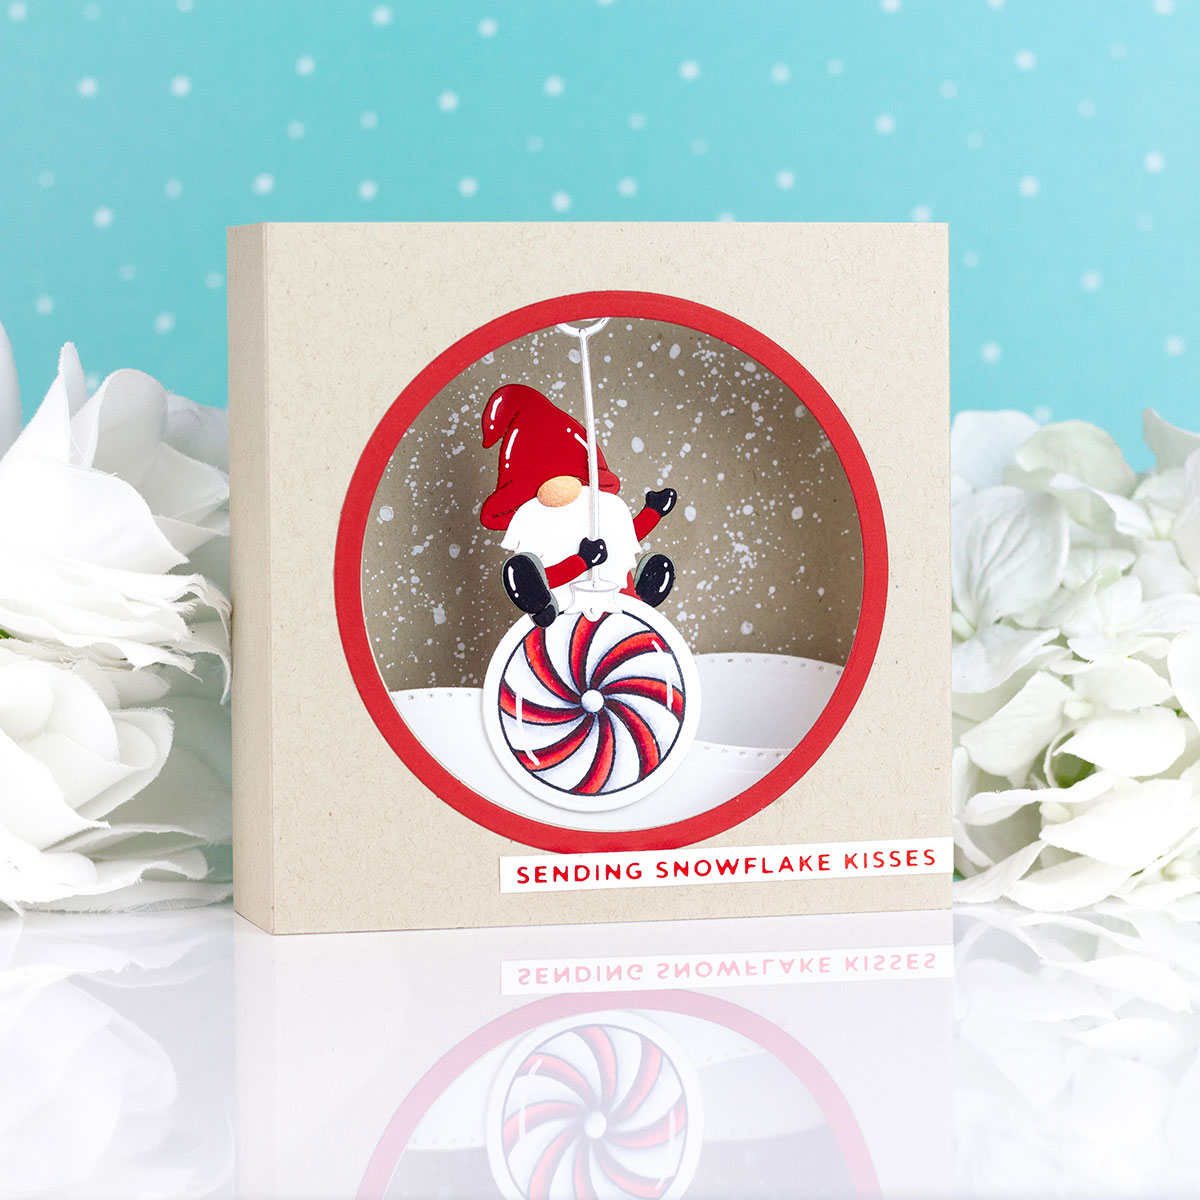
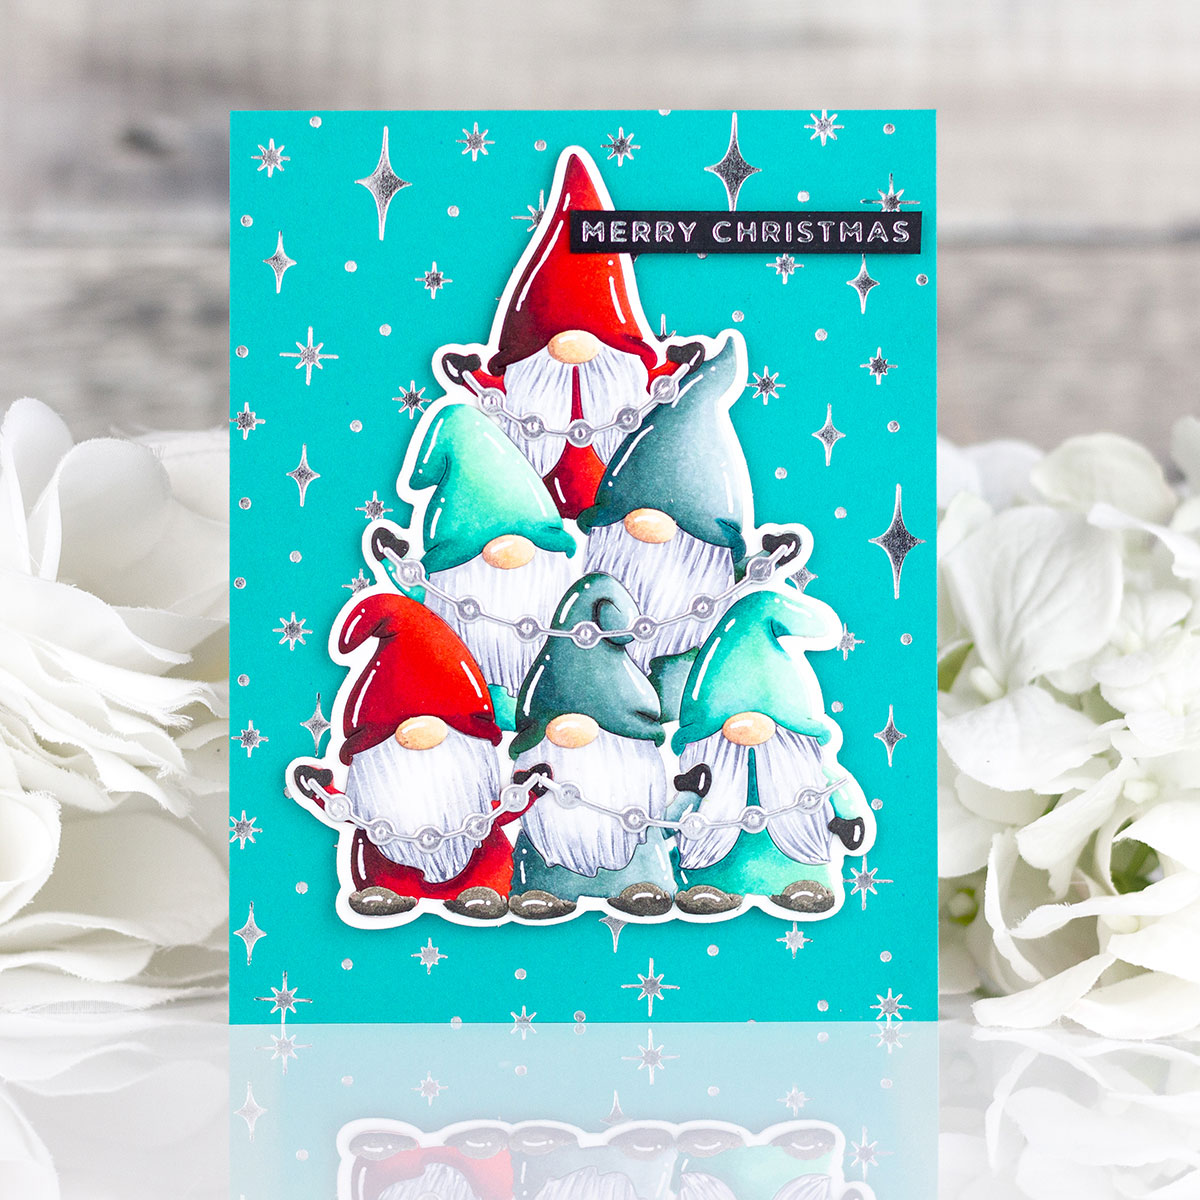
- Trim two pieces of card stock to 7” wide x 5” tall and score them both at ½” and 2”. Die cut a circle (or whatever shaped opening you like) in the center of one of them.
- Create 2 snow drifts that are 5 ¾” long and score tabs at 3/8” from each end (along the 7” side) to form tabs.
- Adhere snow drifts to the inside bottom of the shadow box making sure that they are staggered.
- Create a circle frame using nested circle dies. Trim a strip of card stock to 5 ¾” x ½” and score at 3/8” from each end of the 5 ¾” side to form tabs.

- Add a small strip to the top of the box card
- Adhere the group of punched hole pieces that you had glued together in step 1 onto the center of the top strip
- Place the loop of the ornament “string” over top of the circular disc that you had created
- Adhere the extra gnome body piece to the top of the circular disk with liquid adhesive – locking in the swinging string mechanism.
Lastly, I added my sentiment using the Glimmer Hot Foil Mini Christmas Sentiment Strips and some red Glimmer Hot Foil. Now you should have a 3D Shadow Box Card with an adorable swinging gnome! The fun part is that this card folds perfectly to fit into a 5” x 7” envelope for mailing!
Watch this card in action: Gnome for Christmas with Rachel Alvarado – 3D Cardmaking & Coloring
Gnome Tree Card
For my second project, I created a fun gnome tree using both the Gnome Tree Etched Dies along with the gorgeous Twilight Sparkle Strip Glimmer Hot Foil Plate. To start, I die cut my gnome tree base from some Snowdrift Card Stock. I then die-cut the gnome pieces from some Neenah Solar White 110lb Card Stock and colored each piece with Copic Markers.
You don’t have to color these pieces and can easily use colored card stock instead, but I love to color and wanted to add a little more depth to my images. Once I was finished coloring, I then assembled my gnome tree with some liquid adhesive.
I then created an A2 card base by trimming a piece of Teal Topaz Card Stock to 4.25” x 5.5”. I added some beautiful stars using the Twilight Sparkle Strip Hot Foil Plate and some silver Glimmer Hot Foil. I also used the same hot foil to heat stamp my sentiment. Lastly, I adhered my gnome tree with some 3D Foam Adhesive Tape for added dimension.
JOY-filled card
For my last project, I combined the Holly Jolly Gnome Etched Die Set along with the Big Holiday Words Clear Stamp & Die Set to create a fun “JOY”-filled card. I used a 4.25” x 5.5” piece of Blue Spruce Card Stock for my card base and layered it with a 3.75” x 5” piece of white card stock. I then trimmed another piece of white card stock to 3 5/8” x 4 7/8” and lightly blended the sky area with some Evergreen and Pine Needles Distress Oxide Inks.
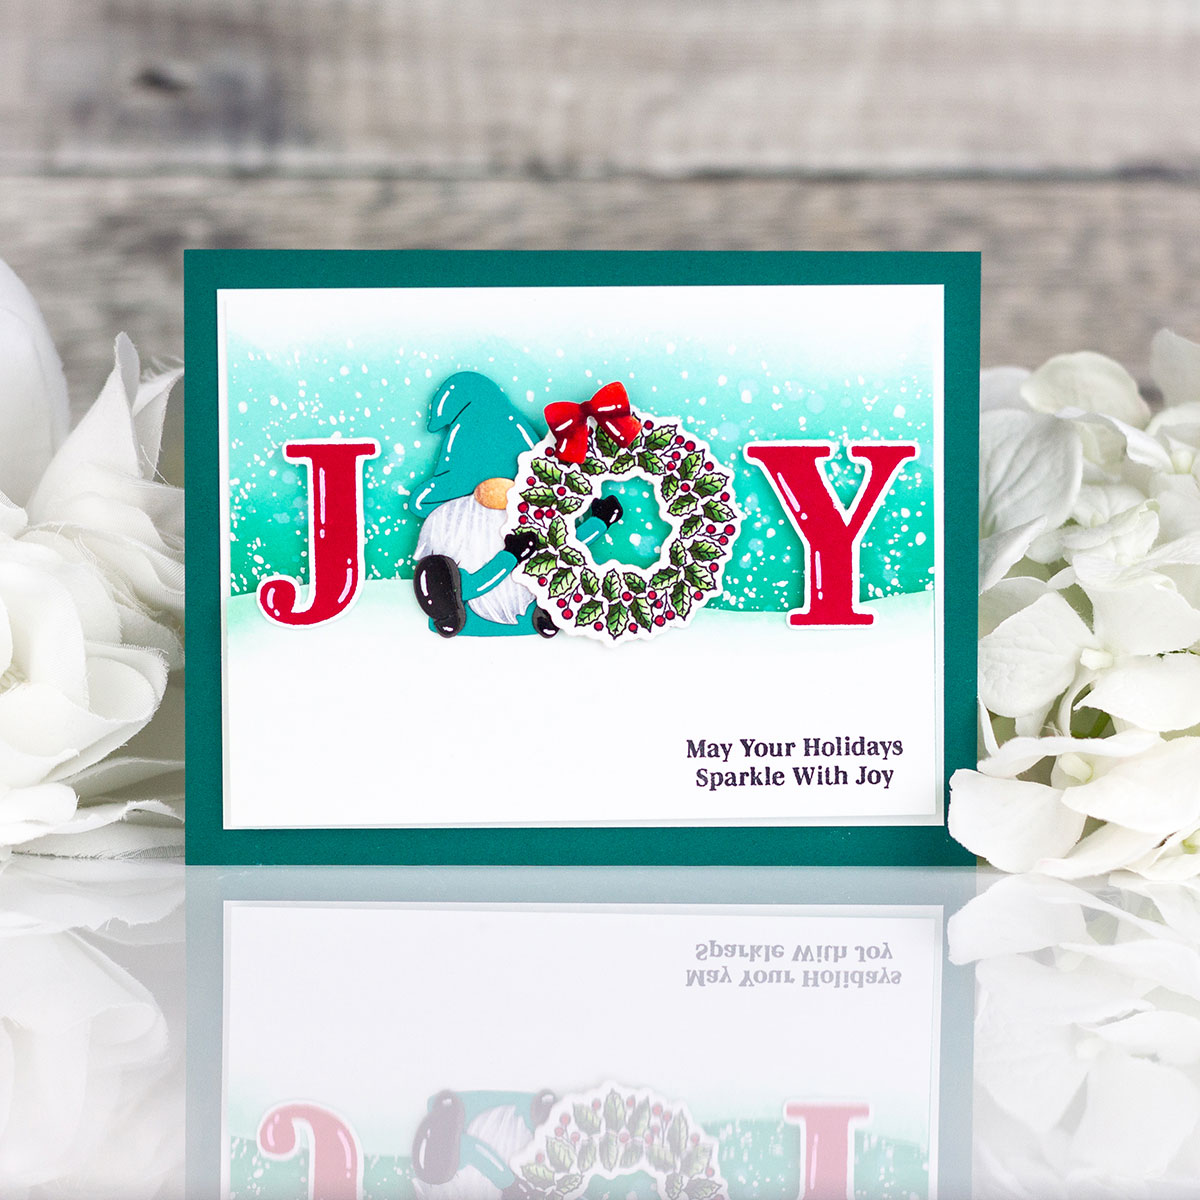
Next, I trimmed another piece of white card stock to 4 7/8” long x ~3” high and used scissors to create a snow drift upon which I stamped my sentiment. I adhered this piece to my card base with some foam adhesive tape and then stamped my “J” and “Y” with some red ink. I also stamped the wreath from the Big Holiday Words Set, colored it with Copic Markers, and used the coordinating dies to cut it out. Lastly, I assembled my gnome and added everything to my card base with more 3D foam adhesive tape.

I hope you enjoyed my projects today! Thank you so much for taking the time to drop by. If you want some more inspiration, feel free to check out my Instagram page HERE.
Wishing you all a wonderful day!
Spellbinders Supplies:

Other Supplies
Evergreen Distress Oxide Ink, Adhesive Foam Tape, Copic Markers, Neenah Solar White 110lb Card Stock, Liquid Adhesive Glue, Standard Hole Punch.


2 Comments
Ronda Powell
hello. I am curious about where to get the pendulum ornament string.
Thank you
Ronda Powell.
Rachel Alvarado
Hi Ronda! I sincerely apologize for the delay in my response! I just saw your question today. I actually didn’t use any string. It simply hangs from a diecut (the die is included in the Holly Jolly Gnome Etched Dies Set). I simply die cut it 3x’s for extra stability. I hope that helps to answer your question! :0)