Colorful Toolbox Essentials Cardmaking Ideas
Hello crafty friends! It’s Rachel Alvarado from RachelAlvaradoDesigns.com. I am so happy to be back for another guest post on the Spellbinder’s blog! I have three projects to share with you today that feature the new Toolbox Essentials Collection by Nancy McCabe.
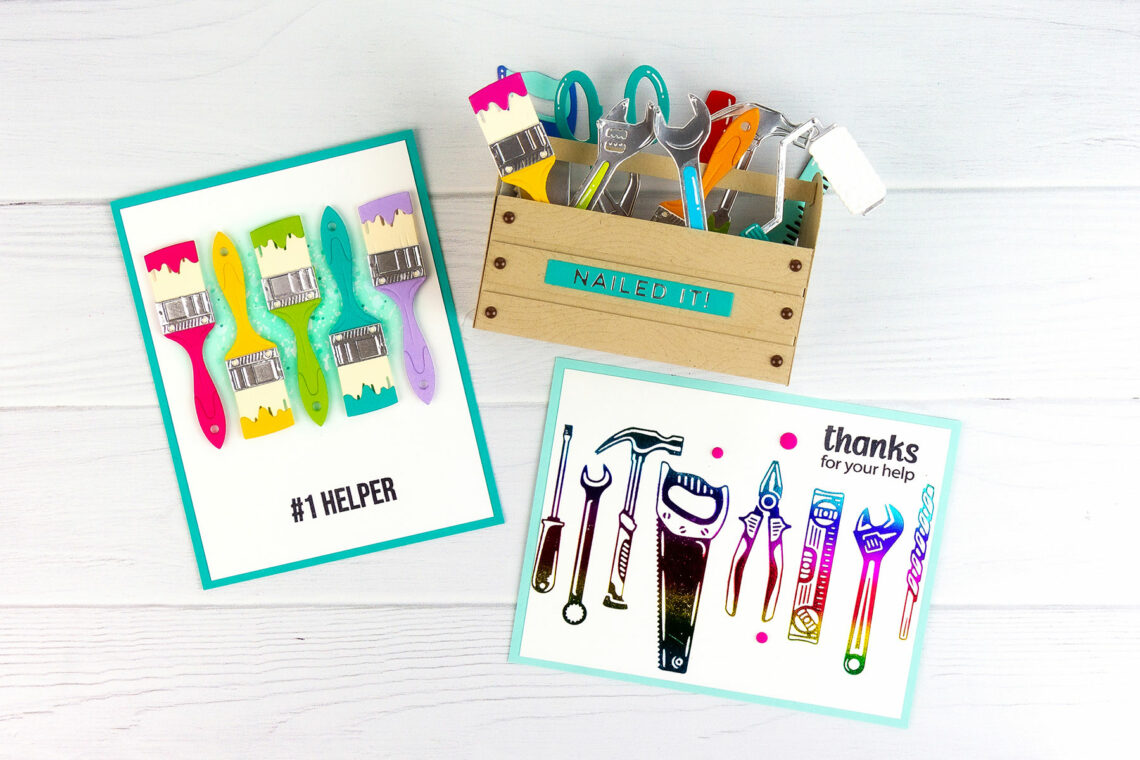
Toolbox Pop-up Card
For my first card, I created a fun mini toolbox pop-up card. To start, I first created my toolbox base using some Kraft Card Stock, a paper trimmer, a scoring board, and some adhesive.

Box Card Measurements:
- Cut 2 strips of kraft card stock to 6” x 1 ¾”
- Score each piece at 1.5” and 5.5” on the long side
- Adhere pieces together by adding adhesive to the ½ tab on each piece to form a rectangular-shaped box.
- Die cut 2 arches from the Essential Arches Etched Dies and attach on each end of box. Make sure to use the arch that measures 1 ½” across the base to fit the sides of the box exactly.
- Cut another strip of kraft card stock to 4 ¾” x 1/4” and score at 3/8”from each end. (This strip will be the handle of the toolbox and will attach between the top of the two arches.)
- Cut inner shelves at 4 ¾” x 1” and score at 3/8” from each side to form tabs
I also added 3 more strips of kraft card stock to the front of my toolbox that I had run through my die-cutting machine with the wood etched die that is included in the A Cut Above the Rest Sentiments Clear Stamps & Dies Set. This gives the pieces a faux wood grain that subtly adds to the card. Each strip measures at 4” x ½” and were added to the front of my toolbox with some 3D foam adhesive tape to give them some added dimension.

Next, I used the super cute All the Tools Etched Dies with a variety of colored card stock pieces as well as some Mirror Silver Card Stock to create my tools. I added each tool to the inside shelves of my toolbox with some liquid adhesive. Lastly, I used my hot foil machine to add my sentiment from the Nailed It Hot Foil Plates onto a strip of Lagoon Card Stock. This card measures at 4” across by 1 ½” wide and stands approximately 3.5” tall. It folds flat to fit into a standard 5×7 envelope for mailing.
Rainbow Hot Foil Card
For my second project, I created a simple thank you card using the Nailed It Glimmer Hot Foil Plates along with the A Cut Above the Rest Sentiment Stamps. I used some Mini Rainbow Glimmer Hot Foil to hot foil my images onto a 5.25” x 4” piece of Snowdrift Card Stock.

I then layered it onto a 5.5” x 4.25” top-folding, horizontal card base that I had cut from a piece of Waterfall Card Stock. Lastly, I stamped my sentiment with some Memento Tuxedo Black Ink onto the top right corner of my card and added some pink enamel dots for extra interest.
#1 Helper Paintbrush Card
For my last project, I used the cute little paintbrush die from the All the Tools Etched Dies Set to create a fun rainbow-themed card. I simply die-cut my pieces from different pieces of colored card stock and assembled them together with some liquid adhesive. Next, I trimmed a piece of Neenah Solar White 110lb Card Stock to 4” x 5.25” and lightly blended the top center portion of it with some Salvaged Patina Distress Oxide Ink.

I then layered this piece with a top-folding, vertical A2 card base that I had cut from some Teal Topaz Card Stock. Next, I stamped my sentiment onto the lower center portion of my card with some black ink. To finish my card, I lastly adhered my paintbrushes with some 3d foam squares to give them a pop of dimension.
Thanks so much for taking the time to drop by! I hope you enjoyed my cards today! If you liked these cards and want some more inspiration, feel free to check out my INSTAGRAM page.
Hugs!
Rachel
Spellbinders Supplies:

Other supplies
Memento Tuxedo Black Ink, Copic White Paint.
3 Comments
drawing411
Love the technics and also seen the fsc girls do theirs on YouTube! wish I could afford to get them, and my Birthday is the 21st of March.
Jeanne
Congratulations, Rachel! Great cards!
ahappyscramper
These are so much fun! I have the dies and can’t wait to play with them. Many thanks for the inspiration of the last few posts! xx