Shake! Shake! Shake! Shaker Cards Made Easy!
Are you ready to add some extra pizzazz to your handmade creations? Well, we’ve got just the thing for you – shaker cards! If you’re not familiar with this delightful trend, don’t worry, because today we’re going to dive into the world of shaker cards and share everything you need to know.
What Are Shaker Cards?
Imagine sending someone a card that not only looks stunning but also brings an element of surprise and playfulness. That’s exactly what shaker cards offer! These interactive cards feature a clear window filled with small embellishments like sequins, confetti, or beads. When you shake the card, the contents inside the window move around, creating a captivating effect that is sure to bring a smile to anyone’s face.
Why Shaker Cards?
Shaker cards add that extra touch of magic to your handmade creations. They are perfect for special occasions like birthdays, weddings, or anniversaries, where you want to make a lasting impression. The shaking motion makes them irresistible and brings a sense of joy and whimsy. Plus, they allow you to combine different textures, colors, and materials to create truly unique designs.
So, let’s buckle up and shake things up! Welcome our guest – Galina, as she shares all the tips and tricks for amazing shaker cards!
Hello! I’m thrilled to be here with you today. Today, I want to share a ton of inspiration and some valuable tips on how to create stunning shaker cards using Waffle Flowers’ Flat shaker covers, Buttons Galore sequin mixes, and the new Spellbinders dies. Plus, I’ll be showcasing four seasonal shaker cards for the upcoming holidays. So, let’s dive in!
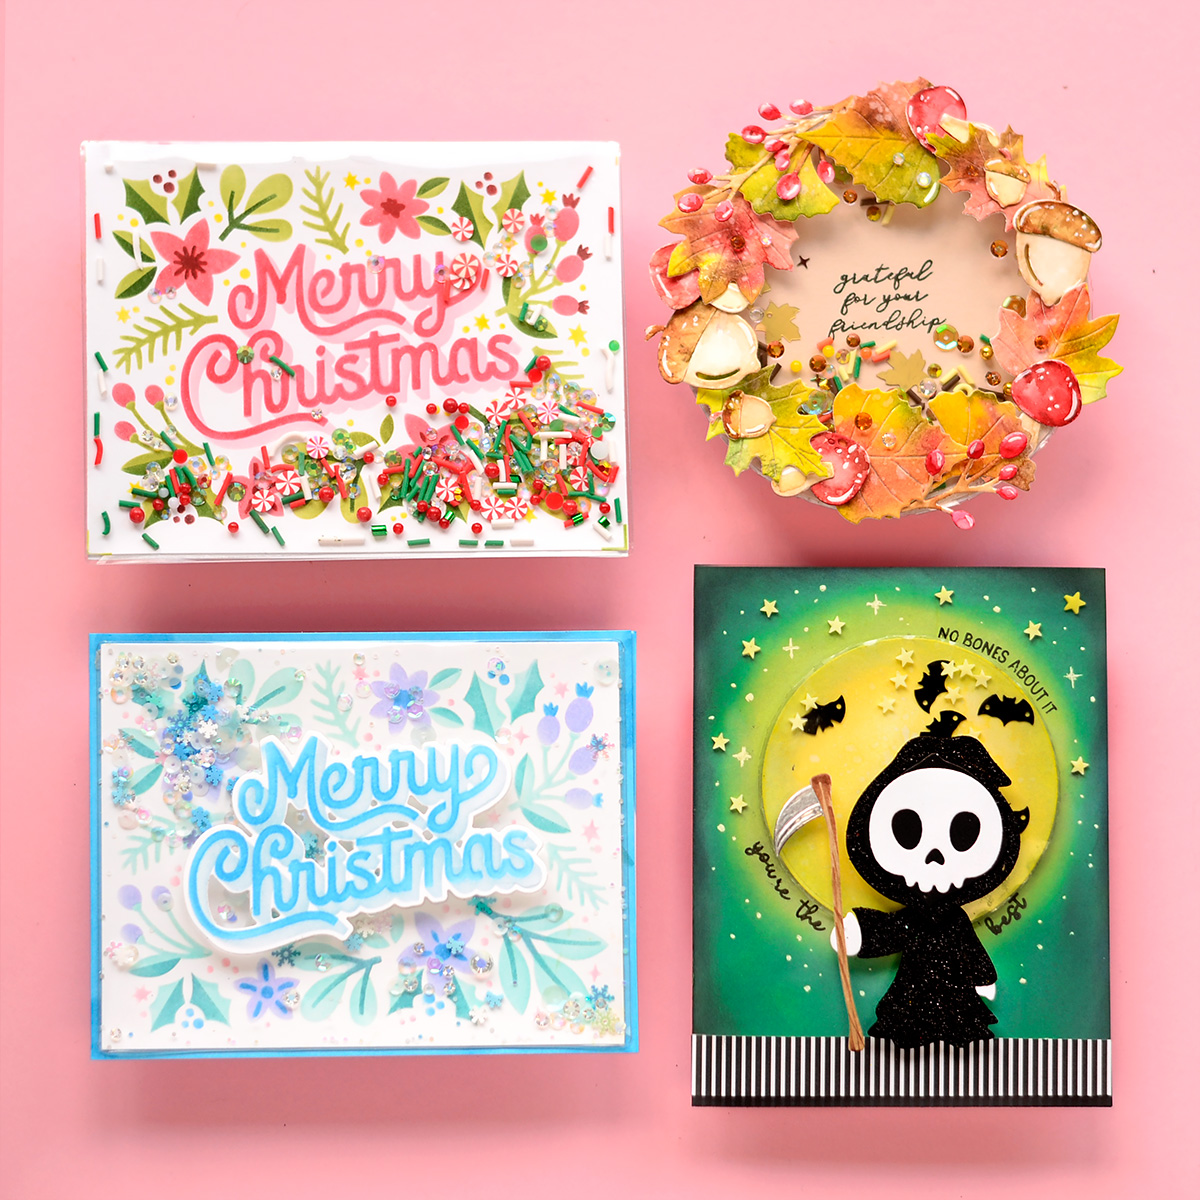
Halloween Shaker Card
For this card, I decided to create a dimensional moon with adorable bats flying around.

Here’s how you can make it:
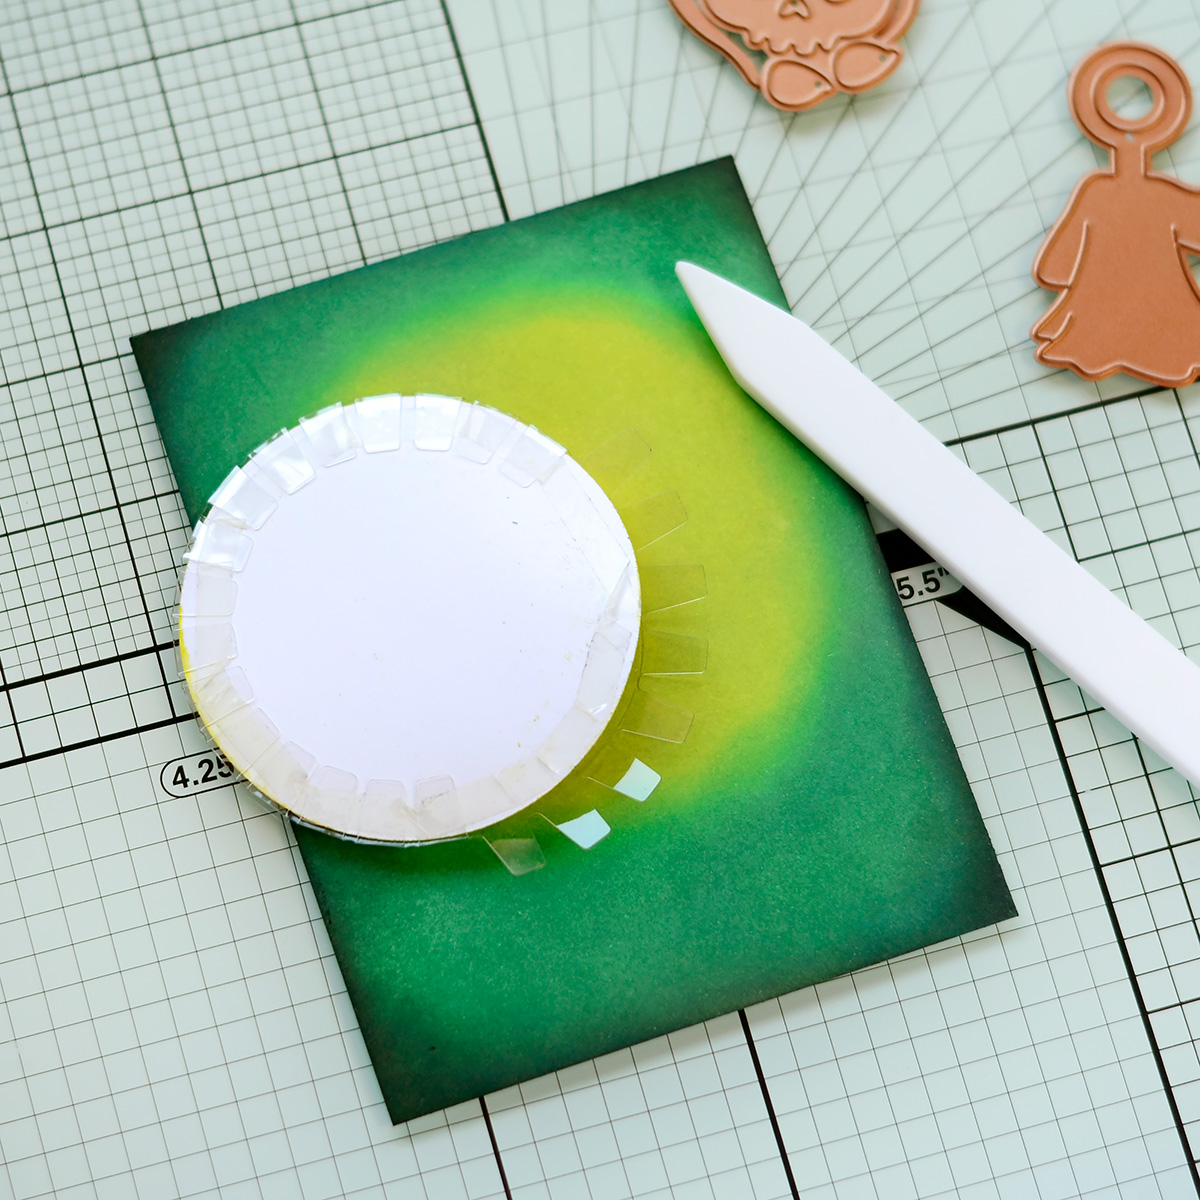
- Step 1: Start by cutting out a circle from white paper, matching the size of the flat shaker cover you’ll be using. Apply inks on both the circle and the white A2 card panel.
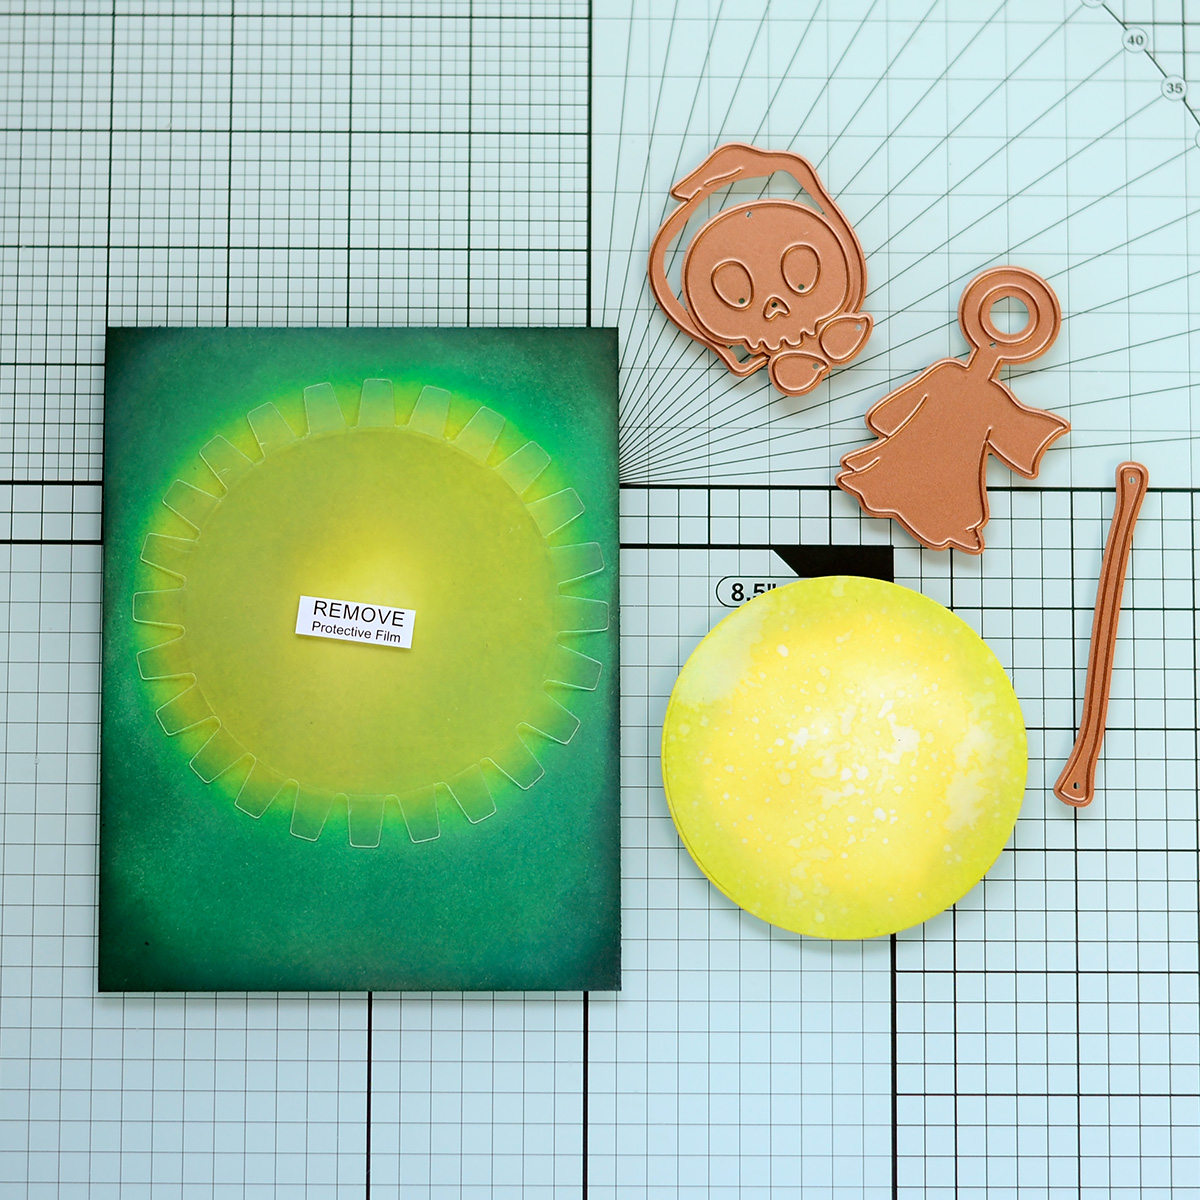
- Step 2: Attach a strong double-sided tape to the back of the circle die cut. Place it face down on the flat shaker cover, making sure to remove the protective sheet. Fold the flaps and use a bone folder for your convenience. Leave some flaps open.
- Step 3: Fill the shaker with bats and stars from the Buttons Galore & More Spellbound Mix Upz Embellishments. Then, close the remaining flaps.
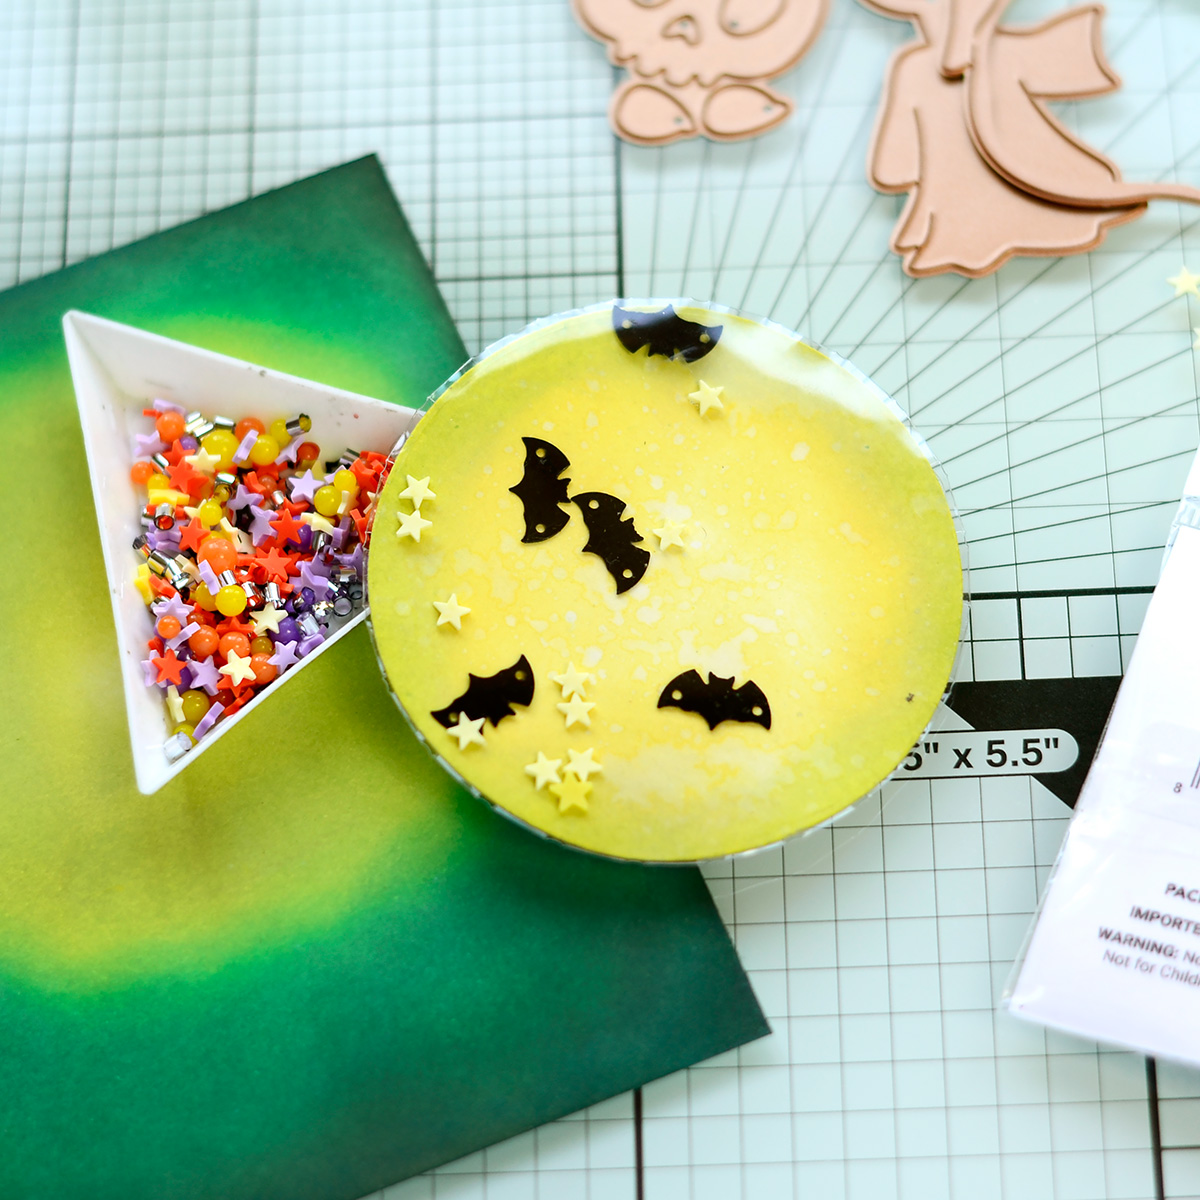
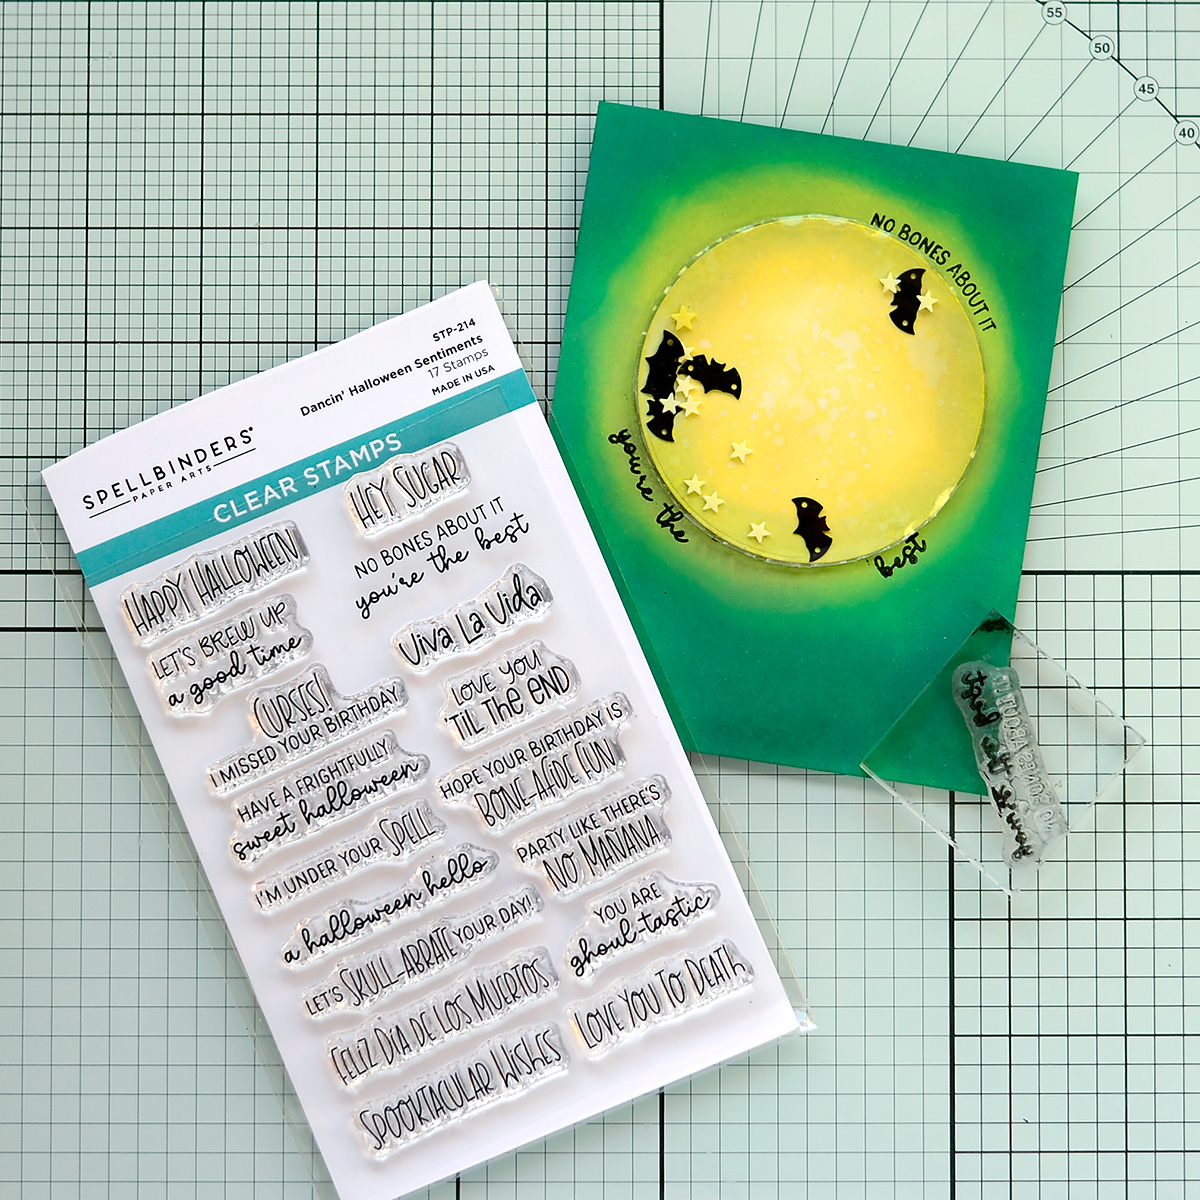
- Step 4: Stamp the sentiments using black ink and the Dancin’ Halloween Sentiments. You can even shape the stamp to match the shaker cover for added visual appeal.
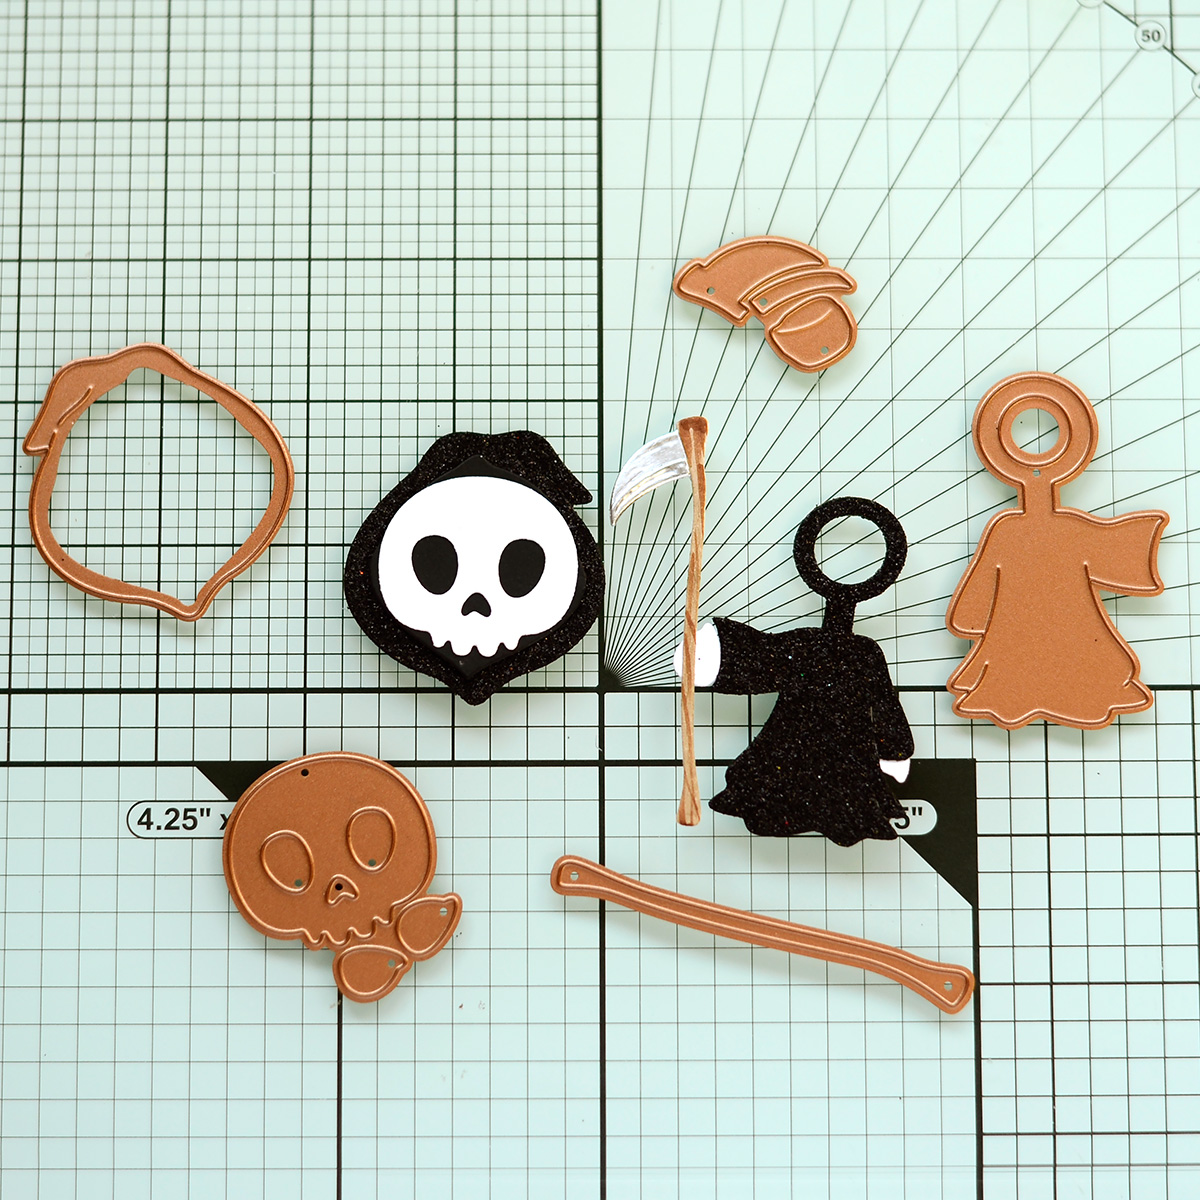
- Step 5: Cut out the adorable Grimm using the Dancin’ Grim die set. Use black glitter cardstock for the body and white cardstock for the head.
Tip: You can use the small flat circle shaker cover to create a dimensional object. Remember, you don’t always have to use it as a shaker.
Tip: Get creative with your sequin mixes by using only select elements. It adds more fun and uniqueness to your designs.
Fall Circle Shape Card
Here’s another way to use the Flat circle Shaker cover – by creating shaped cards that are sure to catch anyone’s eye. The Waffle Flower Shaker Cover 4.25″ Flat Shaker is perfect for filling a standard A2 envelope.
Here’s how to make it:
- Step 1: Cut out a circle die cut that matches the size of the flat shaker cover you’ll be using.
- Step 2: Stamp the sentiment in the center using the Envelope of Wonder Sentiments.
- Step 3: Attach the flat shaker to the die cut using double-sided adhesive tape.
- Step 4: Fill the shaker with Buttons Galore & More Fall Frenzy Mix Upz Embellishments. I suggest removing the largest orange balls from the mix for a better fit.
- Step 5: Apply inks on watercolor paper and cut out leaves using the Autumn Wonder Die Set. Attach the leaves to the flat shaker using double-sided tape.
- Step 6: Embellish the leaves with some crystals from the same mix for added sparkle.
Tip: When using flat shaker covers, try to avoid using oversized shaker elements if you want to keep them flat.
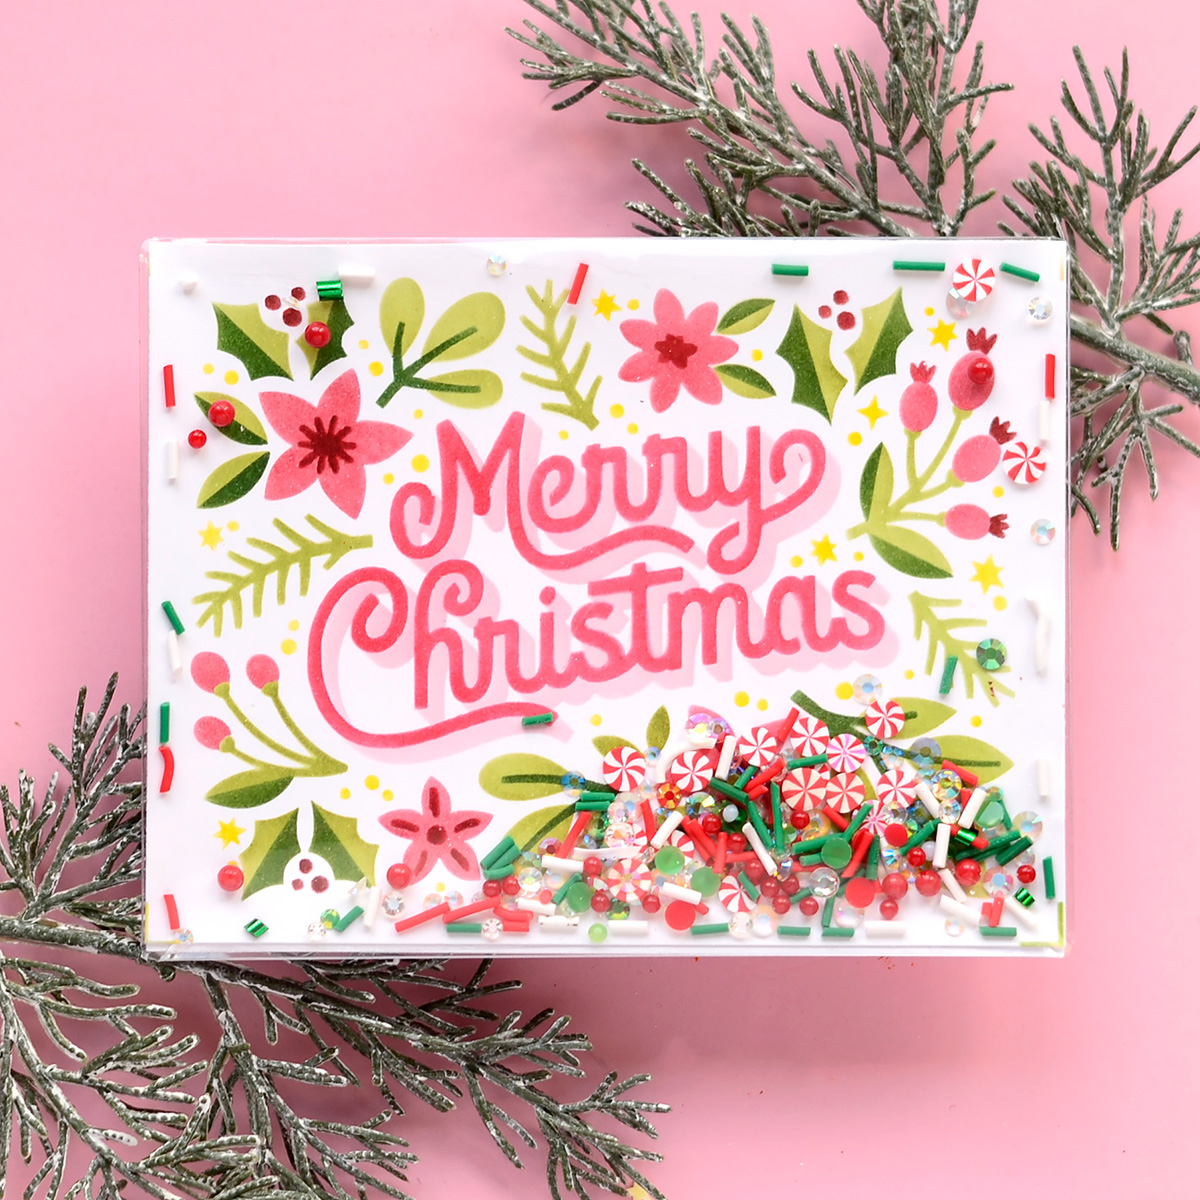
Christmas Shaker Cards
For my next two cards, I used the Layered Merry Christmas Foliage die set along with two different rectangle shaker covers.
Let’s take a look:
I created the first card using the Waffle Flower Shaker Cover A2 Infinity to achieve a no-edge shaker effect. Here’s how:
- Step 1: Cut out a white A2 paper panel.
- Step 2: Apply red, green, and yellow inks through the Layered Merry Christmas Foliage Stencils.
- Step 3: Attach the panel to the Waffle Flower Shaker Cover A2 Infinity. This shaker cover goes with adhesive tape on the flaps
- Step 4: Fill the shaker with Buttons Galore & Elf Made Mix Upz Embellishments.
- Step 5: Close the shaker and attach it to the white card base.
Using the Waffle Flower Shaker Cover 4 x 5.25″ Flat Rectangle, you can create a shaker slightly smaller than the A2 panel, allowing you to add a colorful matching border around it.
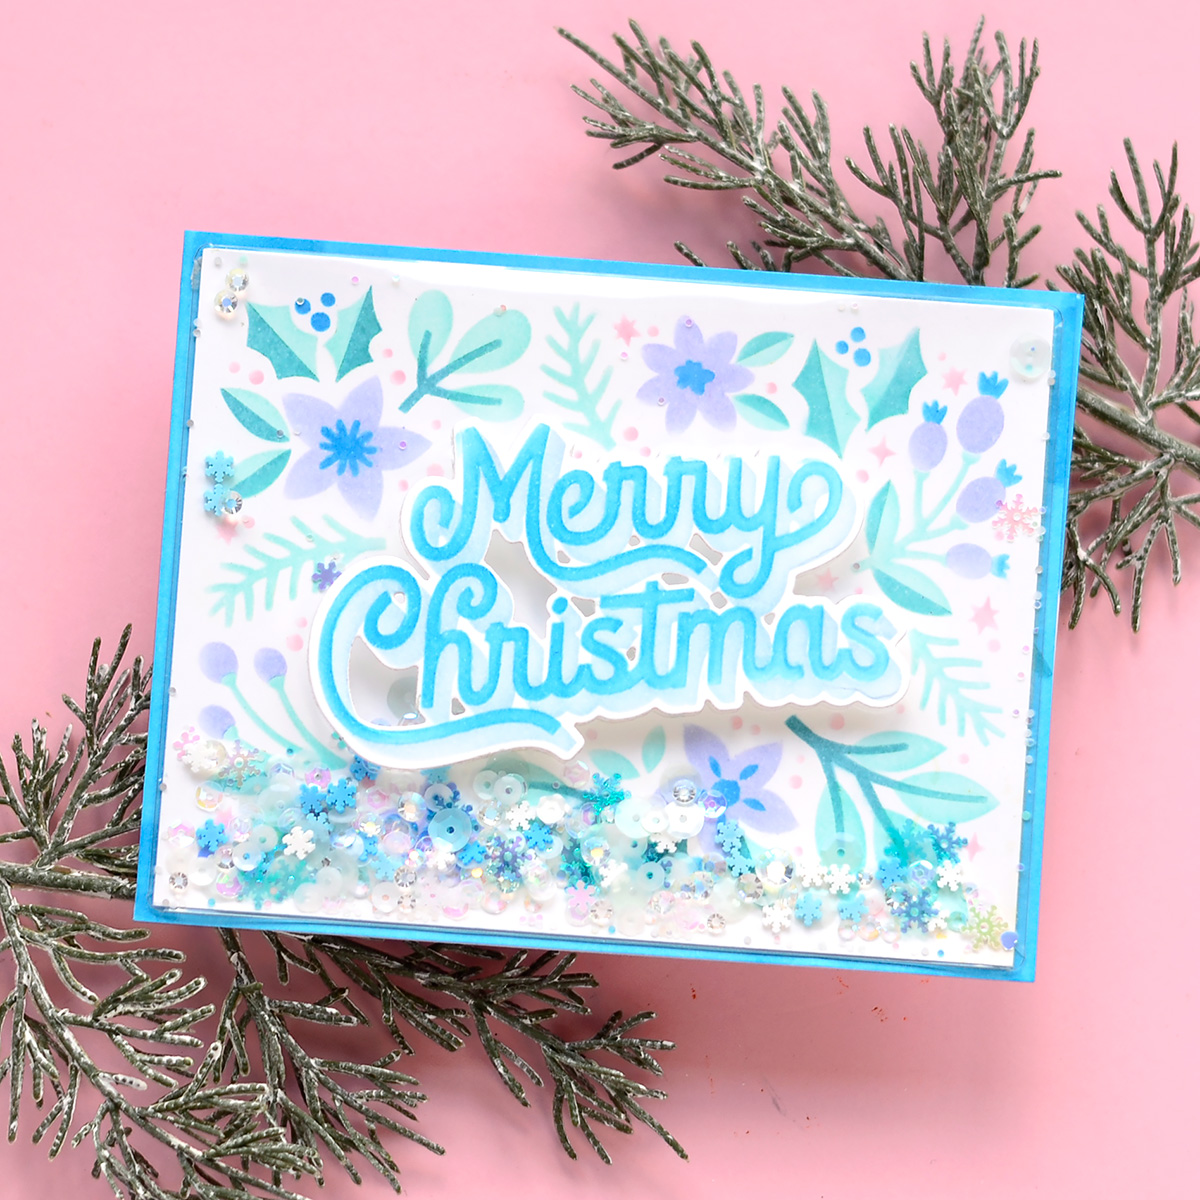
Here’s how:
- Step 1: Cut out a white panel in the size of 4 x 5.25″.
- Step 2: Apply various blue inks through the Layered Merry Christmas Foliage Stencils.
- Step 3: Cut out the central sentiment using the coordinating die.
- Step 4: Attach the panel to the Waffle Flower Shaker Cover 4 x 5.25″ Flat Rectangle using double-sided adhesive tape.
- Step 5: Fill the shaker with Buttons Galore & Frozen Mix Upz Embellishments.
- Step 6: Close the shaker and attach the die-cut sentiment on top of the shaker cover.
- Step 7: Finally, glue the shaker to an A2 card base.
Thank you so much for taking the time to read my blog post and a special thanks to Spellbinders for having me today! I can’t wait to see your shaker creations, so please don’t hesitate to tag me on Instagram @Galachko. Happy cardmaking!
With shaker cards, you can take your cardmaking skills to a whole new level. These delightful creations are guaranteed to impress and bring joy to both the maker and the recipient. So, gather your supplies, let your imagination run wild, and start shaking things up with these mesmerizing cards. Happy crafting, and may your shaker cards be filled with endless smiles and cheer!
Spellbinders Supplies:

Other Supplies
Buttons Galore & Elf Made Mix Upz Embellishments, Buttons Galore & Frozen Mix Upz Embellishments, White cardstock, watercolor paper, black cardstock, silver color cardstock black glitter cardstock, black ink, red, green, yellow, blue ink colors, double-sided tape, liquid glue, bone folder, white card bases, Copic markers.
Joyful Christmas Collection Introduction with Simon Hurley
February 2021 Clear Stamp of the Month is Here – Trefoil Florals & Sentiments