Warm Holiday Wishes Project Kit is Here!
Hello Spellbinders’ and FSJ fans! Our Warm Holiday Wishes Project Kit is here!
This Warm Holiday Wishes Project Kit is the perfect way to get your hands on early products from one of the upcoming August Holiday Collections. This kit comes with an assortment of THREE die sets, s clear stamp set and, a card making project kit to make THREE cards.
Also included are full color instructions and an online Video Tutorial. You will be guided through every step of the way as your create die cut projects.

Included in Project Kit:
- Kaleidoscope Plaid Die sSet S4-1063
- Kaleidoscope Christmas Tree Die Set S4-1064
- Christmas Ornament Border Die Set S4-1068
- To You and Yours Clear Stamp Set STP-023
- Kit Materials to create THREE Cards
Ornament Merry Christmas Card
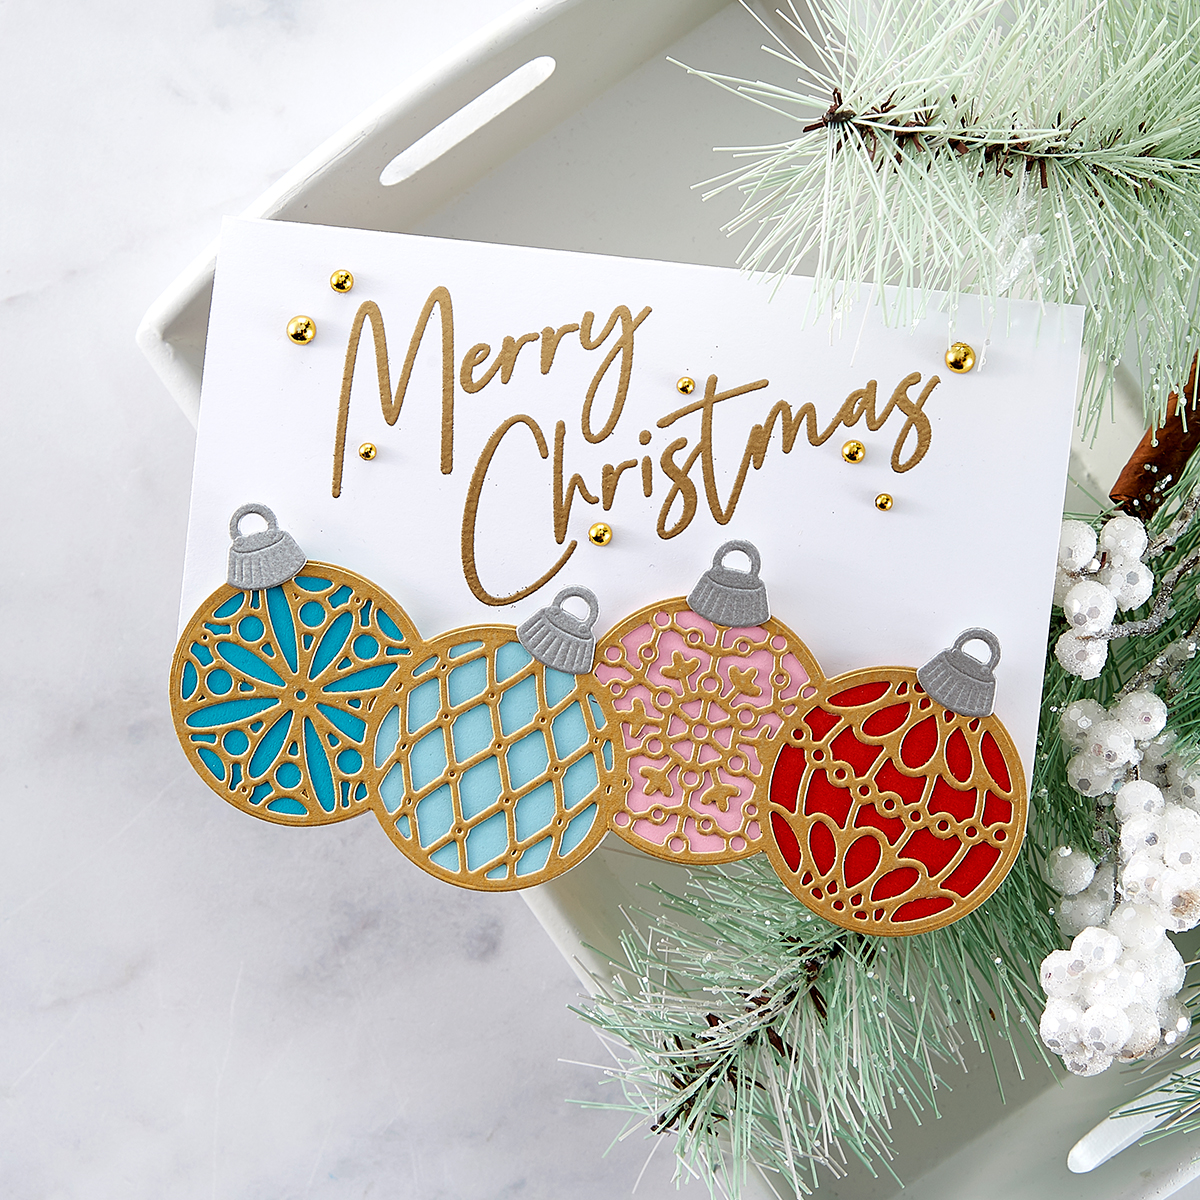
Finished Size: 5 1/2” x 4 1/4”
Instructions:
- Fold Whip Cream cardstock in half to create card base; using removable tape, position bottom half of ornament rim along bottom edge of card front and die cut; repeat for back of card.
- Back Brush Gold cardstock with White Liner Sheet and die cut entire ornament strip (including top and bottom outer rims), set aside.
- Use the top and bottom outer rims as a guide to cut Turbo Teal, Pool Play, Bubble Gum and Rich Coral circles to place behind Brush Gold ornament strip; adhere behind die cut and set aside.
- Stamp “Merry Christmas” on top of card front (use Ornament Strip as guide for sentiment placement) using Clear Pigment ink and heat emboss with Gold powder.
- Adhere completed Ornament strip to bottom edge of die cut card front using foam adhesive.
- Die cut (4) ornament tops from Brush Silver cardstock and adhere to Ornament strip.
- Embellish with Fashion Gold Dots.
Supplies:
STAMPS: To You and Yours STP-023; DIES: Christmas Ornament Border S4-1068; CARDSTOCK: Journey Brush Gold CS-0134, Journey Brush Silver CS-0135, Whip Cream CS-0040, Rich Coral CS-0093, Turbo Teal CS-0127, Bubble Gum CS-0099, Pool Play CS-0092; INKS: Journey Gold Embossing Powder IP-0101, Clear Pigment Ink IP-0102; ACCESSORIES: Fashion Gold AC-0292; BASIC SUPPLIES: White Liner Sheets AD-0113, White Liner Tape AD-0001, Easy Glide Permanent Adhesive Runner AD-0081, Journey Foam Squares Medium AD-0085, Journey Craft Glue AD-0111, Crease Tool TO-0040.
Merry Christmas Kaleidoscope Card
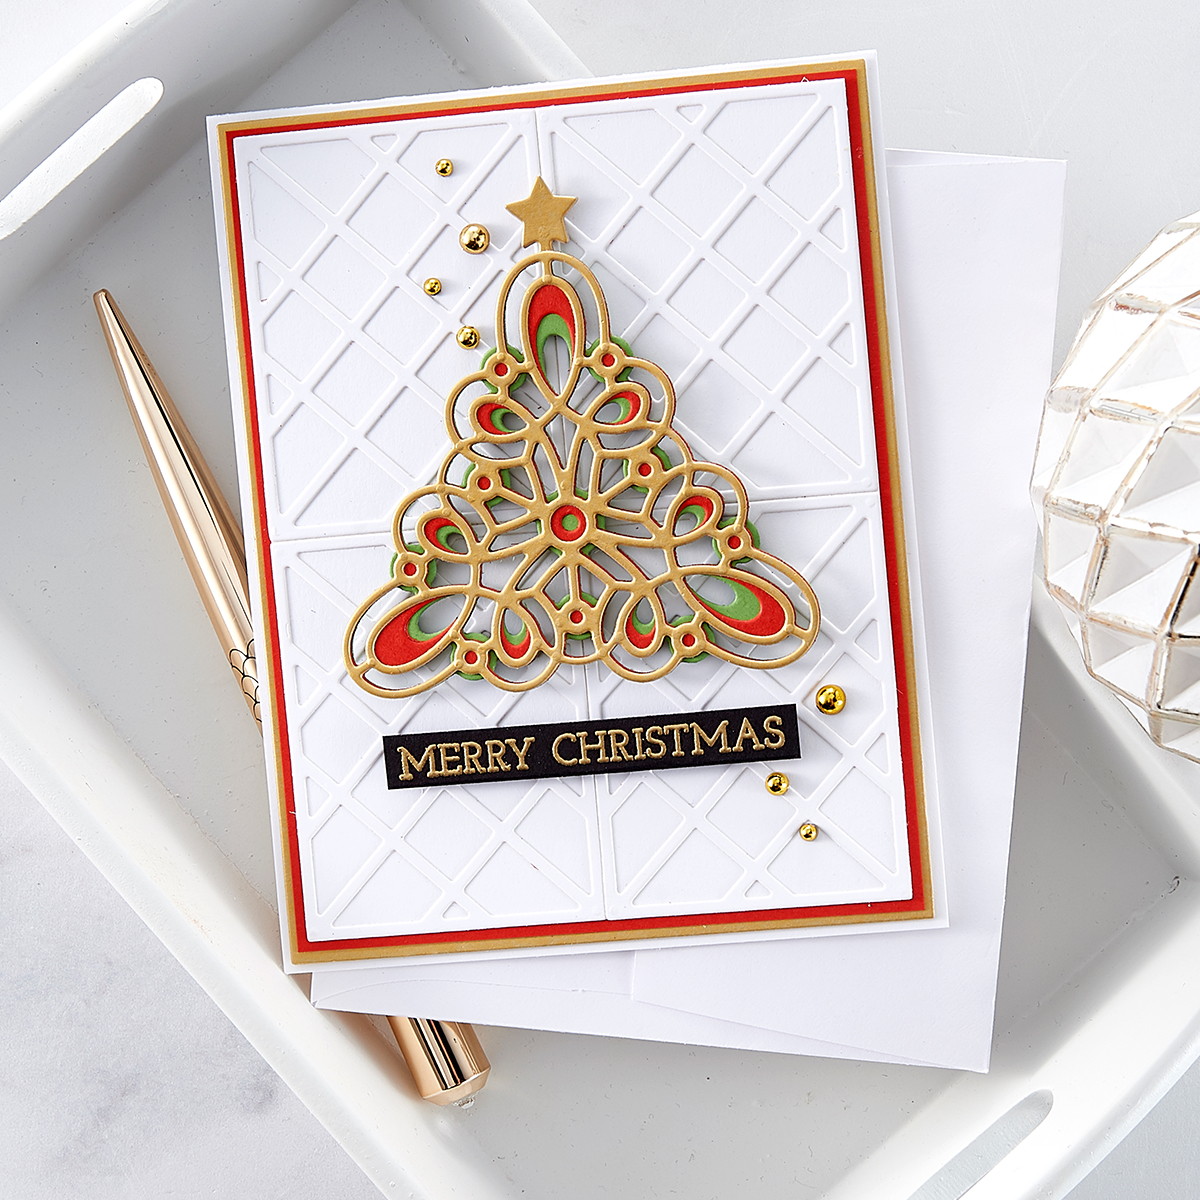
Finished Size: 4 1/4” x 5 1/2”
Instructions:
- Fold Whip Cream cardstock in half to create card base, adhere Brush Gold panel to card front and adhere Rich Coral panel to Brush Gold (set aside smaller Whip Cream panel).
- Add White Liner Sheet to back of Whip Cream cardstock, die cut (4) TOP layer(s) of Kaleidoscope Plaid die set; peel adhesive and adhere to reserved Whip Cream panel to create a lattice background, adhere finished background to Rich Coral panel on card front.
- Add White Liner Sheet to back of Limeade Splash, Rich Coral and Brush Gold cardstock and die cut each layer of Kaleidoscope Tree (see photo for color placement), layer and adhere together
Die cut star from Brush Gold cardstock and adhere finished tree and star to card front with foam adhesive. - Stamp “Merry Christmas” on Black Licorice cardstock using Clear Pigment ink, heat emboss with Gold Powder, trim sentiment and adhere to card front below tree
Embellish with Fashion Gold dots.
Supplies:
STAMPS: To You and Yours STP-023; DIES: Kaleidoscope Christmas Tree S4-1064, Kaleidoscope Plaid S4-1063; CARDSTOCK: Black Licorice CS-0003, Journey Brush Gold CS-0134, Whip Cream CS-0040, Limeade Splash CS-0020, Rich Coral CS-0093 INKS: Journey Gold Embossing Powder IP-0101, Clear Pigment Ink IP-0102; ACCESSORIES: Fashion Gold AC-0292; BASIC SUPPLIES: White Liner Sheets; AD-0113, White Liner Tape AD-0001, Easy Glide Permanent Adhesive Runner AD-0081, Journey Foam Squares Medium AD-0085, Journey Craft Glue AD-0111, Crease Tool TO-0040.
Very Merry Christmas Card

Finished Size: 4 1/4” x 5 1/2”
Instructions:
- Fold Whip Cream cardstock in half to create card base, adhere Brush Gold panel to card front and then adhere Rich Coral panel to Brush Gold (set aside Whip Cream panel).
- Add White Liner Sheet to the back of Electric Lime, Brush Gold and Rich Coral cardstock, die cut (4) layers from each color and adhere layers together (see photo for color placement).
- Adhere finished panels to reserved Whip Cream panel to create an all over plaid background; adhere to card front.
- Stamp “Have a Very Merry Christmas” to center of Black Licorice Die cut using Clear Pigment Ink, heat emboss with Gold powder.
- Adhere Brush Gold circle die cut behind stamped circle and adhere to center of card front using foam adhesive.
Supplies:
STAMPS: To You and Yours STP-023; DIES: Kaleidoscope Plaid S4-1063, Essential Circles S4-1039; CARDSTOCK: Black Licorice CS-0003, Journey Brush Gold CS-0134, Whip Cream CS-0040, Electric Lime CS-0123, Rich Coral CS-0093; INK: Journey Gold Embossing Powder IP-0101, Clear Pigment Ink Pad IP-0102; BASIC SUPPLIES: White Liner Sheets AD-0113, White Liner Tape AD-0001, Easy Glide Permanent Adhesive Runner AD-0081, Journey Foam Squares Medium AD-0085, Journey Craft Glue AD-0111, Crease Tool TO-0040.
Warm Holiday Wishes Project Kit – Video Tutorial
Watch video tutorial using this kit below or on Youtube:

One Comment
susieprovince
Beautiful! Never too early for Christmas ideas. Thanks and God bless.