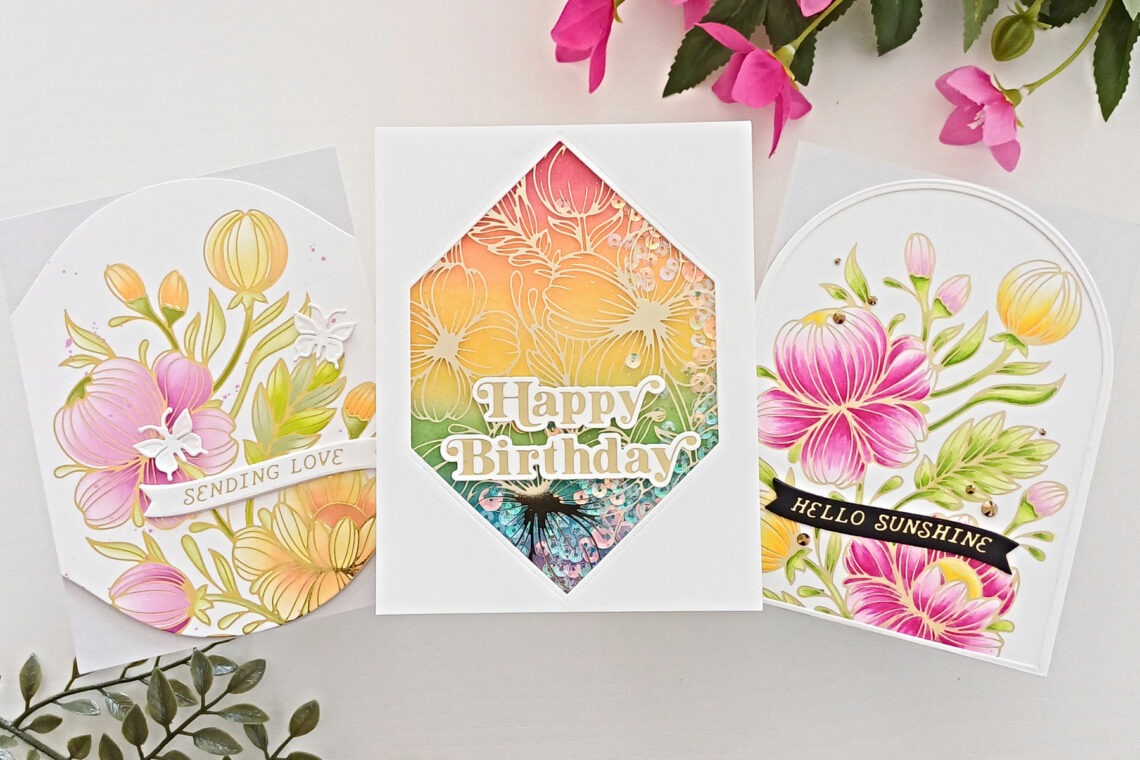
Sunny Floral Inspiration – Adding Colour and Using Shapes Three Ways
Hello there Spellbinders friends! This is Lisa Tilson from My Card Trip and I am thrilled to be back here again with you on the Spellbinders blog. Today, I have three cards to share with you using the Glimmering Flowers Collection. This collection consists of two floral glimmer hot foil plates which you can use on their own or you can use them with their coordinating layering stencils. There is also a new glimmer sentiment set which has lots of useful everyday sentiments in a fun curved banner design. I show three different ways of adding color to your card designs and I have kept my color palette similar on all three cards but the results are all quite different. I am also using three different shaped dies to draw focus to the flowers. These foiling plates are designed to fit an A7 size card but they can be used on other card sizes too. I use a standard A2 size on all three of my cards.
Hello Sunshine
For my first card, I am using alcohol markers and the Glimmering Peonies Glimmer Plate along with the Curved Everyday Sentiments Glimmer Plate and Die Set.
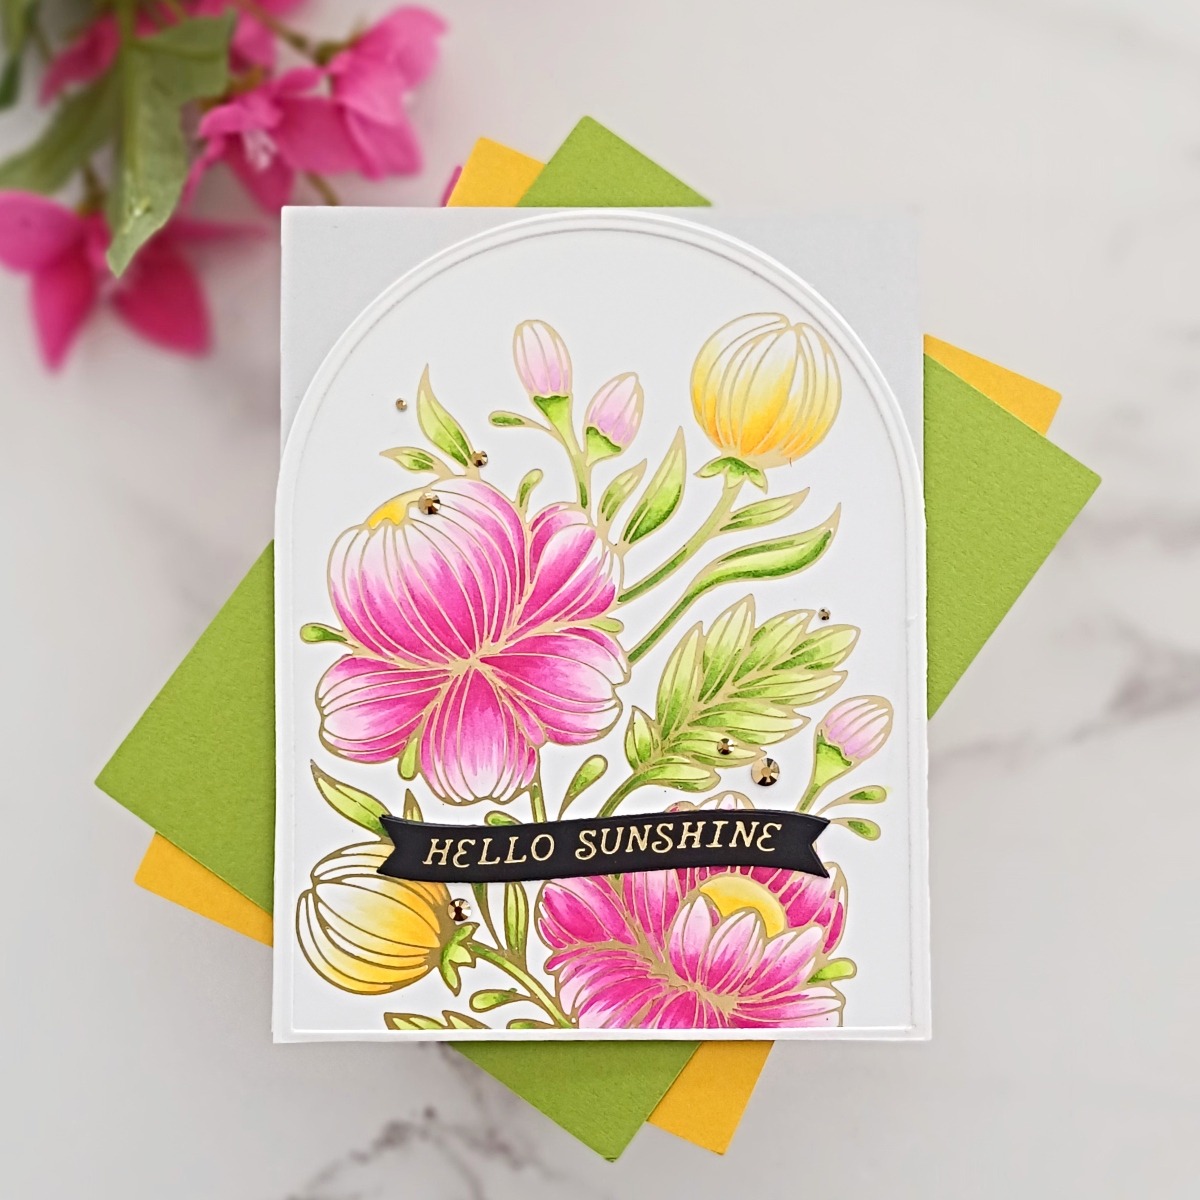
I started off my card by foiling the Glimmering Peonies Glimmer Plate onto some Hammermill cardstock using Matte Gold Glimmer Hot Foil and the Glimmer Hot Foil System. I then went to work with my Copics.
For my leaves, I went with one of my favorite green Copic combinations – YG17, YG03, and YG01. This cardstock is very smooth and Copics blend well on it. You will also find that in most cases your foil will resist alcohol markers but if some ends up sitting on the foil, just carefully dab it off with a cloth at the end.

The two large peonies were colored with a bright pink combination (RV17, RV09, RV06, RV04 and RV02). Getting a really smooth blend with this combination usually requires a little bit of work as the jump in color between RV06 and RV04 and RV04 and RV02 is quite large, but for the purposes of my flowers today, I went with a less blended look.
The smaller yellow/orange buds were colored with Y18, Y17, Y15, and Y13 and the small pink buds were colored using V04, RV02, and RV10.

Once I had finished the coloring, I took the largest arch from Essential Arches Etched Dies and cut the panel down. I adhered it to a panel of Fog Color Essentials Cardstock using Bearly Art Glue. I then cut a frame from white card using the two largest arch dies and I adhered that down on top. This panel was added to a 110lb white A2 notecard.
The sentiment is from Curved Everyday Sentiments Glimmer Plate and Die Set. This set comes with two glimmer plates which you can foil in one go and then cut out in one pass with the coordinating die. I foiled one set of the plates using Matte Gold Glimmer Hot Foil onto Onyx Color Essentials Cardstock and then die-cut them out with the coordinating die. I took the die and also cut it from a panel of Onyx card so that I would have extra banners to enable me to create a small stack.
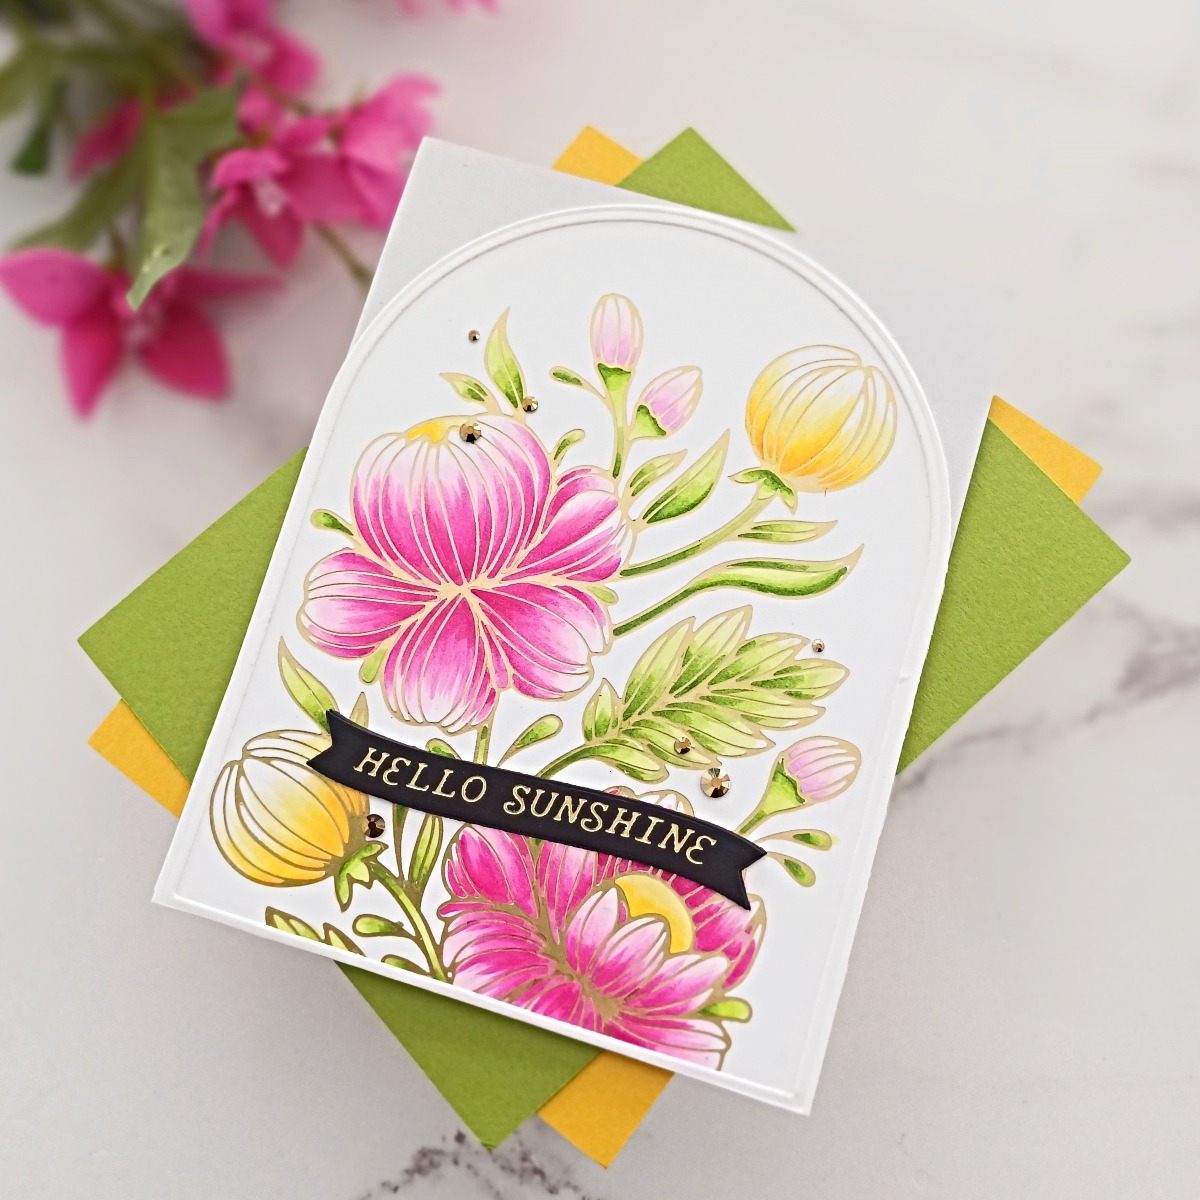
I adhered a plain black die cut onto the back of my foiled sentiment and adhered it down onto my panel using wet adhesive. I then finished by adding some Gold Mix Color Essentials Gems.
Happy Birthday
For my second card, I am using the Glimmering Buttercups Glimmer Plate and foiling it onto acetate. My color is added via a background panel and I turned the card into a shaker.
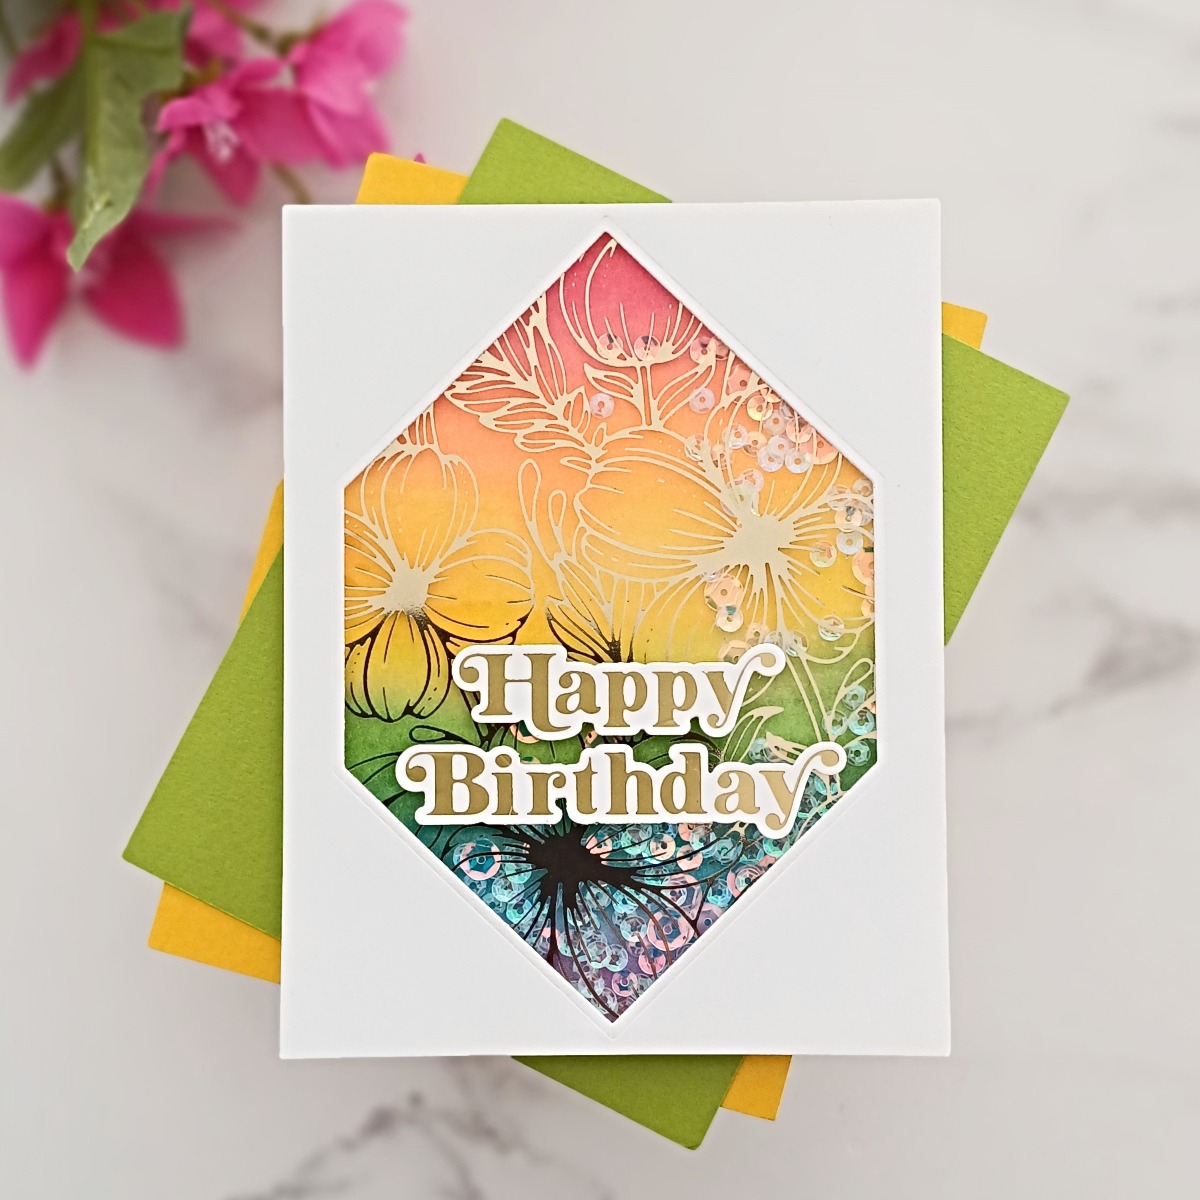
Whenever foiling onto acetate, you must use a heat-resistant acetate. It foils beautifully and the results are stunning! So, I took a piece of heat-resistant acetate and foiled it with Champagne Glimmer Hot Foil, and set it to one side. Even as a foiled image without any color whatsoever, this is a beautiful plate. I kept picking it up and staring at it! I think foiling is magical!
For my color, I created a watercolored panel using rainbow colors. For this, I used Tim Holtz Distress Watercolor Cardstock (smooth side) and I used a selection of pans from the Gansai Tambi Watercolor 36 set. I used 35, 33, 42, 51, 63 and 139 from top to bottom. I used a flat brush and the wet-on-wet technique for my first layer. I dried it with a heat tool and then went ahead and added a second layer. I then left the panel to air dry.
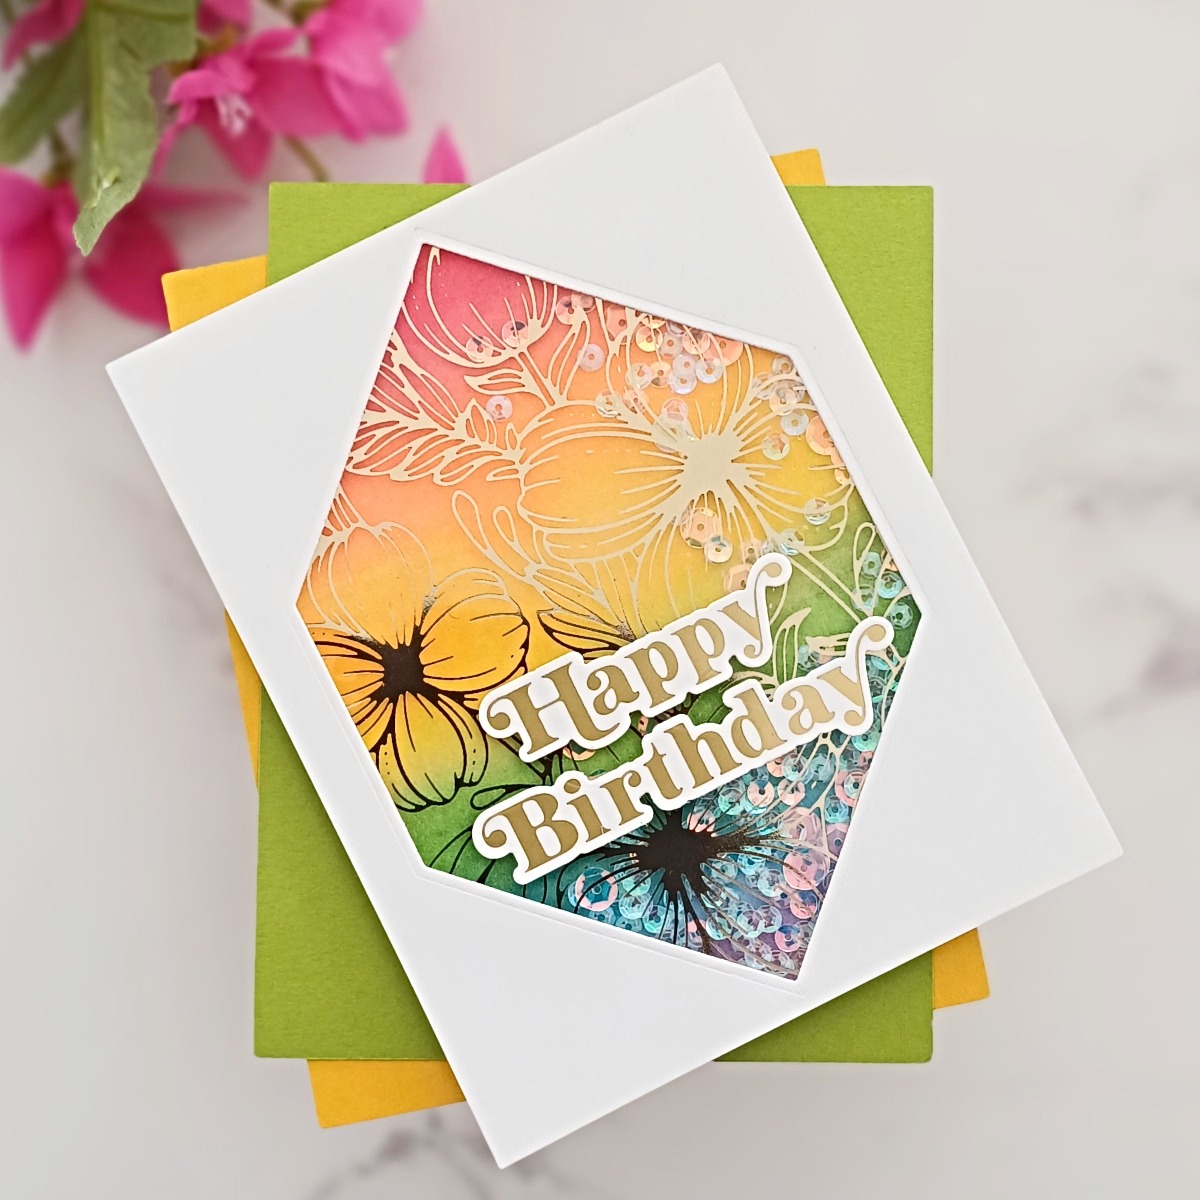
After it had dried, I added the panel to a top folding A2 110lb white notecard using Bearly Art Glue. I then took a panel of 80lb Neenah card and cut it with the second largest die from Essential Hexi-Gems Etched Dies. I added some glue to the back and then adhered my foiled acetate panel, cutting off any excess from the top and sides with scissors.
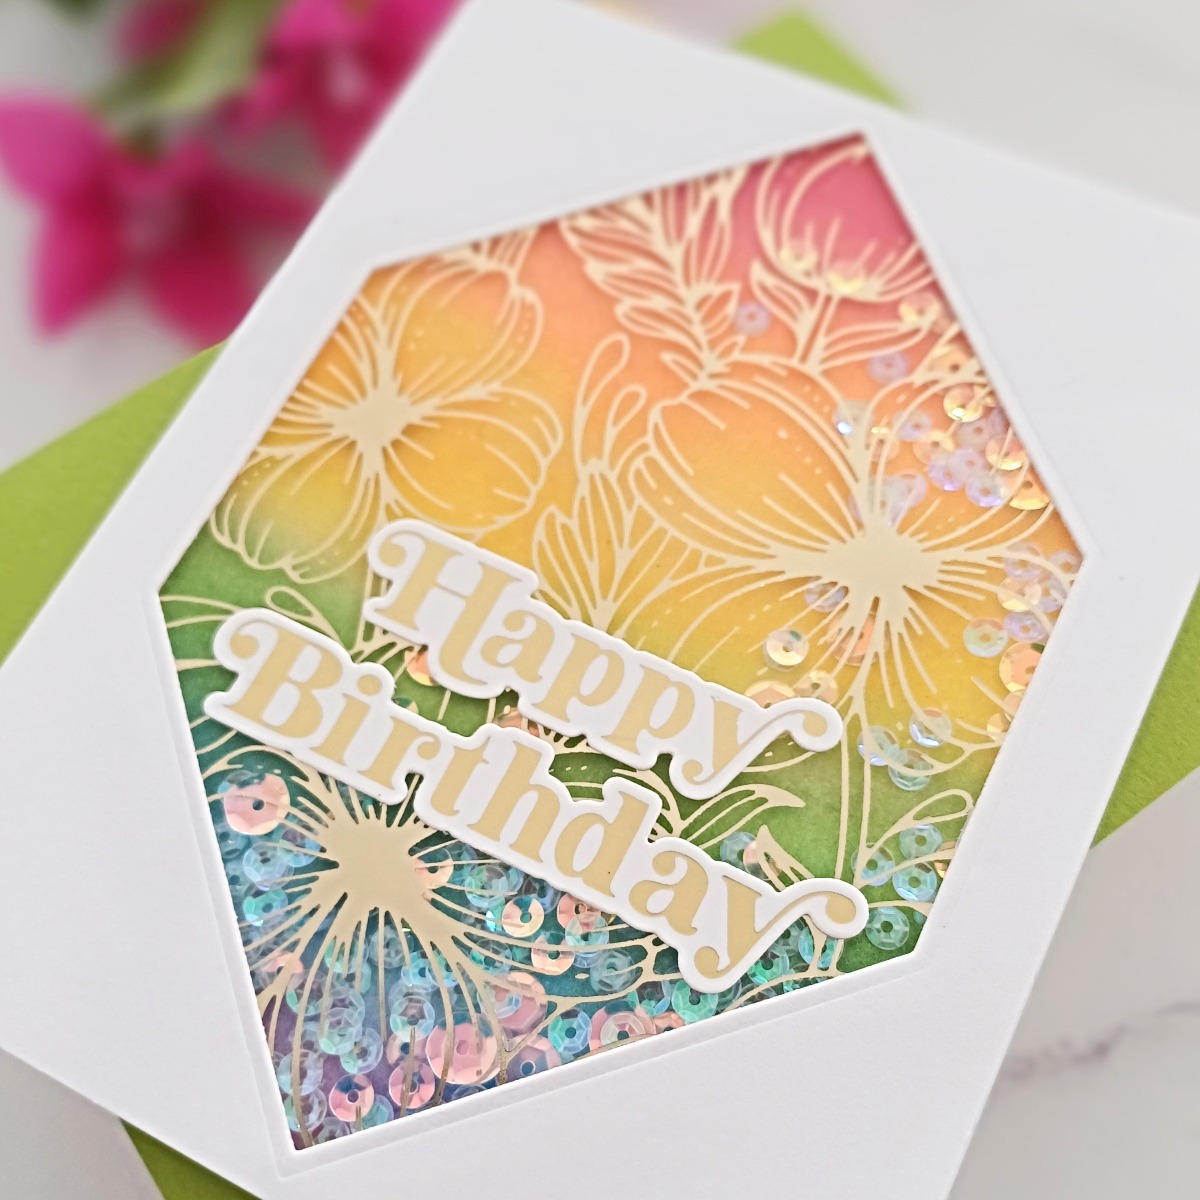
Next, I added some 3M Double Sided Foam tape to the back of this panel and set it one side. I took some iridescent sequins from my stash and placed a bunch of them down onto the watercolored panel. Then I removed the backing tape from the double-sided tape and placed the panel down over my sequins, trapping them inside.

To finish the card I used a sentiment from Be Bold Glimmer Sentiments Glimmer Hot Foil Plate and Die Set which had been foiled with Champagne Glimmer Hot Foil and cut out with the coordinating dies. The two were simply adhered onto the acetate using Bearly Art Glue. This card has quite a lot going on but the foiled acetate is stunning and shaker cards are always a fun surprise for the recipient.
Sending Love
For my final card, I am using the Glimmering Peonies Glimmer Plate and Stencil Bundle. Using the stencils with ink blending gives a more muted and softer look.
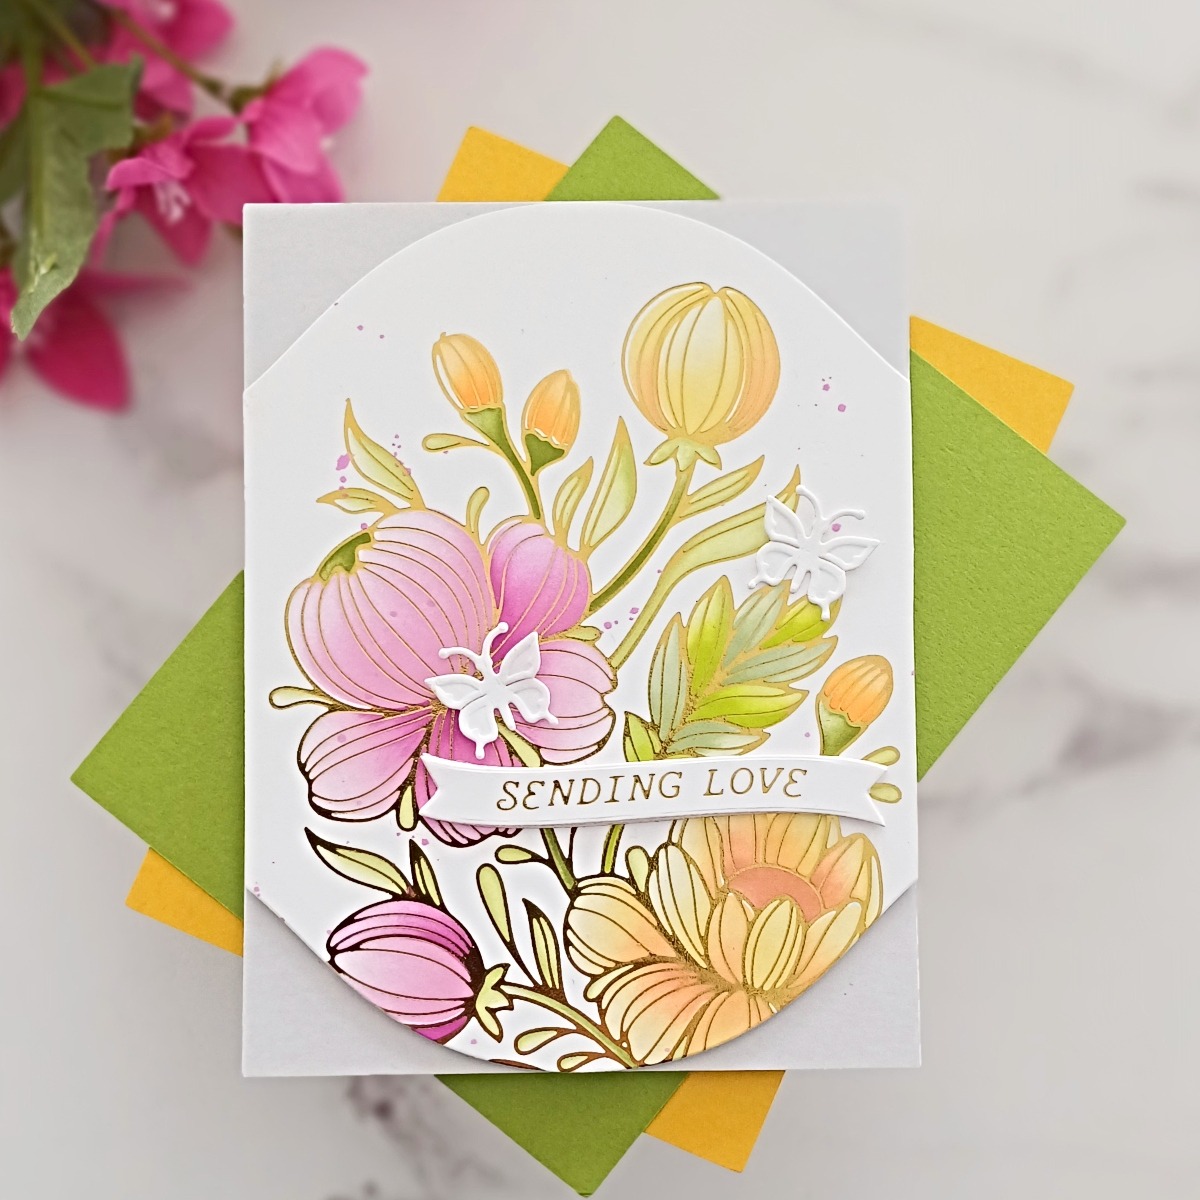
For this card, as I did for my first, I foiled the image onto Hammermill cardstock but this time I used Gold Glimmer Hot Foil. I find this gold quite bright normally and I don’t use it too often but I thought that it would work well with the softer inks and maybe highlight them a little bit more. In real life when you tilt the card, the gold is really striking and I love it!
After the foiling, the panel was placed onto a grip mat and I worked my way through the stencils. There are five and they are super easy to line up. To add the inks, I used a mix of large blending brushes and also some smaller shader brushes where I needed darker areas. I pretty much used Altenew inks for all of my ink blending except for one area where I had to revert to Distress Inks as I wanted a different yellow/orange).
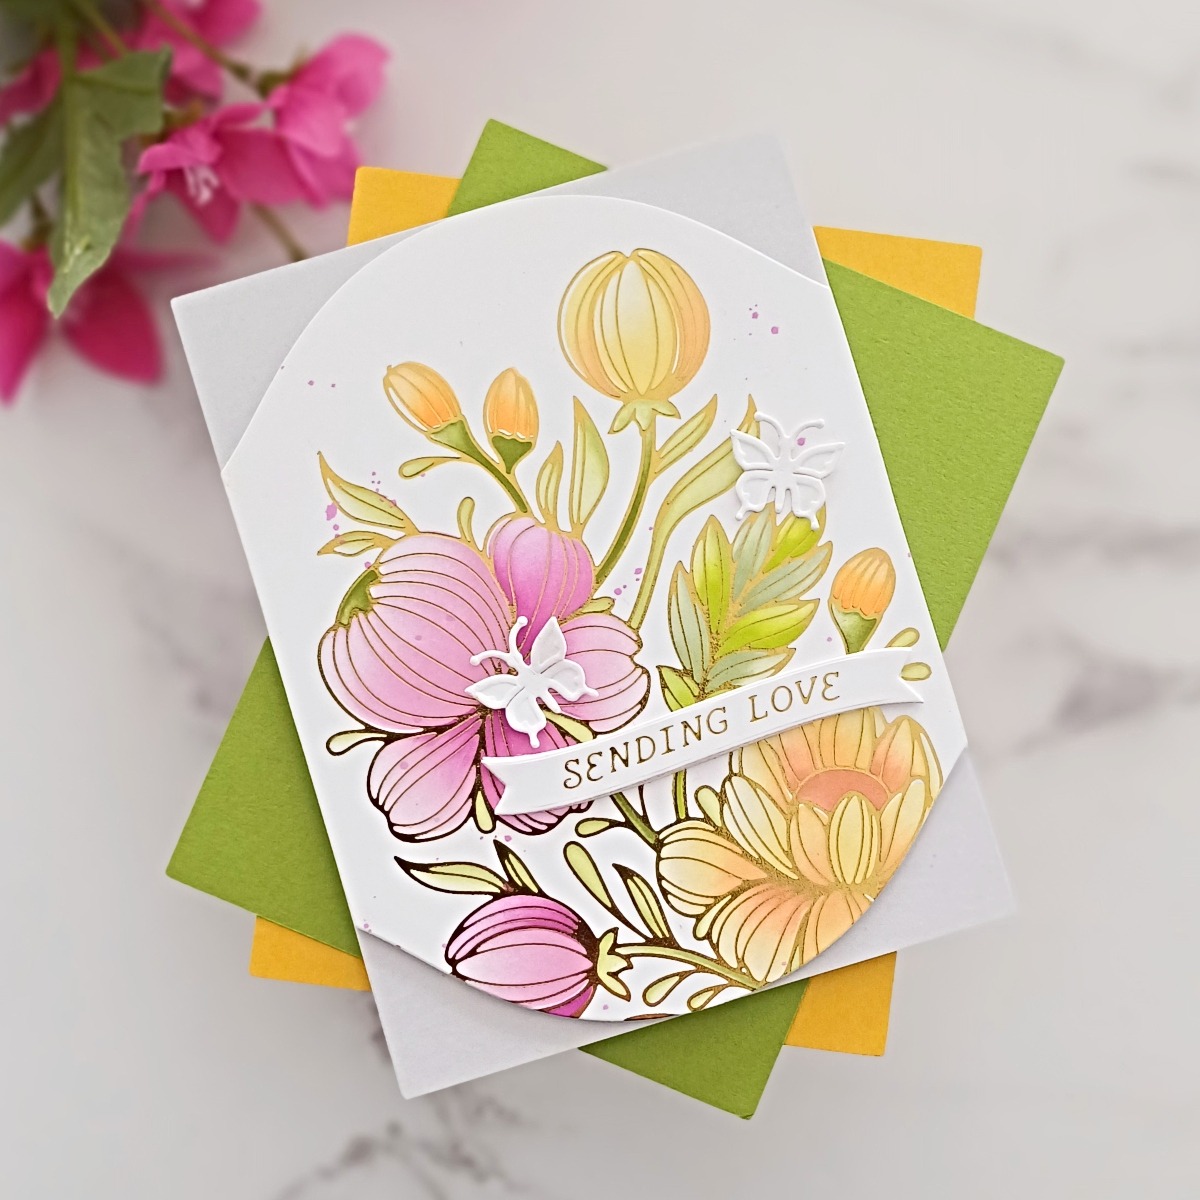
Layer 1 – I used my lightest colors for this layer which colors some of the leaves and some parts of the larger flowers. I used Pink Diamond (followed by Pinkalicious), Buttercream (followed by Warm Sunshine), and Bamboo (followed by Parrot).
Layer 2 – This stencil covers other parts of the larger flowers and I used some slightly darker inks here. Warm Sunshine (followed by Caramel Toffee) along with Rubellite (followed by Razzleberry)
Layer 3 – This layer covers the smaller buds, some other areas of the leaves, and the larger flowers. This is where I used some Distress Inks on the small buds. I used Dried Marigold (followed by Spiced Marmalade). Then I applied Frayed Leaf (followed by Forest Glades), Pink Diamond (and then Razzleberry)
Layer 4 – This stencil just adds a bit more detail to stems and one of the flower centers. I used Moss and Paper Bag inks here.
Layer 5 – This layer is the final layer on the leaves and I finished with some Bamboo ink here.
I then smooshed some Razzleberry ink onto my glass mat, spritzed it with water, and splattered some drops over the panel using a No 2 round brush.
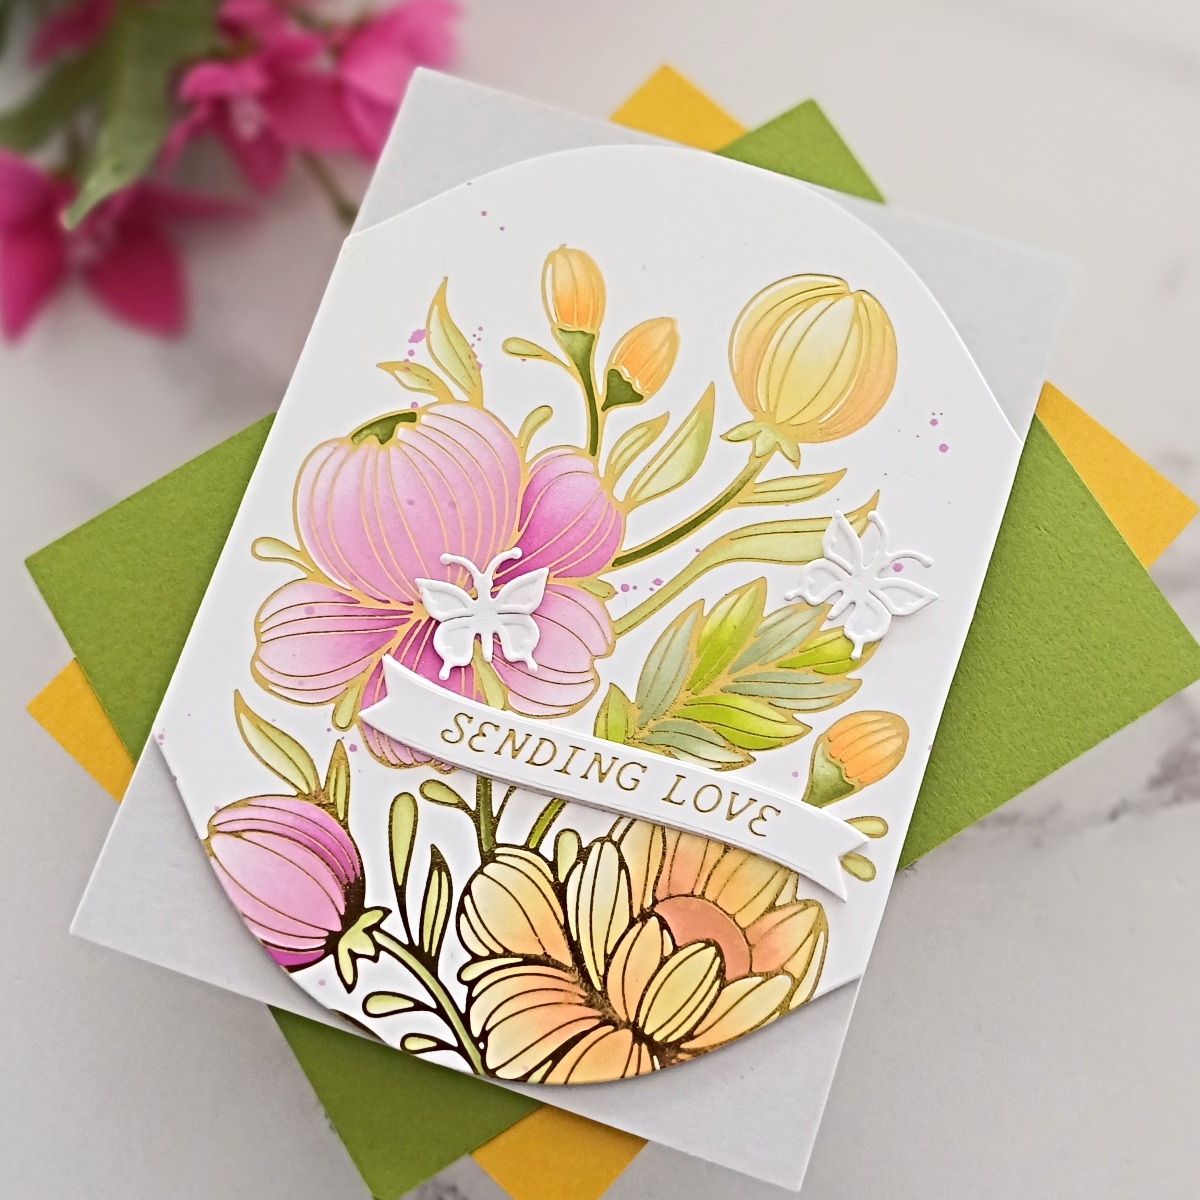
Once the panel had dried, I cut it out with the largest die from Mirrored Arch Labels Etched Dies. I cut another two panels of card using a slightly smaller die and adhered them to the back of my colored panel to give it some dimension before I added it onto an A2 panel of Fog Color Essentials Cardstock. This in turn was then added onto a 110lb A2 white notecard.
The sentiment is from Curved Everyday Sentiments Glimmer Hot Foil Plate and Die set and it was foiled with Gold Glimmer Hot Foil onto white card and cut out with the coordinating die. I added a few extra layers of plain white card behind and adhered it to my panel using Bearly Art Glue.
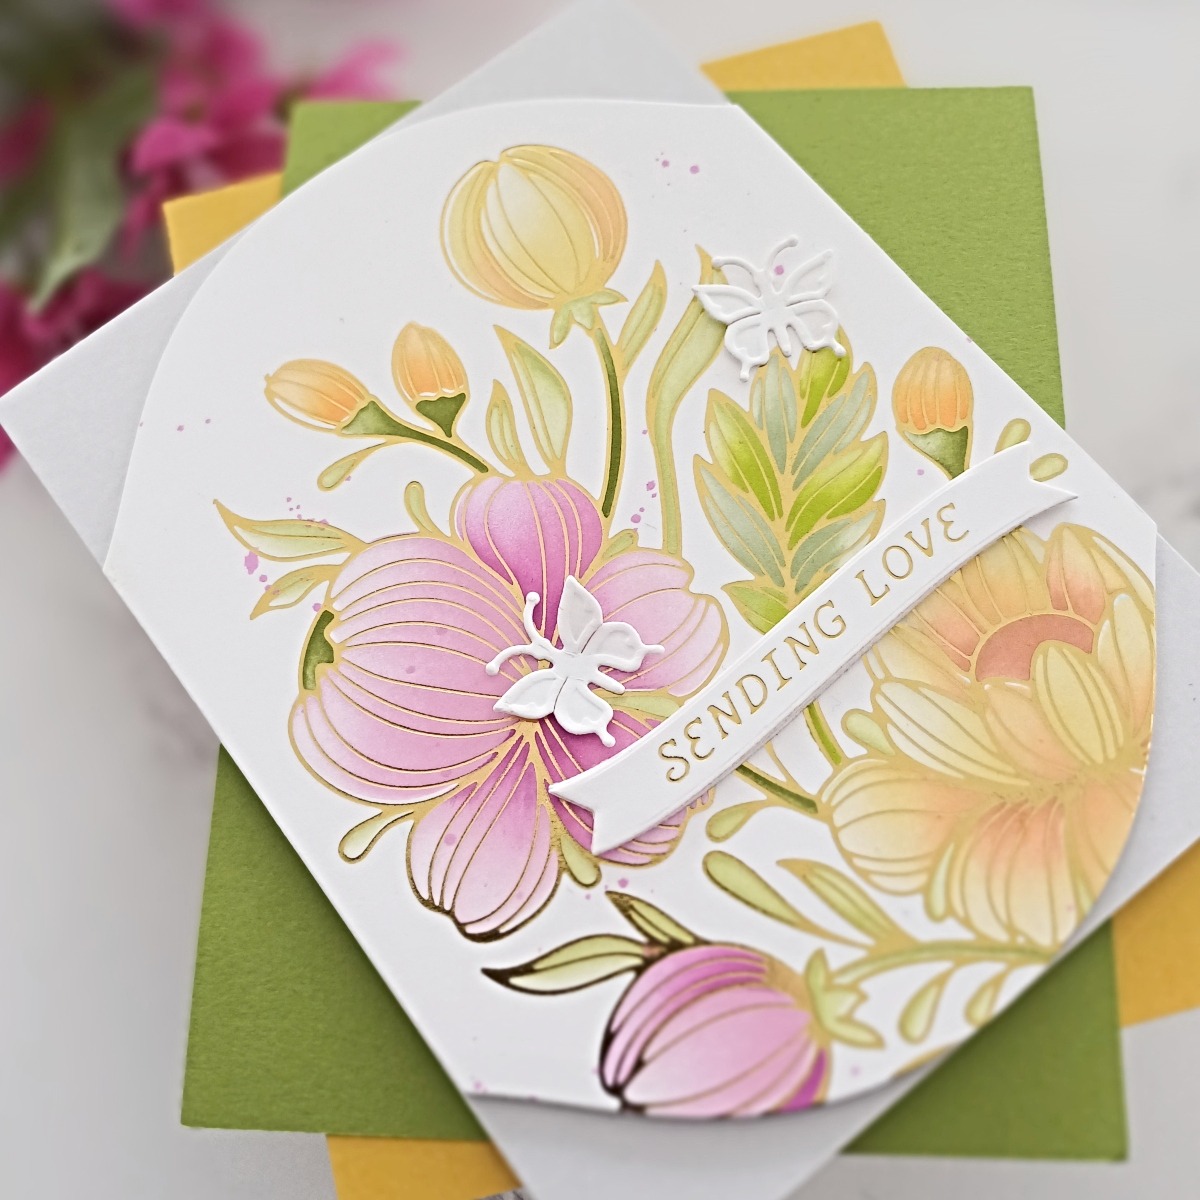
To finish I die cut a couple of butterflies from Hummingbird and Lily Etched Dies and added them just above the sentiment.
I hope that you like today’s cards and that they give you some ideas for creating with this pretty collection! If you would like to see more of my cards, I would love to have you join me over on my blog, Instagram, Facebook or YouTube. In the meantime, thank you so much for joining me here on the blog today. I hope that you have a fabulous day!
Spellbinders Supplies:

Other Supplies
Neenah Solar White Classic Crest 80lb and 110lb, Hammermill Premium Color Copy Cover Cardstock 100lb 8.5” X 11”, Tim Holtz Distress Watercolor Cardstock, Waffle Flower Grip Mat, Hero Arts Blending Brushes, Waffle Flower Shader 0 Plus Brushes, Altenew Inks (Cherry Blossom, Summer Afternoon, Green Fields, Tropical Forest), Dried Marigold Distress Ink, Spiced Marmalade Distress Ink, Picket Fence Studios Iridescent Moonshine Sequin Mix, Heat Resistant Acetate, Kuretake Gansai Watercolor (36 set), 3M Double Sided Foam Tape, Hero Arts Tweezers, Copic Markers,
One Comment
Aileen Ryan
Three absolutely stunning creations Lisa. I love flower cards as you know and these all thick every box for me. Perfection xx