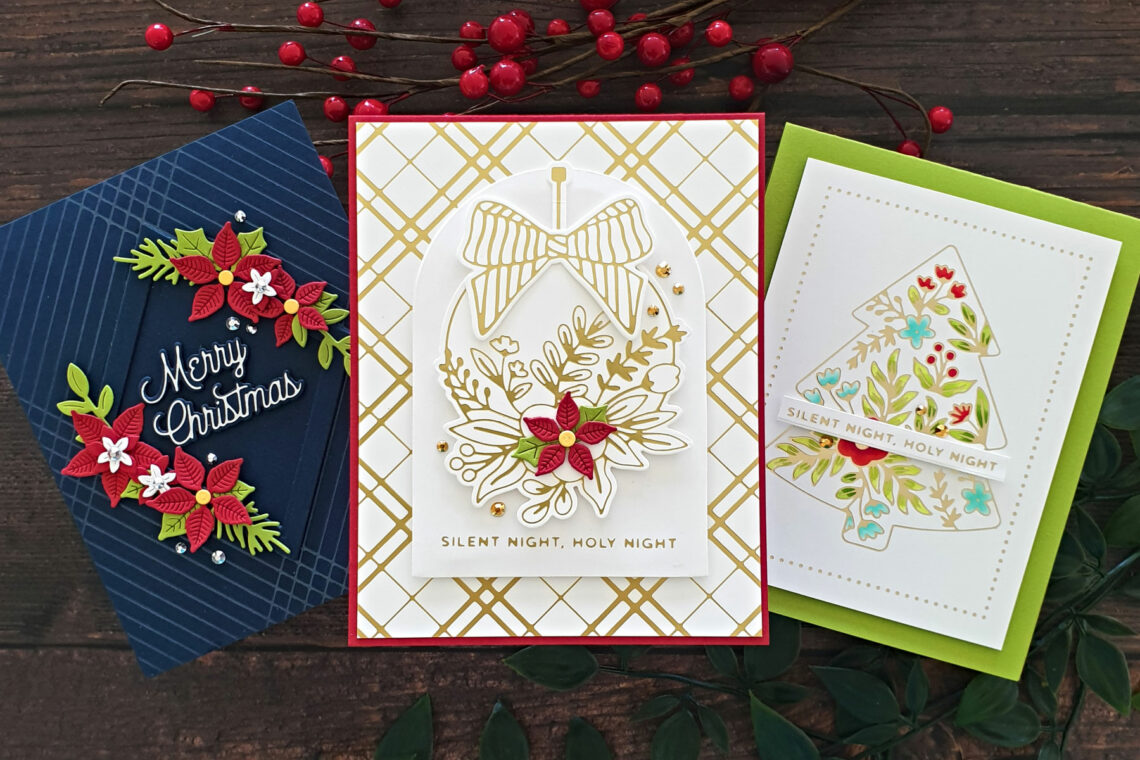
Foiled Glimmer Greetings Cards with Lisa Tilson
Hello everyone, this is Lisa Tilson from My Card Trip and I am thrilled to be a guest on the Spellbinders blog today. I will be showcasing the fabulous new Glimmer Greetings collection and have three cards to share with you. The collection is beautiful of course and you can have a lot of fun with it! Included are two gorgeous glimmer cover plates, a glimmer ornament, a glimmer tree, and two new solid shapes which enable you to get even more out of your foiling. That’s always a good thing, right? Also included are two nesting die sets which work in conjunction with your new solid shapes. So, put on some Christmas music, and let’s get started with the cards!
Silent Night Holy Night
I began by foiling the Plaid Tidings Background onto some Specialty Cardstock using Matte Gold. I love this cardstock as it really does make your foiling super easy as you get a perfect result almost every single time. If you do get any over foiling, then you can use a sand eraser to lightly rub it off. I then took another piece of Specialty Cardstock and foiled a sentiment from Yana’s Christmas Sentiments onto it, again with Matte Gold foil. This was then cut with an Essential Arch die and set to one side.
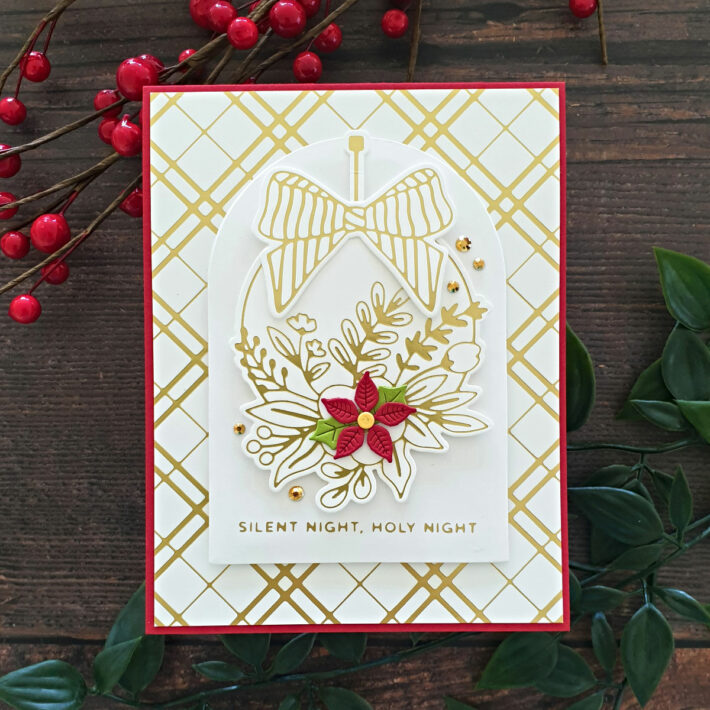
I repeated the process with the Blooming Ornament foil plates and cut the pieces out with the coordinating dies. The Blooming Ornament set contains the bauble, string, and bow and you have dies to cut each part out. I think this is such a pretty foil plate that looks beautiful just foiled or you could color it with alcohol markers. Either way, it’s a stunning focal point. So, with all three pieces cut, I then adhered them using some wet adhesive and set them aside whilst the glue dried.
To assemble the card, I trimmed the background down a little bit with a paper trimmer and adhered it using double-sided tape onto an A2 top folding base card that I had created with Phone Booth cardstock. The arch was then added on top with foam tape, followed by the ornament, also with foam tape. The ornament string is adhered at its tip with glue.
For a pop of color, I took the Christmas Blooms set and die-cut the flower from Phone Booth, the holly leaves from Rainforest, and the flower center from some yellow cardstock. I assembled the flower and popped it onto the ornament. To finish the card, I added a selection of gold jewels.
Merry Christmas
For my second card, I went with a much darker color palette! I do love white and gold but I also love navy and silver together, so that was what I opted for on this card. I began by taking a panel of navy cardstock and foiling it with the Crossed Lines Cardfront glimmer plate and some Opal foil. If you haven’t tried Opal foil, you must! On a light-colored card, it gives a really beautiful subtle foil which can even look like you have just scored your card, depending on the color you use and the light in the room. On navy, it shows up more but it isn’t quite as prominent as silver for instance. I use it a lot on my cards.
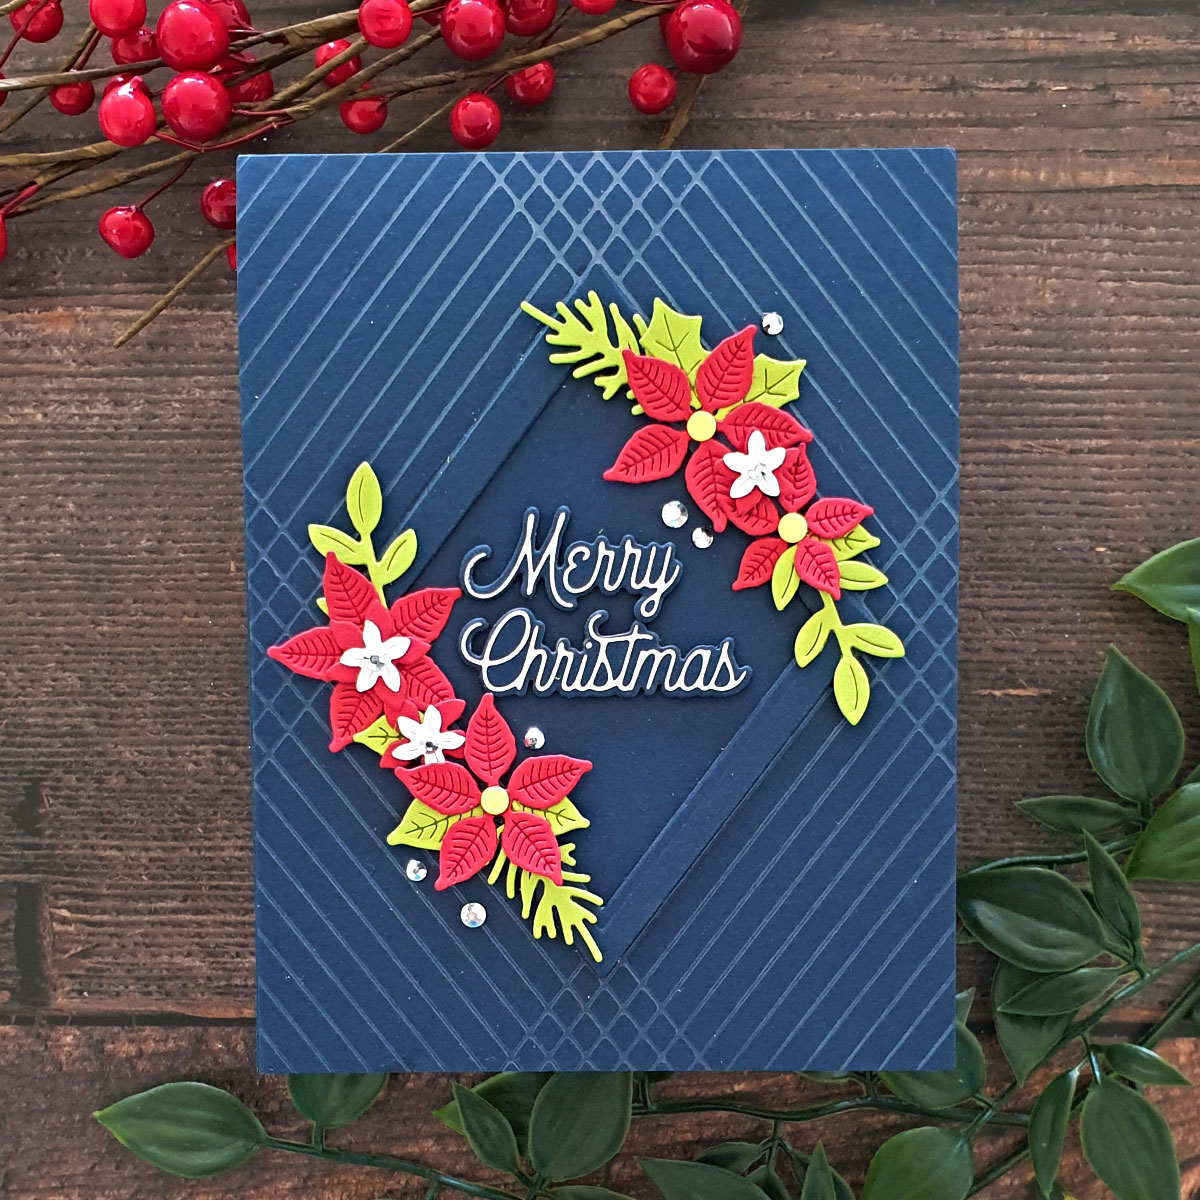
Next, I took the Essential Diamonds dies and die-cut a diamond frame twice from navy cardstock. They were adhered together to form a stack and then added onto the background panel. I added the background onto a top folding navy heavyweight card base at this point too.
For the greeting, I took the “Merry Christmas” from Merry Glimmer Sentiments and foiled it onto navy card using Matte Silver foil and then cut it out with the coordinating dies. I took the same coordinating dies and die-cut two more layers from navy cardstock and glued them all together to form a small stack. This gives the sentiment some solid dimension and beats fiddling round with little pieces of foam tape! This was then adhered into the center of the diamond.
For my flowers and leaves, I used the gorgeous Christmas Blooms set again. The flowers were cut from Phone Booth and Neenah 80lb card. The foliage is die cut from Rainforest cardstock and the flower centers from yellow cardstock. All the elements were adhered together and then added around the diamond frame, either with foam tape or directly onto the panel.
To embellish the card, I added some jewels onto the white flowers and around the panel.
Christmas Blooming Tree
This is definitely the simplest to create of all three cards I have to share with you but I love how pretty the foiling looks with the Copic coloring!
I started off by foiling an Essential Glimmer Rectangle onto some 130lb white cardstock using Champagne foil. I absolutely adore Champagne foil, it is one of my most used foils and I also love the dotted detail you get with the rectangle. It adds such a pretty detail to any panel.
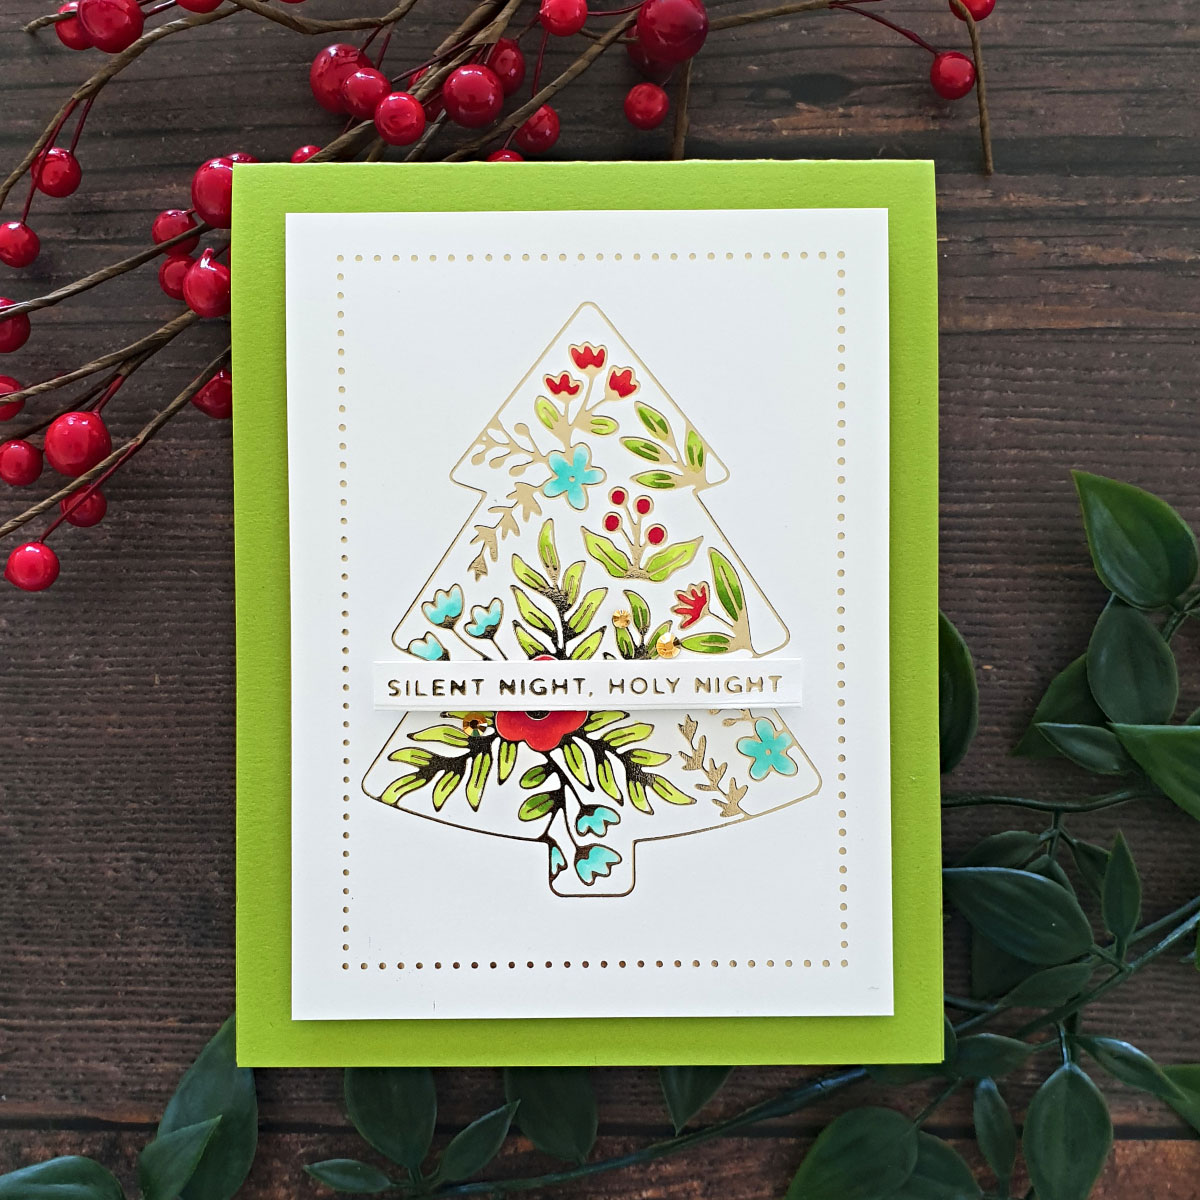
Next, I took the Blooming Tree glimmer plate and centered it within the rectangle. Using some Best Ever Craft Tape to hold it in place, I then added my Champagne foil under the plate and foiled as I would normally. You could have foiled the rectangle and the tree at the same time but as I am still learning about foiling, I seem to do everything the slowest way possible!
Using Copic markers, I did some very basic coloring on the image. Like the Blooming Ornament, the Blooming Tree also has the gorgeous outline floral and foliage detail which looks fabulous on its own or colored in. However, with the Blooming Tree set, you also have some smaller glimmer plates which you can use to add foiled flower and foliage accents to the tree if you want. I have listed the Copic numbers below in case you want to know what I used.
I foiled a sentiment from Yana’s Christmas Sentiments using Champagne Foil and some 130lb white cardstock. I trimmed it out with the sentiment die from Yana’s Tiny Sentiments before adding it across my tree with foam tape. I adhered a few gold jewels for some extra detail. To finish, the panel was popped up onto a top folding A2 Rainforest note card using foam tape.
Copic Markers: Leaves (YG01, YG03) (YG03, YG17), Flowers (BG32, BG11) (R29, R27) (R27,R24)
Spellbinders Supplies:

Other supplies
Yellow cardstock, Adhesive, Foam Tape, Double Sided Tape, Embellishment Wand, Little Things from Lucy’s Cards – Gold Mix Jewels, Paper Trimmer, Die Cutting Machine, Tombow Mono Sand Eraser, Little Things from Lucy’s Cards – Platinum Jewel Mix, Neenah Solar White 80lb, Concord & 9th Midnight cardstock, Hero Arts Nautical, Concord & 9th Buttercup cardstock, Simon Says Stamp 130lb white cardstock, Copic Markers.
I hope that this gives you some ideas for this lovely collection. To see more inspiration from me, you can find me over on my blog, Instagram or Pinterest. Thank you so much for joining me today on the Spellbinders blog. I hope that you have a great day!


One Comment
Delia Wilkes
Gorgeous cards. Thank you for the inspiration ❤️