Beat the Winter Blues with Flowers From the Garden
Hi friends! Emily Midgett here on the Spellbinders Blog today, and I’m super excited to be sharing some soft and elegant inspiration using the stunning new From the Garden collection by Wendy Vecchi. I am a sucker for anything floral, and these beautiful floral images from this collection have stolen my heart! Let’s get started with the details.

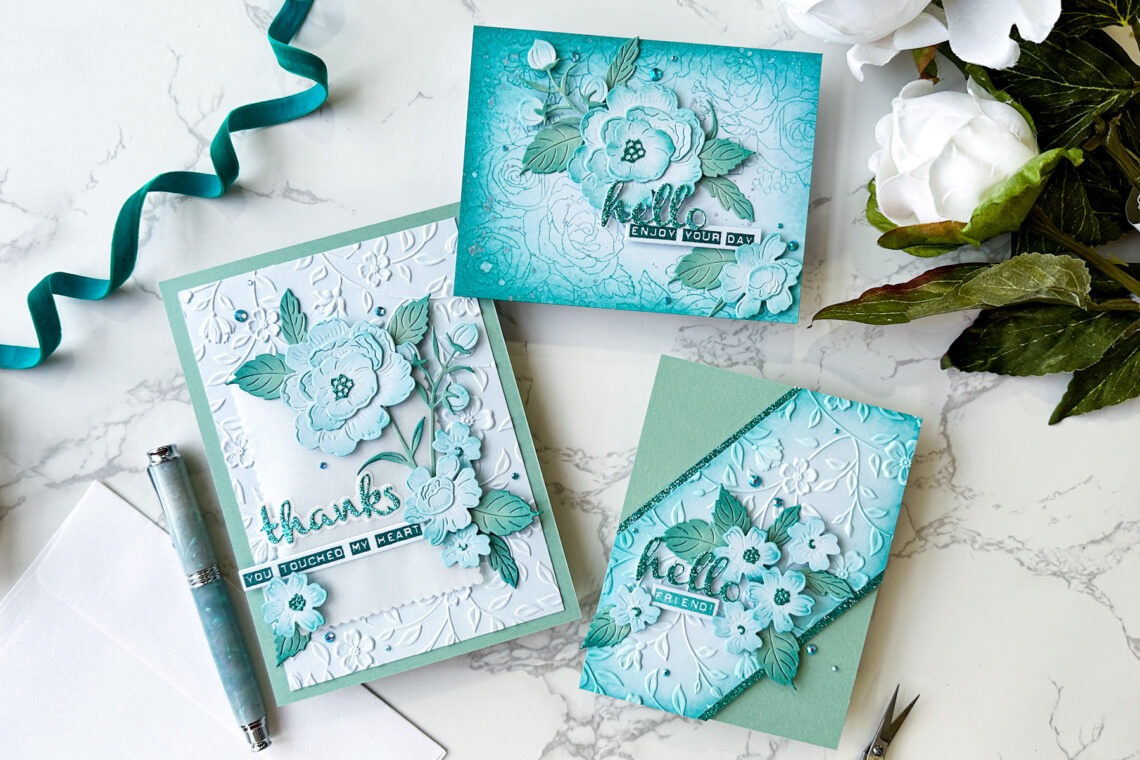
Whenever I am working with a group of coordinating products, I find it such fun to create a coordinating card set using similar colors but tweaking the layout and products used. Keeping the color scheme the same throughout the set helps keep everything cohesive! Blue is one of my favorite colors, in fact, the walls on most of my house are painted some shade of blue, but I forget when working with floral images that I don’t have to stick to traditional pinks and purples. I thought I would rectify that oversight by going all in with a gorgeous Glacier and Sage color palette for my trio of cards!

For my first card, I used the bouquet image from the Garden Party Clear Stamp set to stamp a subtle, tone-on-tone border around the edge of my A2 panel, softening it with some ink blending and splatters, then adding some die-cut flowers and sentiment over the top.
- Stamp the bouquet image around the edge of the A2 panel using a similar shade of ink, rotating the stamp each time so as to create a unique pattern.
- Using the same shade of ink, lightly blend around the edges to soften the pattern, then splatter with sparkling watercolors if desired.

- Die cut the flowers from the Vintage Florals die set from Glacier cardstock and the foliage from Sage cardstock.
- Lightly blend around the edges of the die cuts using the same shade of light aqua ink used on the card front. Assemble.
- Die cut the greeting using aqua glitter paper, then stamp the sentiment strip using a greeting from the Garden Party stamp set and die cut with the coordinating die.
- Arrange the flowers and greeting components on the blended card front, adding some Aquamarine AB gems for extra sparkle!

For my second card, I used the same colors and Vintage Florals die set, but altered the layout, juxtaposing the soft floral theme with a bold diagonal stripe.
- First, emboss a panel of Glacier cardstock using the Flowers & Foliage 3D Embossing Folder, then use a trimmer to trim off the corners, creating a diagonal stripe.
- Ink blend around the edges of the embossed panel using pale aqua ink, then lightly swipe a white pigment ink pad over the raised areas to add extra emphasis on the raised pattern.
- Add strips of aqua glitter paper on each long side of the embossed panel, then mount to an A2 panel of Sage cardstock.

- Die cut some of the smaller, single-layer flowers from the Vintage Florals die set from more Glacier cardstock, as well as foliage from Sage cardstock.
- Lightly ink blend more pale aqua ink around the edges of the die cuts to add more dimension.
- Die cut the “hello” greeting from Vintage Florals using aqua glitter paper and stamp a sentiment from Garden Party, die cutting it with the coordinating die.
- Arrange the flowers in a cluster around the sentiment, popping them up with foam adhesive.
- Add a few Aquamarine AB gems for extra sparkle.

For my last project, I wanted to take advantage of the large size of the Flowers & Foliage 3D Embossing Folder to create a 5×7 card.
- First, trim down a panel of Glacier cardstock to 4.5 x 6.5” and run it through your Spellbinders Platinum 6 using the Flowers & Foliage 3D Embossing Folder.
- Mount the embossed panel in the center of a full size A7 panel of Sage cardstock using strong double sided adhesive.

- Die cut the flowers and foliage from the Vintage Florals die set using more Glacier and Sage cardstock, blending around the edges to add extra definition.
- Die cut a scalloped rectangle from Heartfelt Thanks and Scallops using pearlescent vellum for a soft look.
- Die cut the “thanks” greeting from Heartfelt Thanks and Scallops, cutting the detail layer from aqua glitter paper and the outline layer from more pearlescent vellum. Stamp the greeting from Garden Party and die cut with the coordinating die.
- Before adhering the vellum scalloped rectangle to the embossed panel, arrange the greeting and floral die cuts on the panel, adhering them with foam adhesive.
(TIP: to keep your semi-transparent vellum clean, hide your adhesive by adhering your solid die cuts to the vellum first, then flipping the whole thing over and adding your adhesive behind the solid die cuts!)
- Adhere your embellished scalloped rectangle to the card front, orienting it to the bottom left-hand side.
- Add a few more Aquamarine AB gems for sparkle!
Well, that’s all for these projects. I am in love with the classy, elegant aesthetic that these cards have! It’s been such a pleasure to play with them and create this card set. If you’d like to see more of my work, you can check out my blog over at EmilyMidgett.com or find me on Instagram as @eamidgett. Thanks so much to Spellbinders for having me as their guest to play with this beautiful collection of products, and thank you for reading! Have a marvelous day, friends!
Spellbinders Supplies:

Other Supplies
Simon Says Stamp Pawsitively Saturated Ink, Tonic Turquoise Lake Glitter Cardstock, Tonic Pearled Silver Vellum paper, handmade glitter watercolors (for splattering), Foam Adhesive
2 Comments
Amy Donohue
These are so beautiful! I love the cards so much that I just bought the whole “From the Garden” release! (Gulp!). I know I am going to love it all. And I got the Garden Party stamps, stencils and dies so I know it will make lots of varied cards – in addition to your monochromatic ones. Thanks so much for the inspiration, Emily! I am excited!
Pat
These cards done by Emily Midgett are stunning! Buying all the supplies! That doesn’t happen very often. Thanks Spellbinders .