A Fresh Look At Your Dies Using Old Techniques
Hello, friends! It’s Savannah O’Gwynn from Savannahland2. I’m honored to be sharing some of my ideas using the Spellbinders Monster Birthday collection die sets.
#SAVfact: If you know me, then I have MORE ideas to share than I can fit in one blog post!! In hopes to keep this post short, I have decided to use some OLD craft/cardmaking techniques to create FRESH card designs.
We will see how “short” this post will be! Either way- be sure to scroll and read through for lots of inspiration, several tutorials, and lots of tips and tricks!

Grab this collection and join me in making some interactive and fun cards for just about anyone! I’ve shared two cards and a tutorial for each technique, as well as an inspired bonus card and technique at the end!
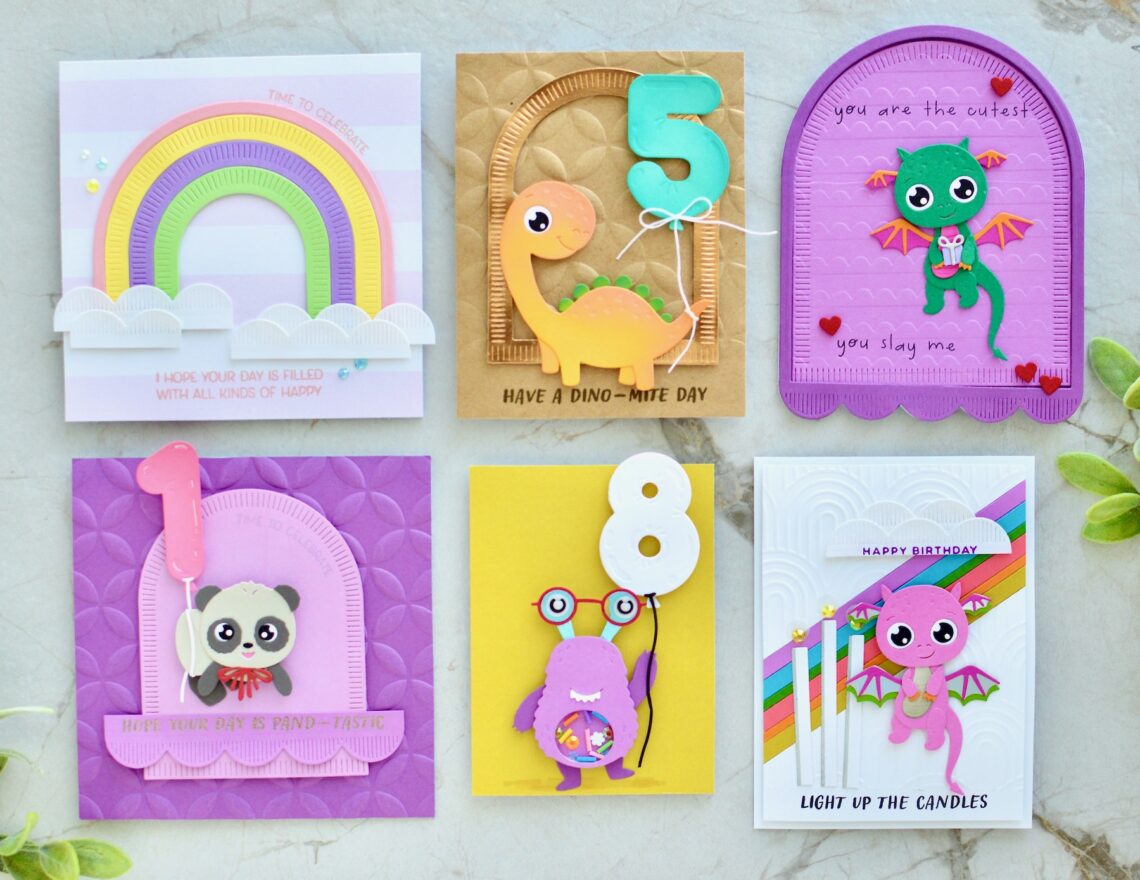
Stretching Dies: Arches into Rainbows
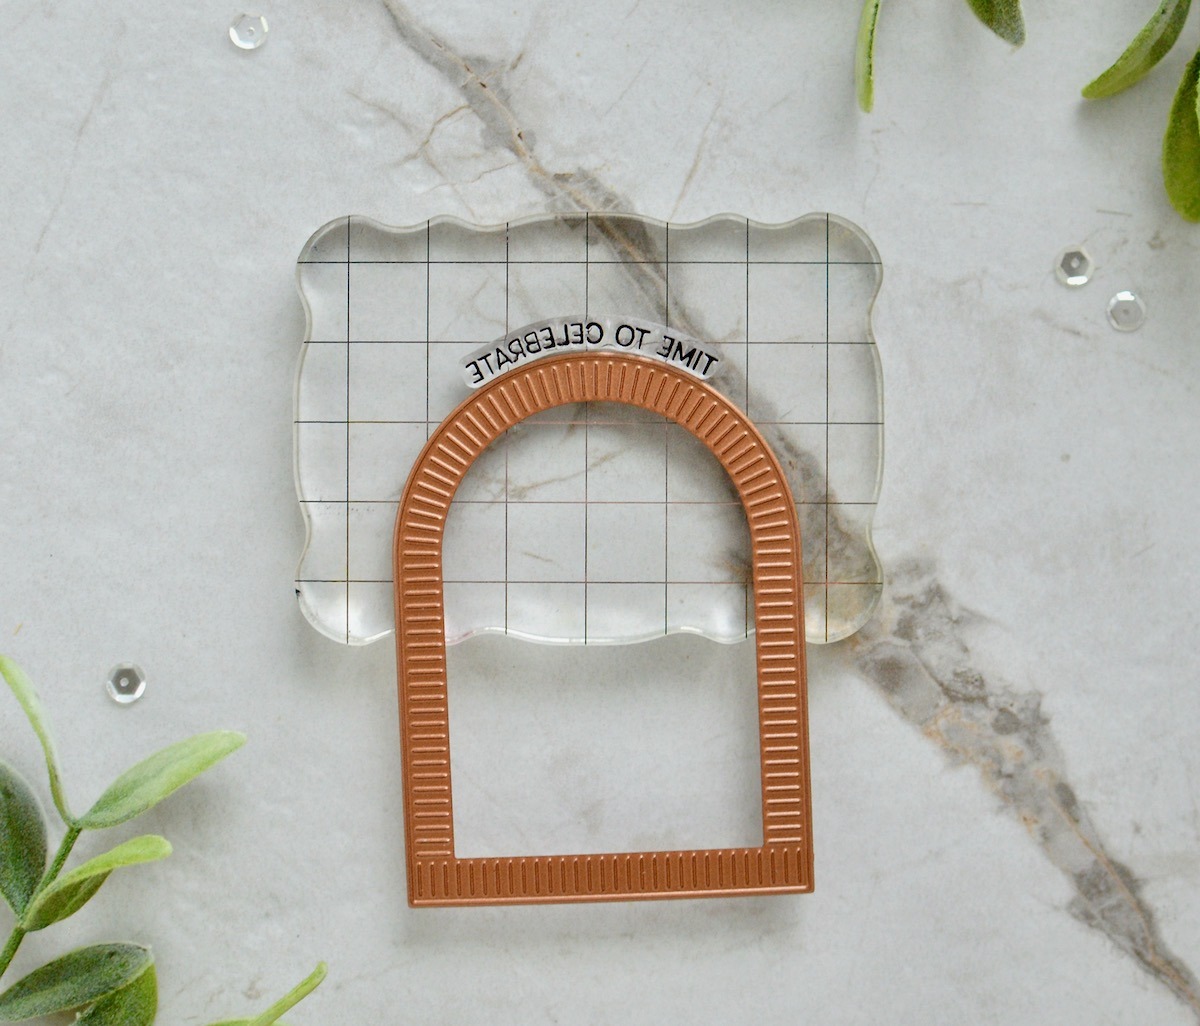
The Make A Wish Arch Label dies are beautiful as is… however, let’s stretch our supplies and make them into a rainbow!
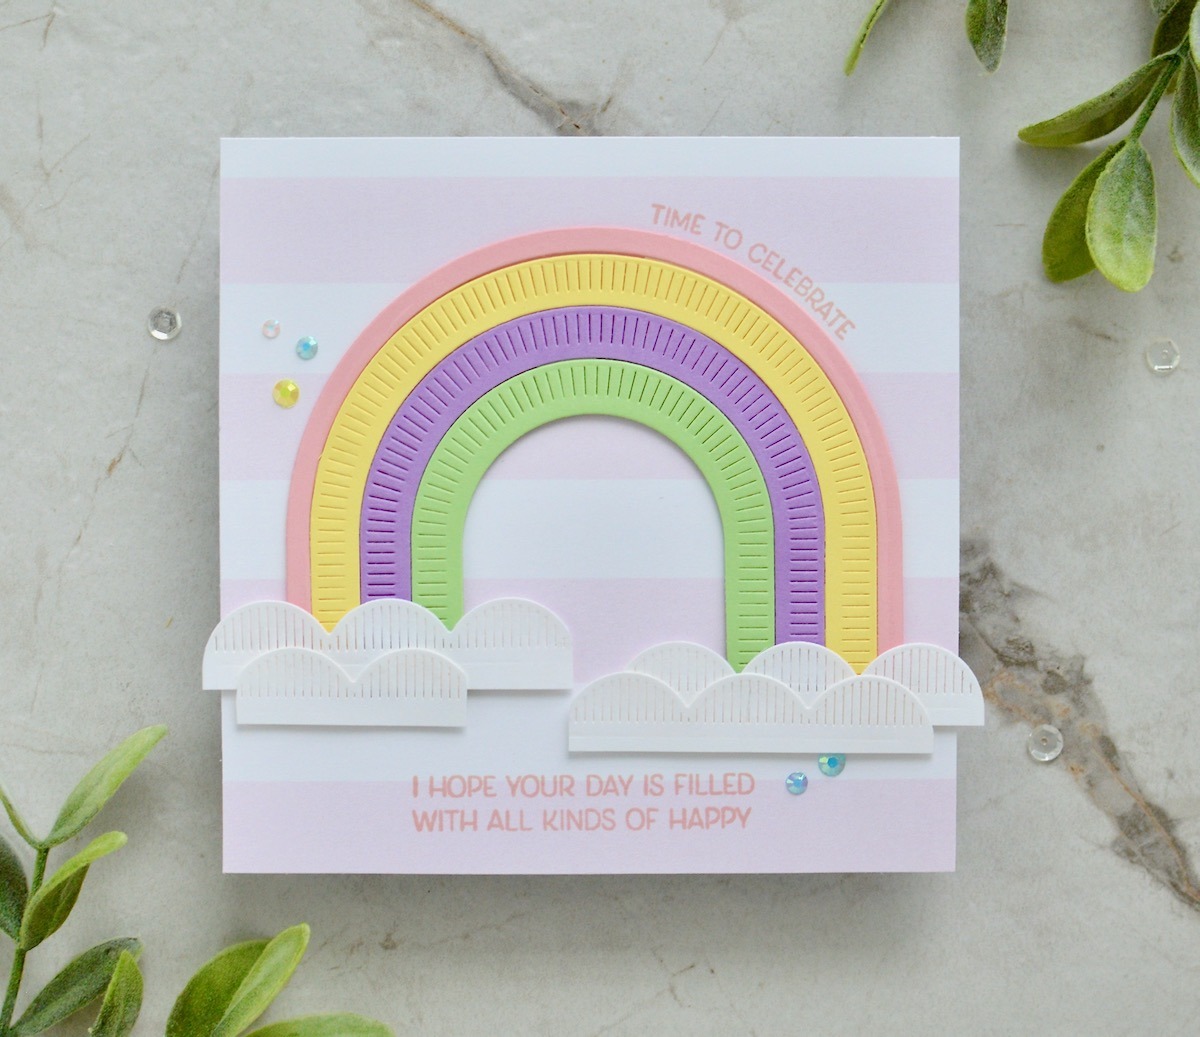
- Create background using patterned paper (or create your own with strips of paper).
- Die-cut rainbow arches using two adjacent arch dies per color. TIP: Save the scraps!!!
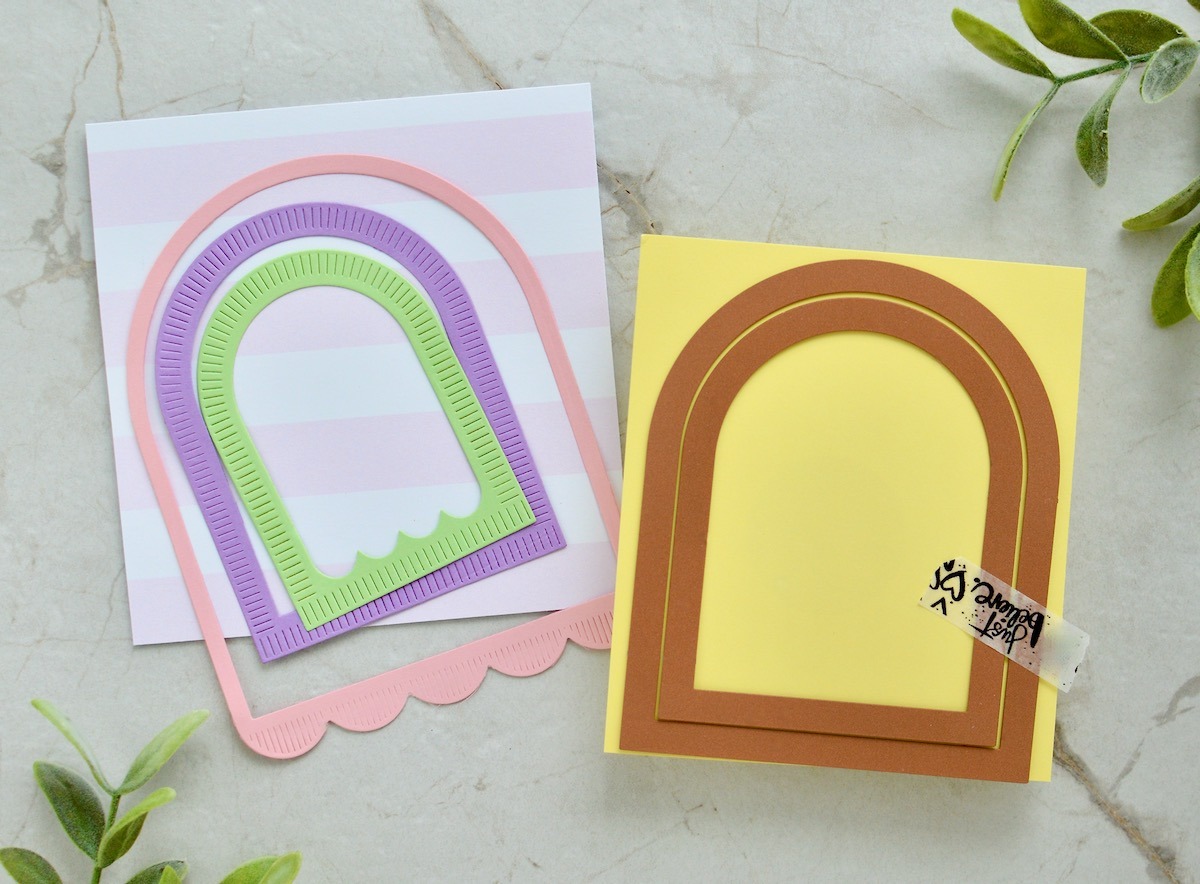
- Die cut and cut scallops on larger arch die for clouds.
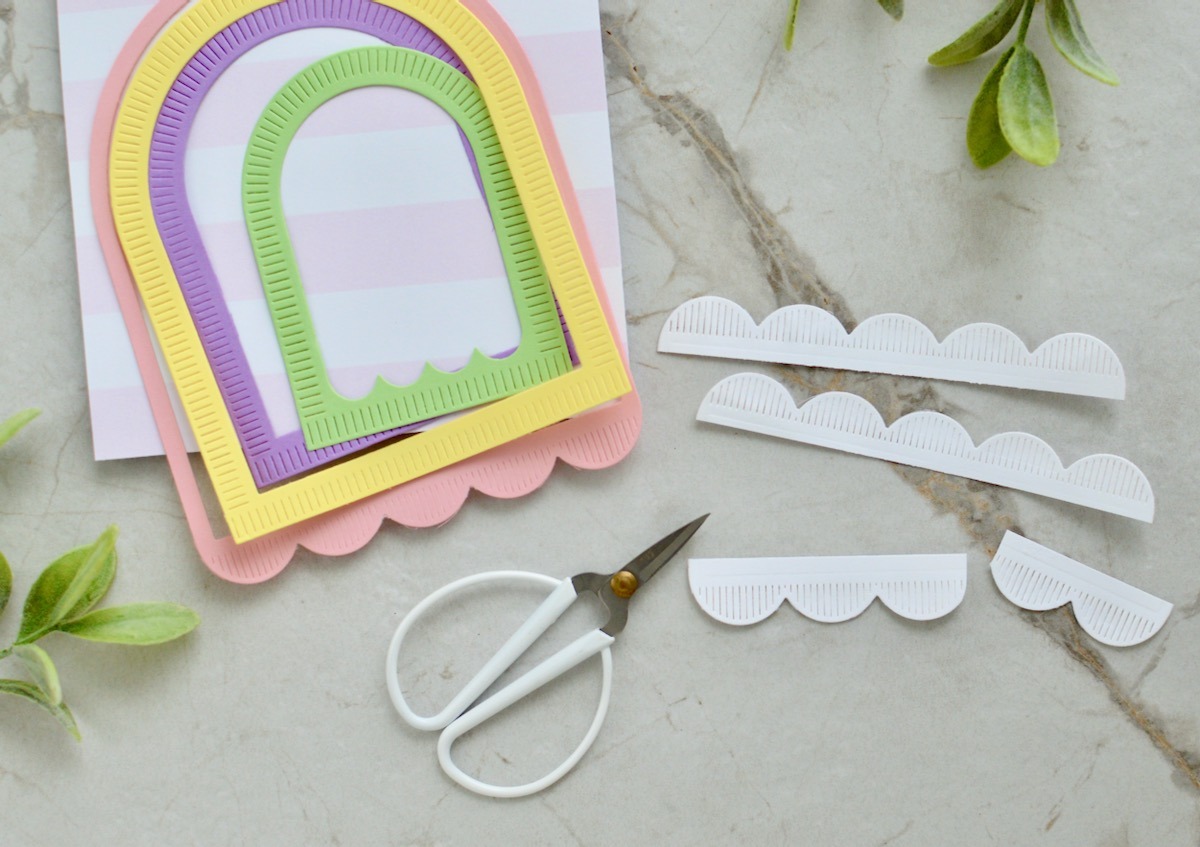
- Temporarily tape arches together using washi tape and cut arches to create rainbow. Add rainbow and clouds to card base. TIP: Add glitter for added interest on clouds.
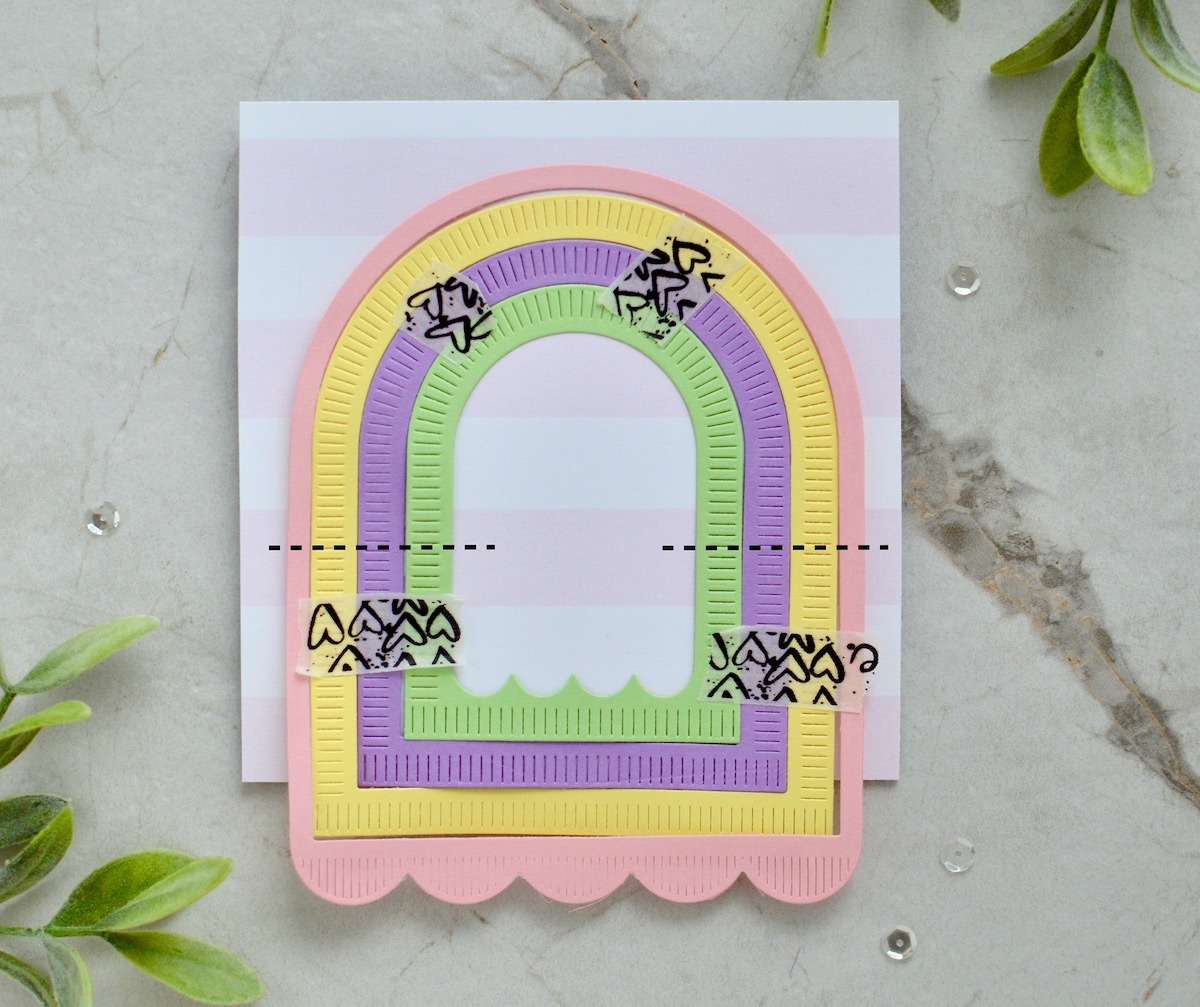
- TIP: To add a curved sentiment that matches the arch curve, place arch die on clear block and then match the sentiment to that curve! EASY!
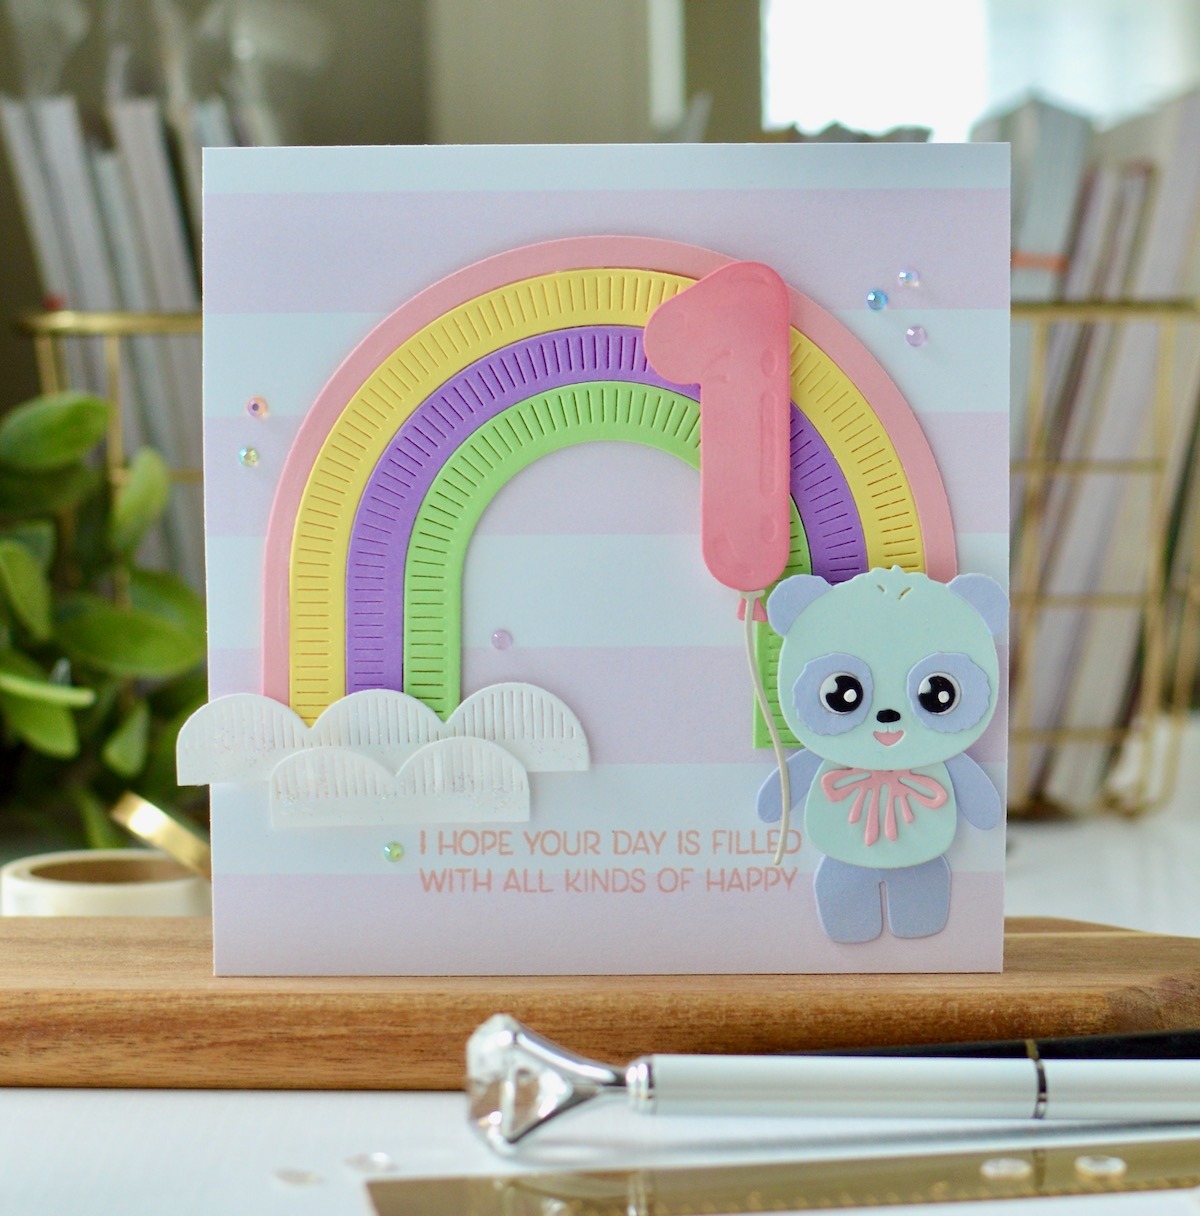
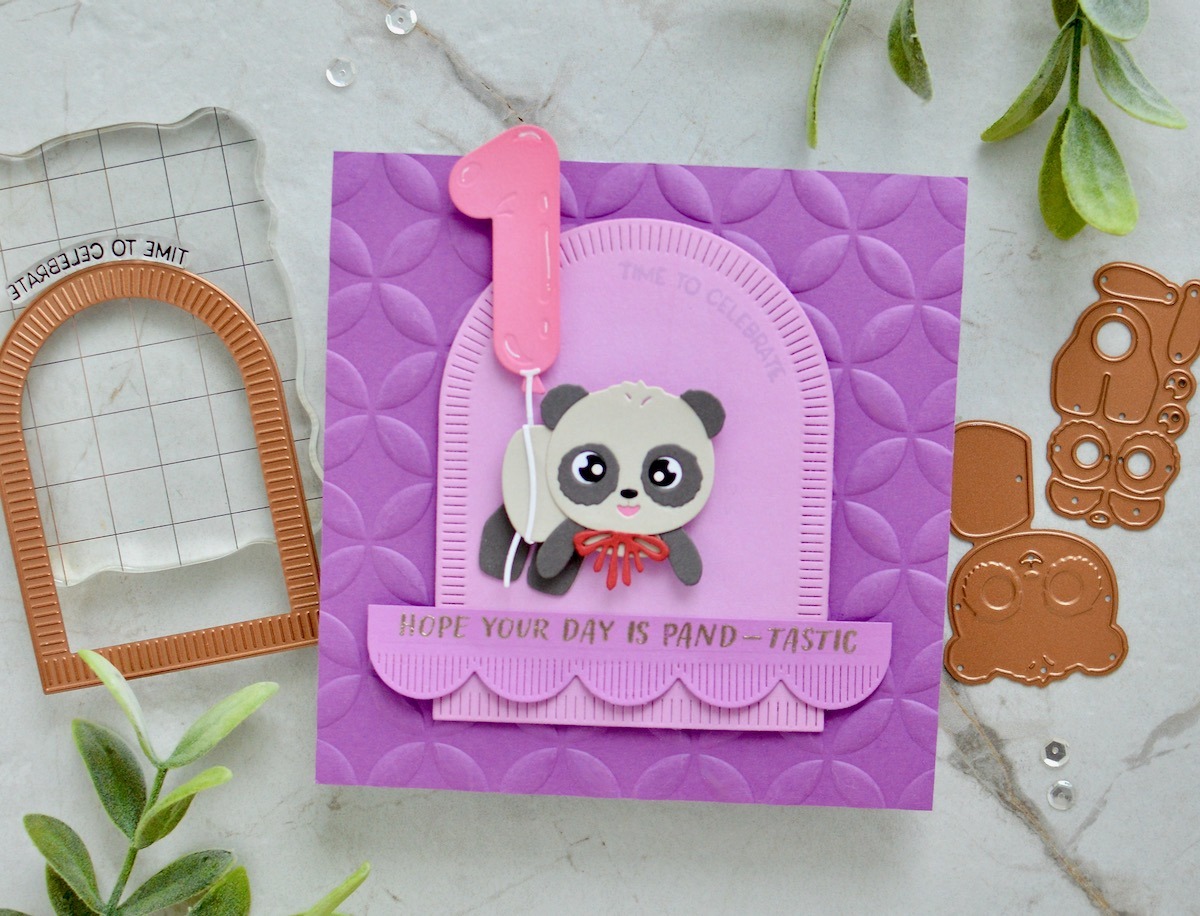
BONUS Card Ideas: Here is another example of using these arches as a rainbow! And then I also used the scraps to create the second card:)
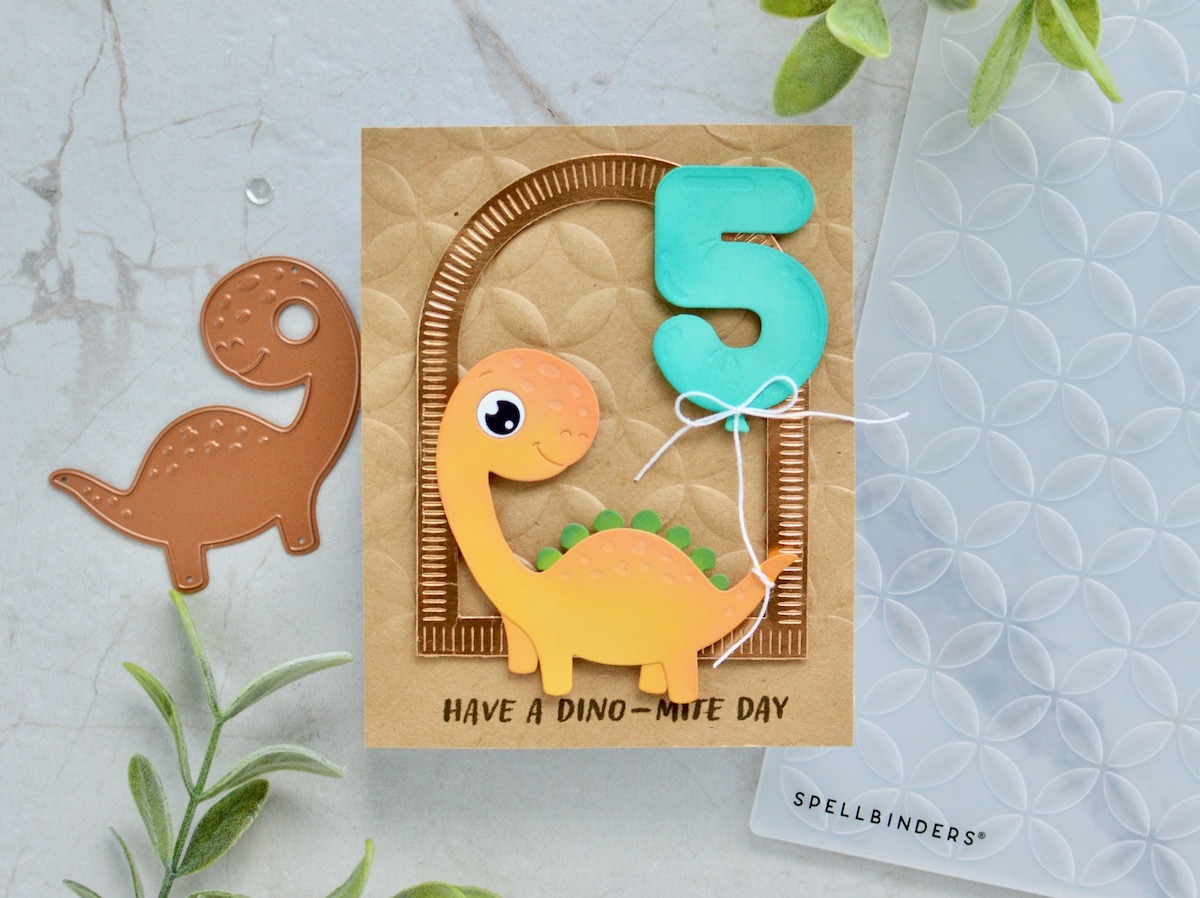
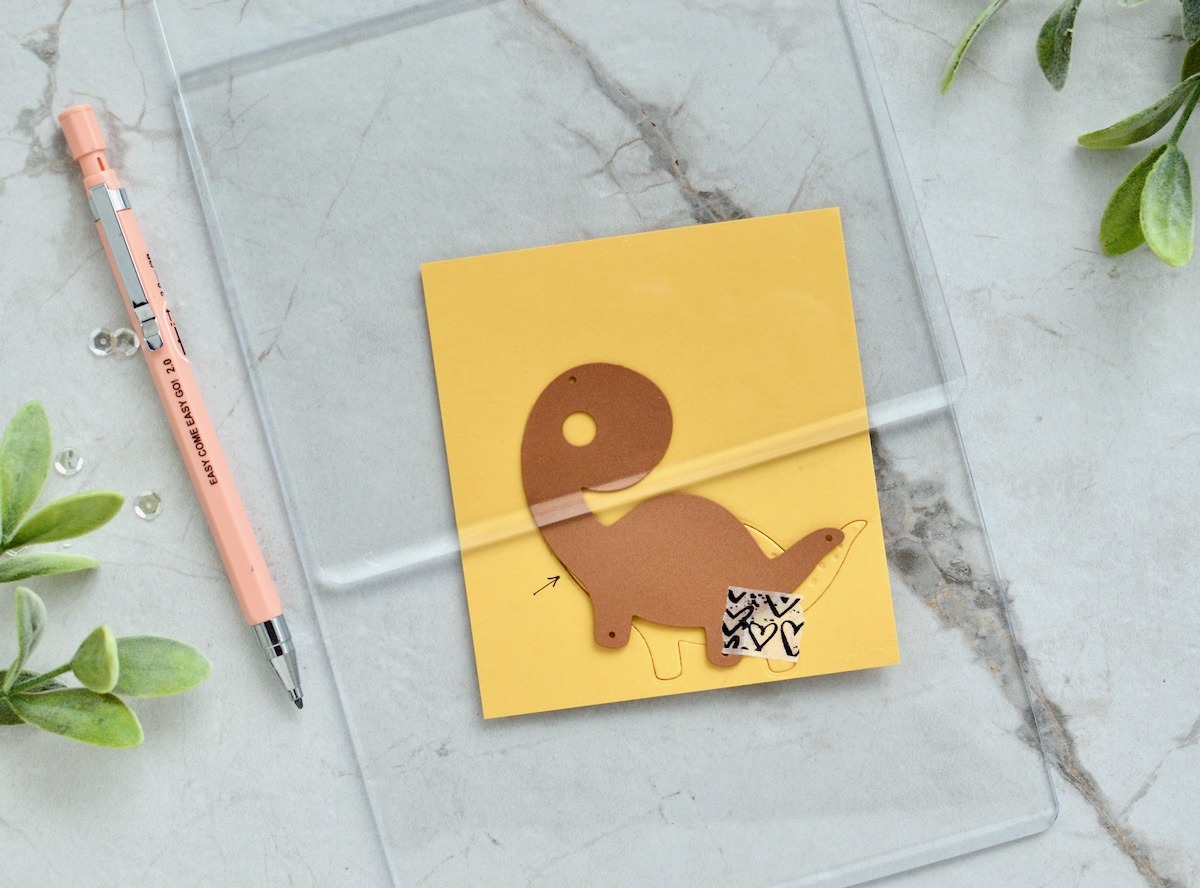
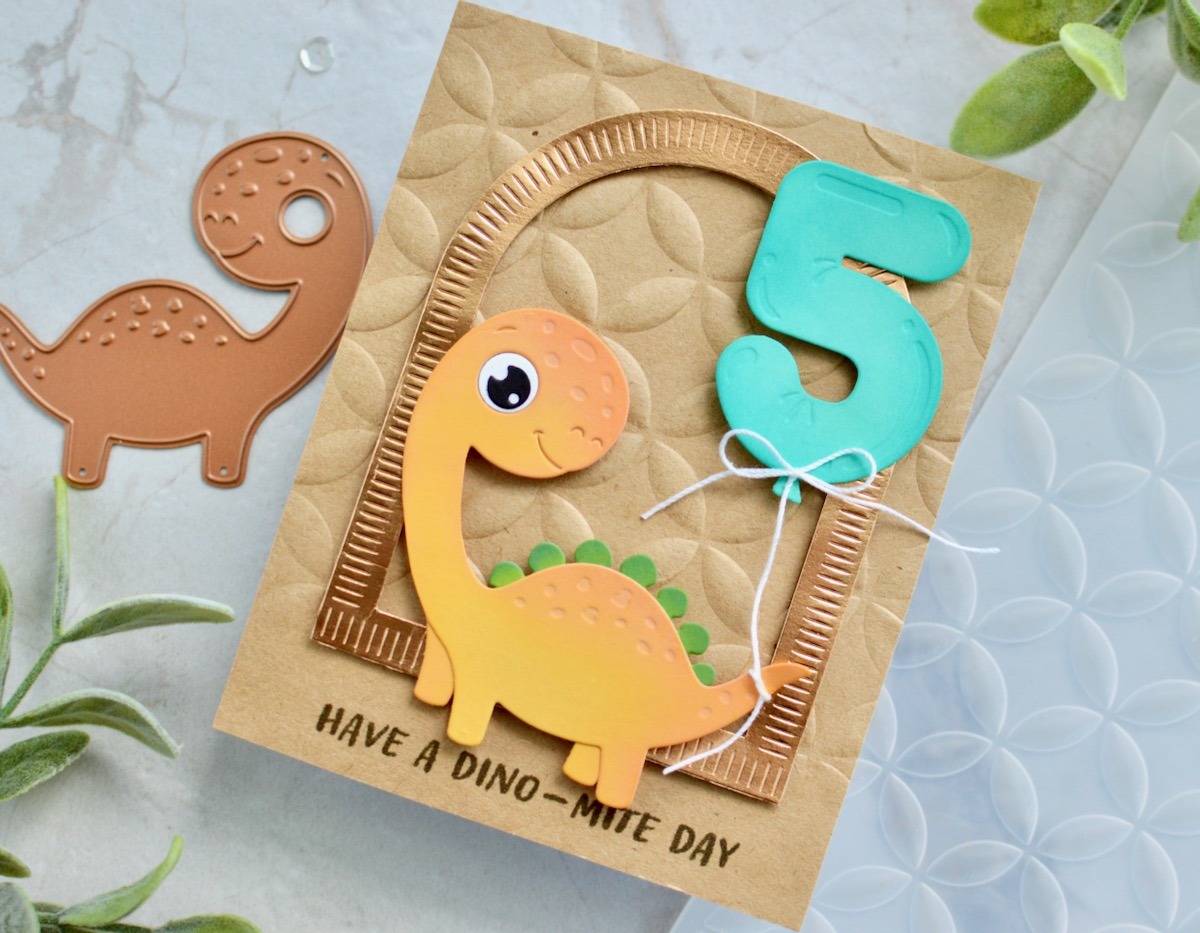
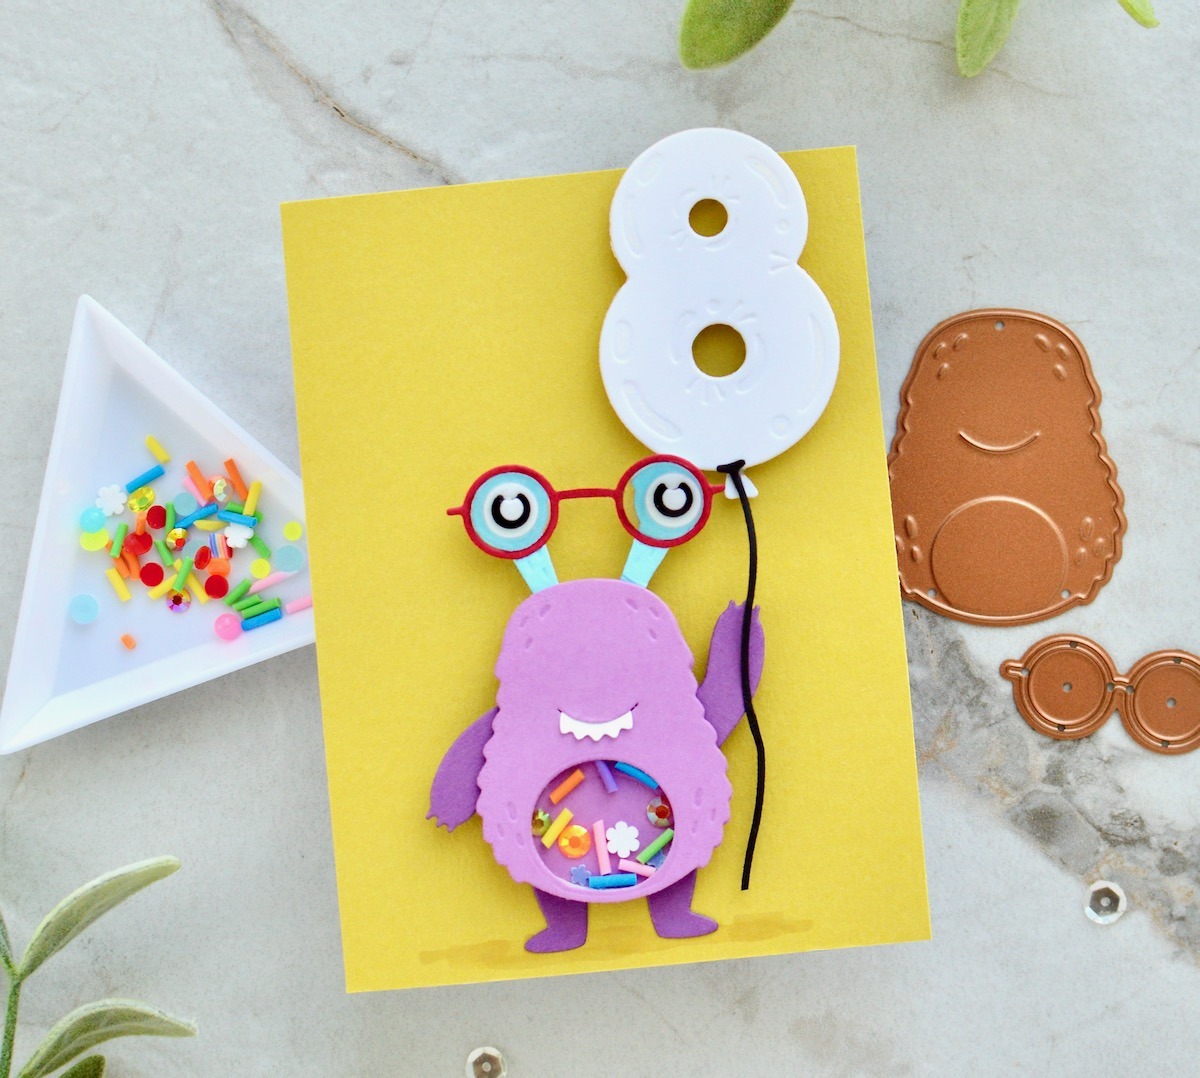
Extending Dies: A Long-Long Neck Dinosaur and Bigger Glasses
I have used this technique of extending dies for SO MANY of my cards!! Click HERE for one of my videos showing this easy technique.
- Die-cut part of the dinosaur image by placing the die-cutting plate on the portion of the die you want to cut. **NOTE: Notice the arrow on the paper- this is where the die-cutting machine will STOP cutting because the die-cutting plate is not over the top half of the image.
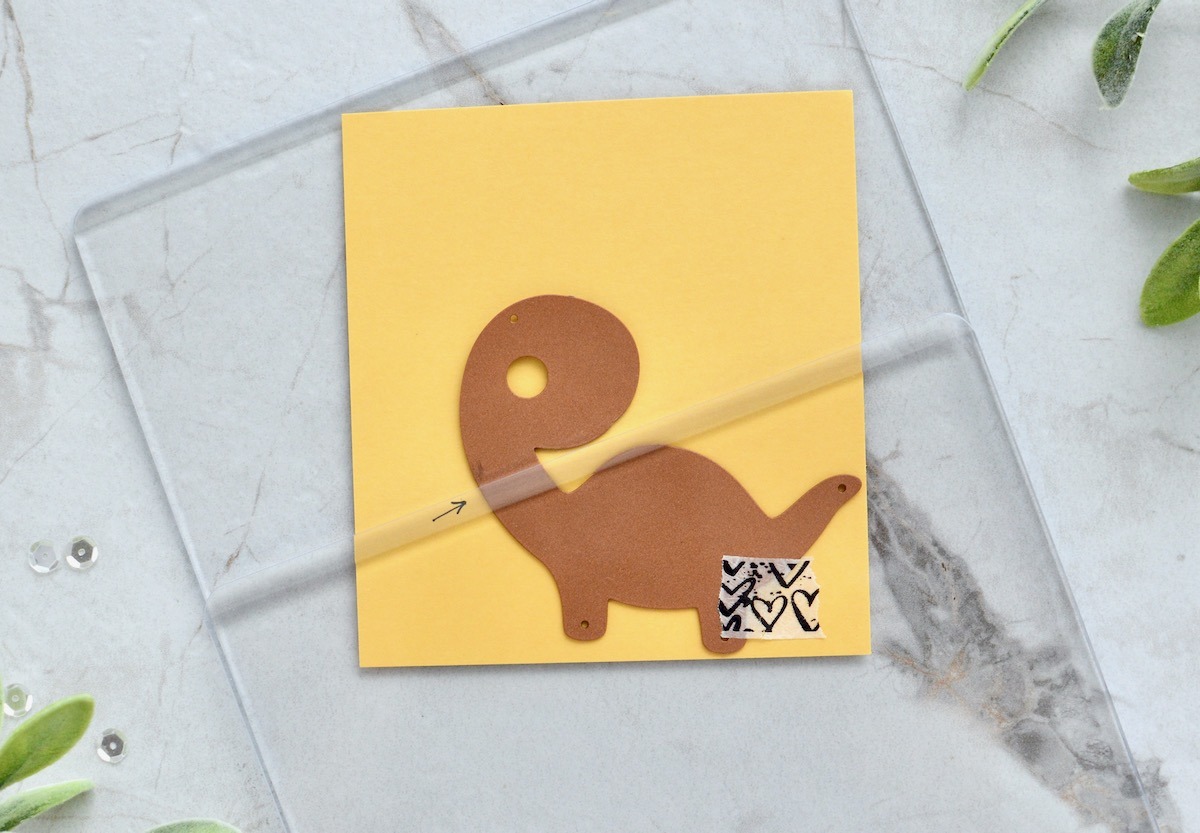
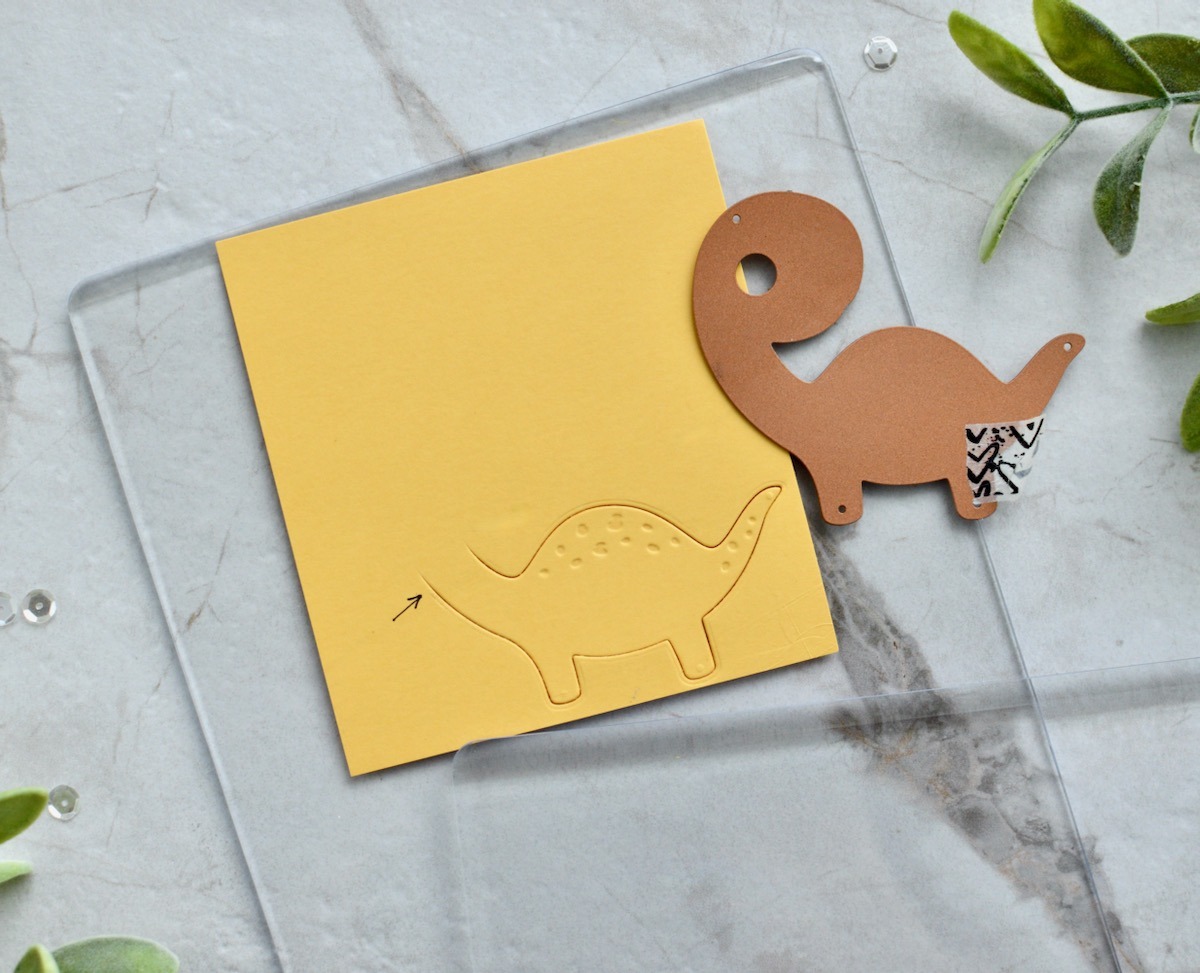
- Now trace the die cut image to have a “base” for extending. **I traced the dinosaur neck so that I could place the image on this line and it would flow for the extension.
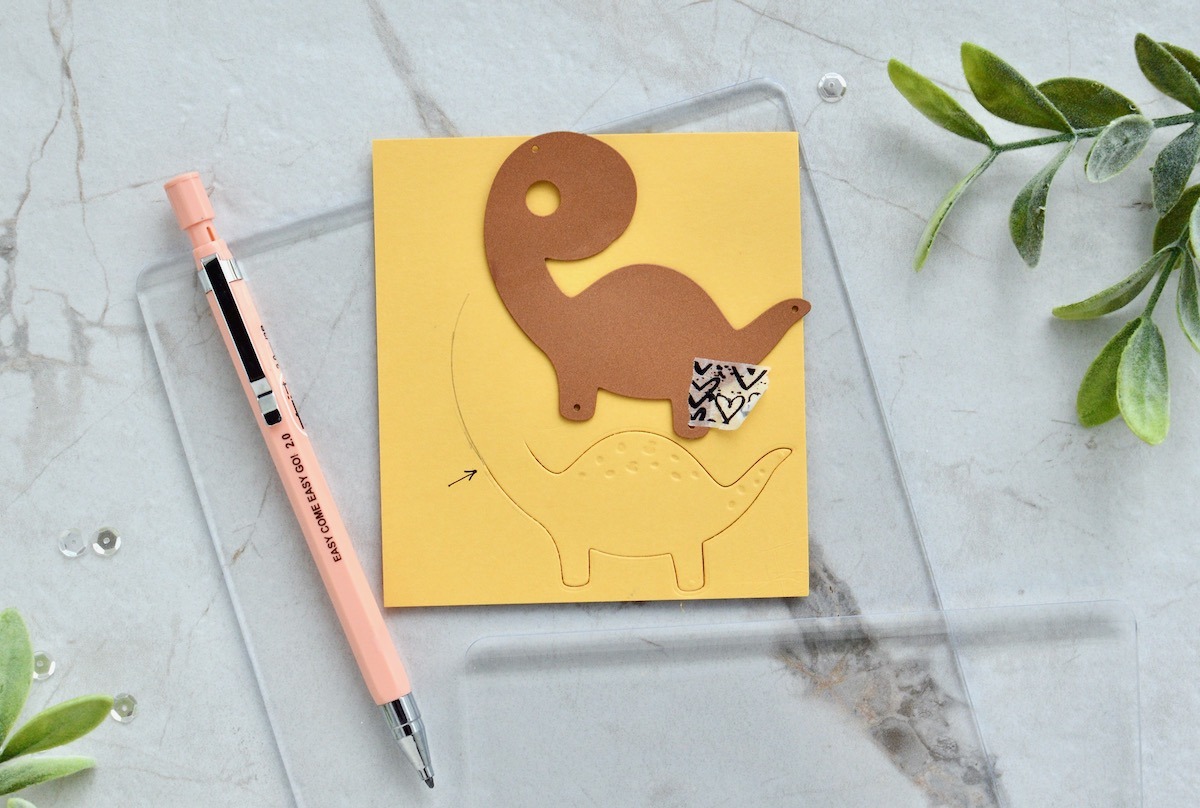
- Place the die back on your paper above the initial die cut line and along the “base” pencil line. Add the die-cutting plate ONLY over the section you want to cut. **NOTE: There will be a small section of the image that will not be cut as this is the extension.
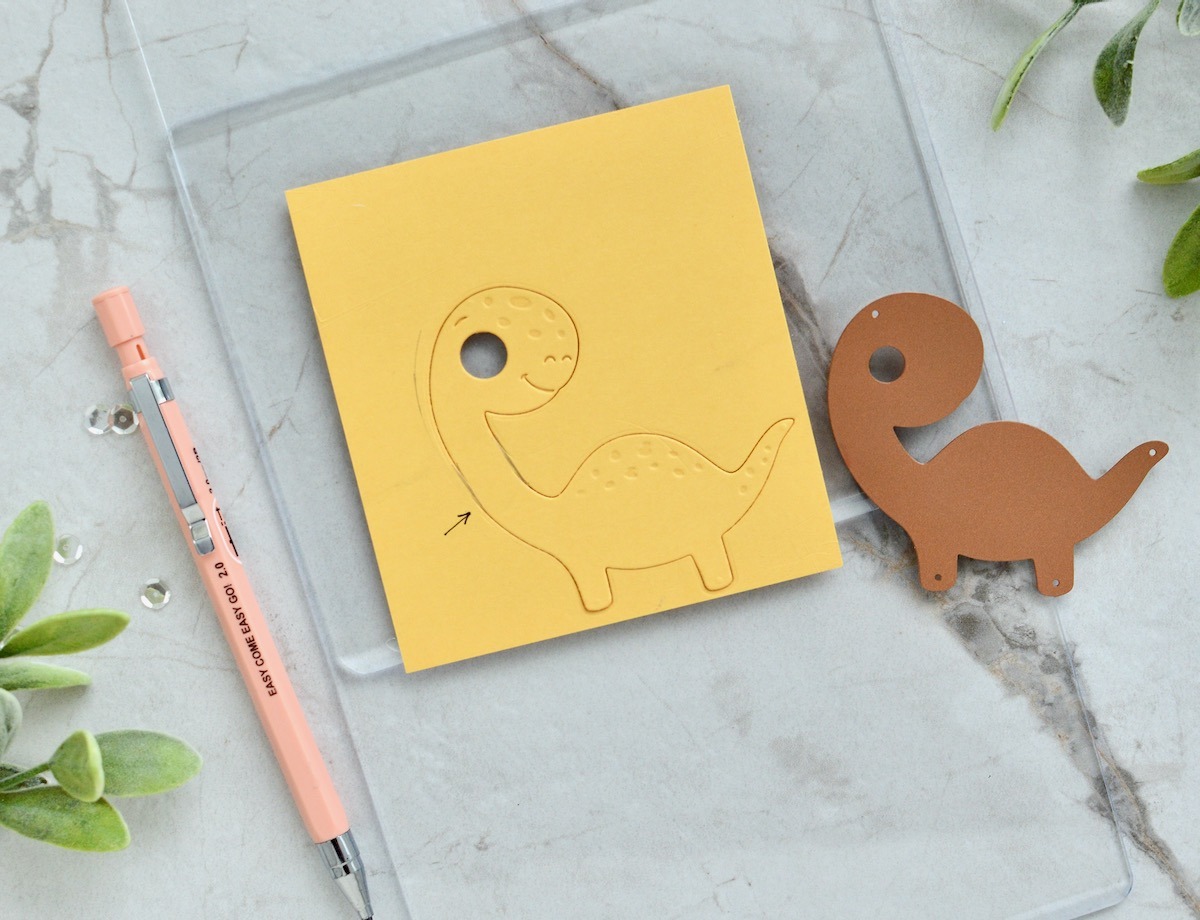
- Detach your extended image by snipping the parts that are not cut. **This is easy to do because of our pencil line!
- Finish your card by adding dimension, embellishments, and ink blending.
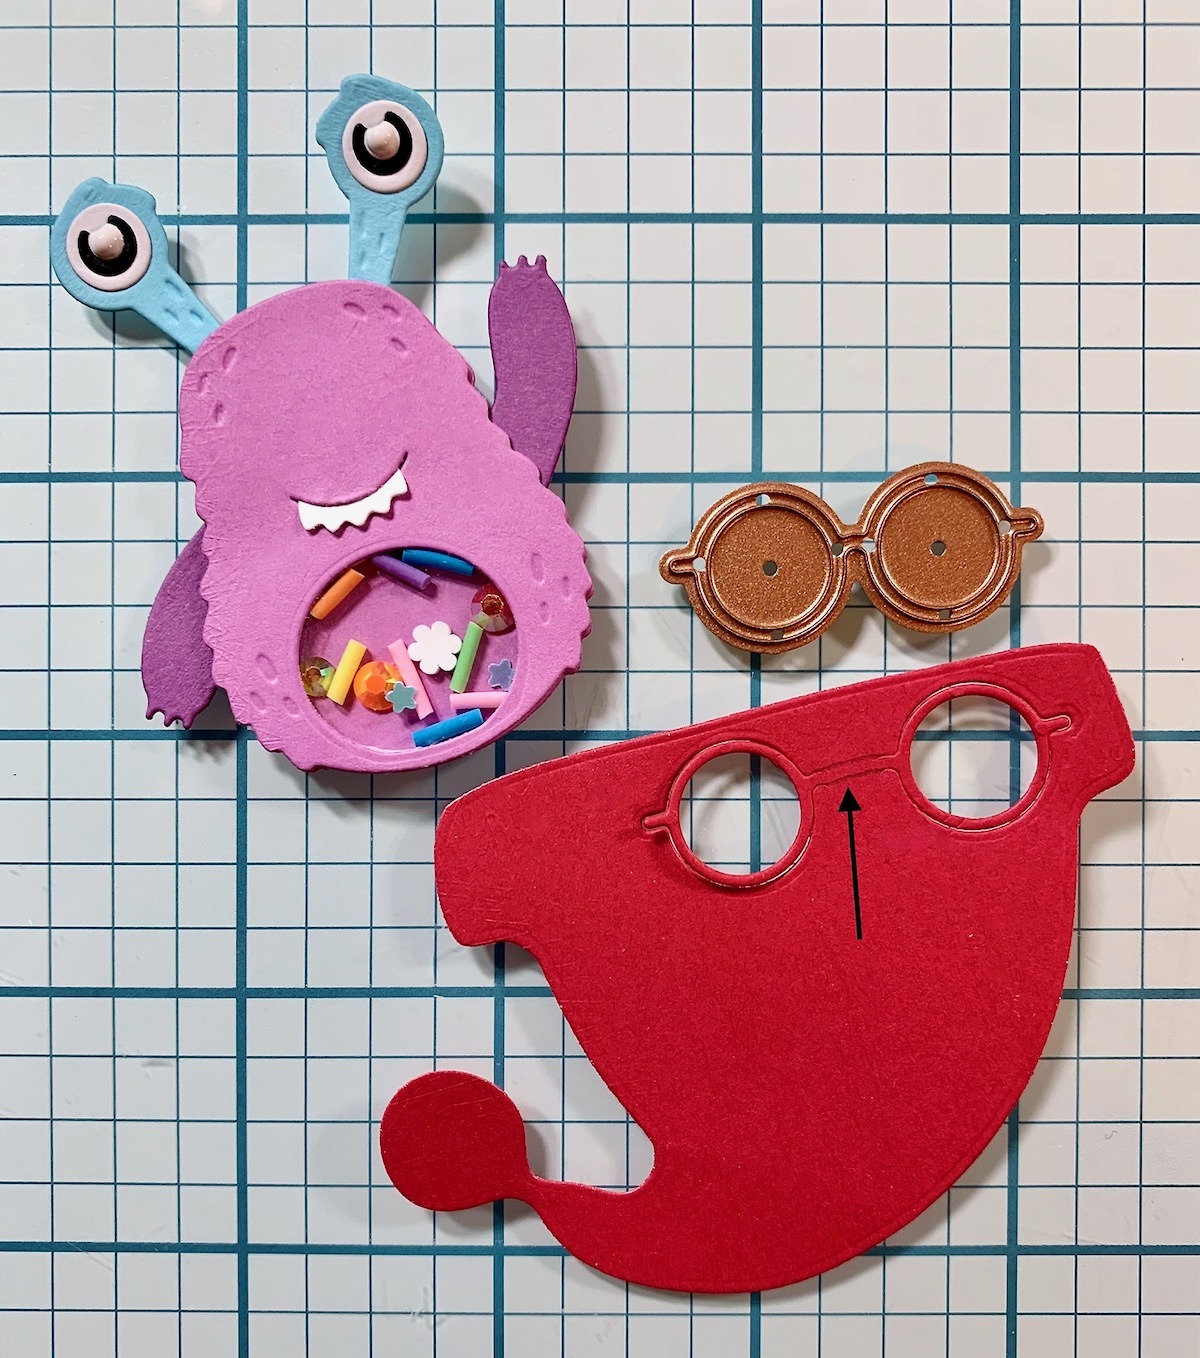
BONUS Card Idea: Use this same technique to extend the glasses dies to fit a two eyed monster! I even extended the balloon string to make it longer! Another bonus—I made the monster belly a shaker! So fun:)
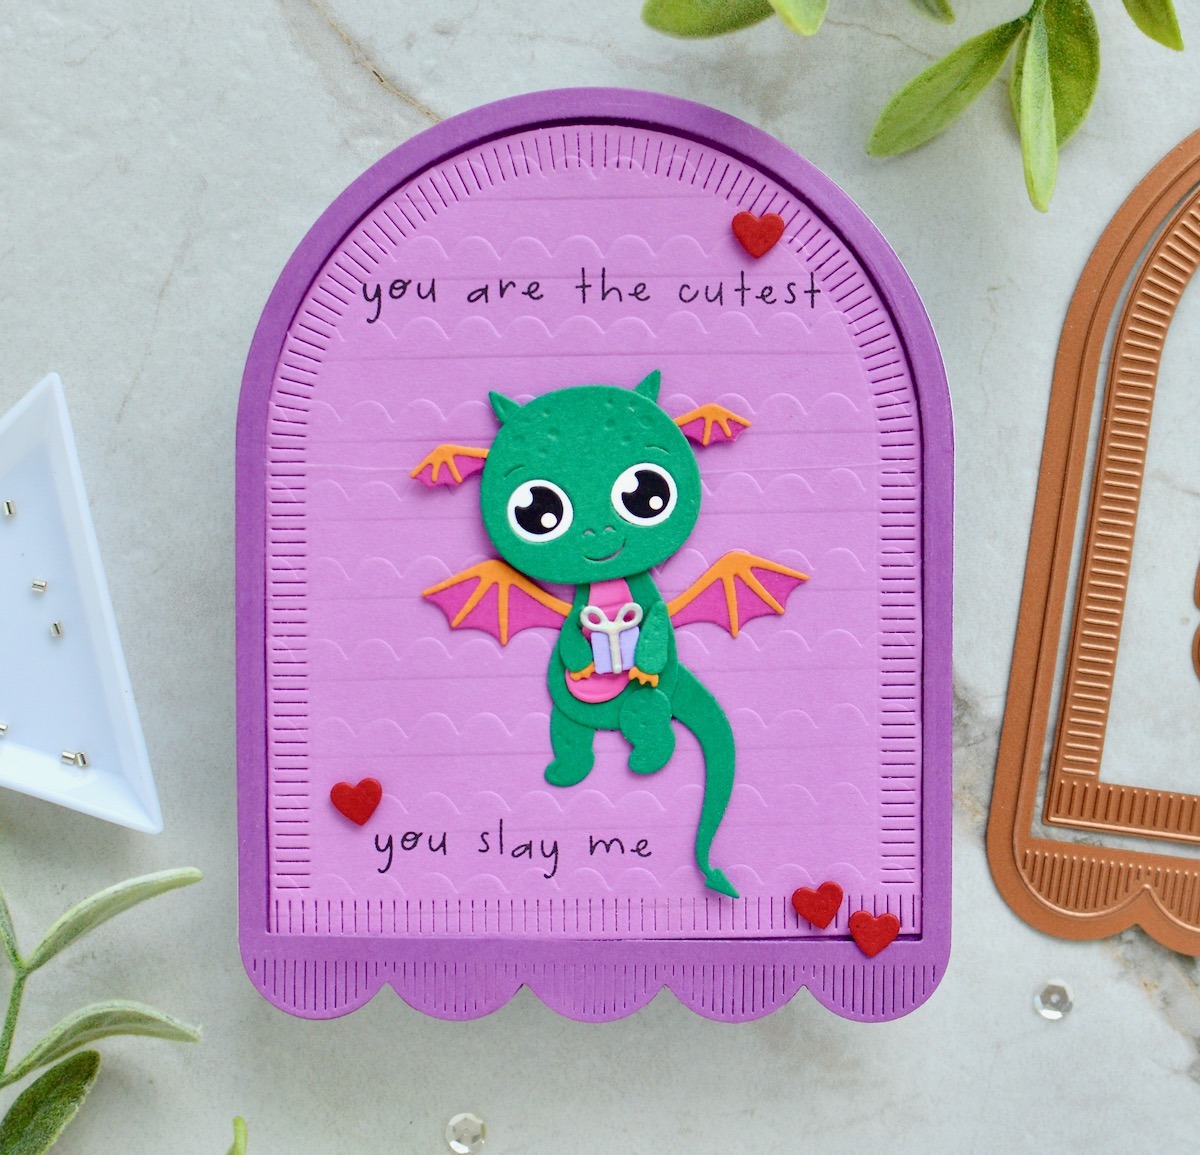
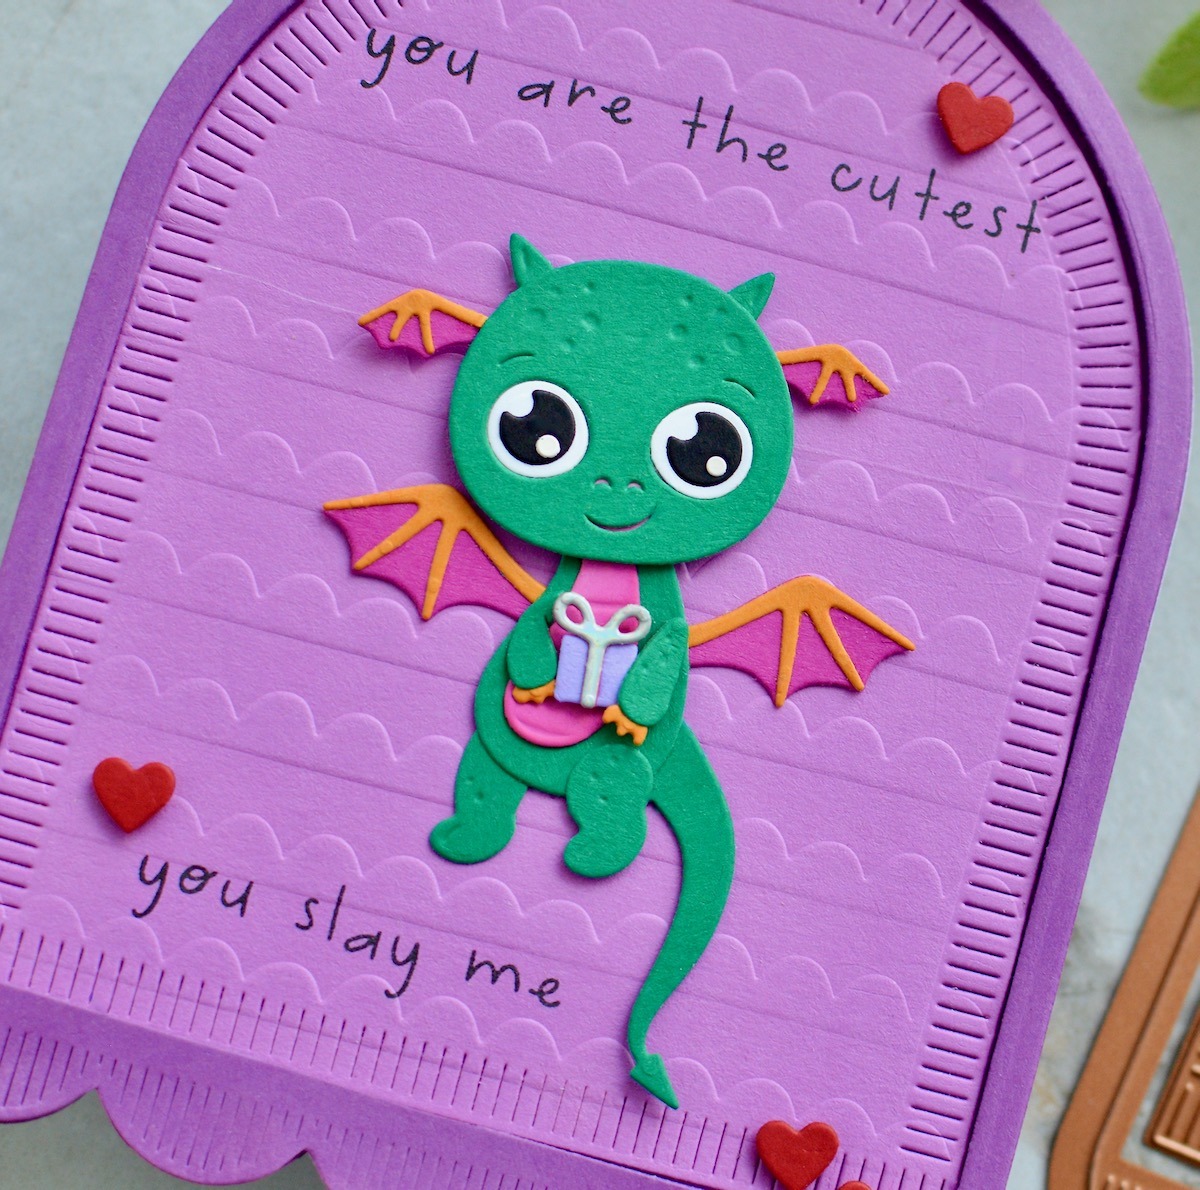
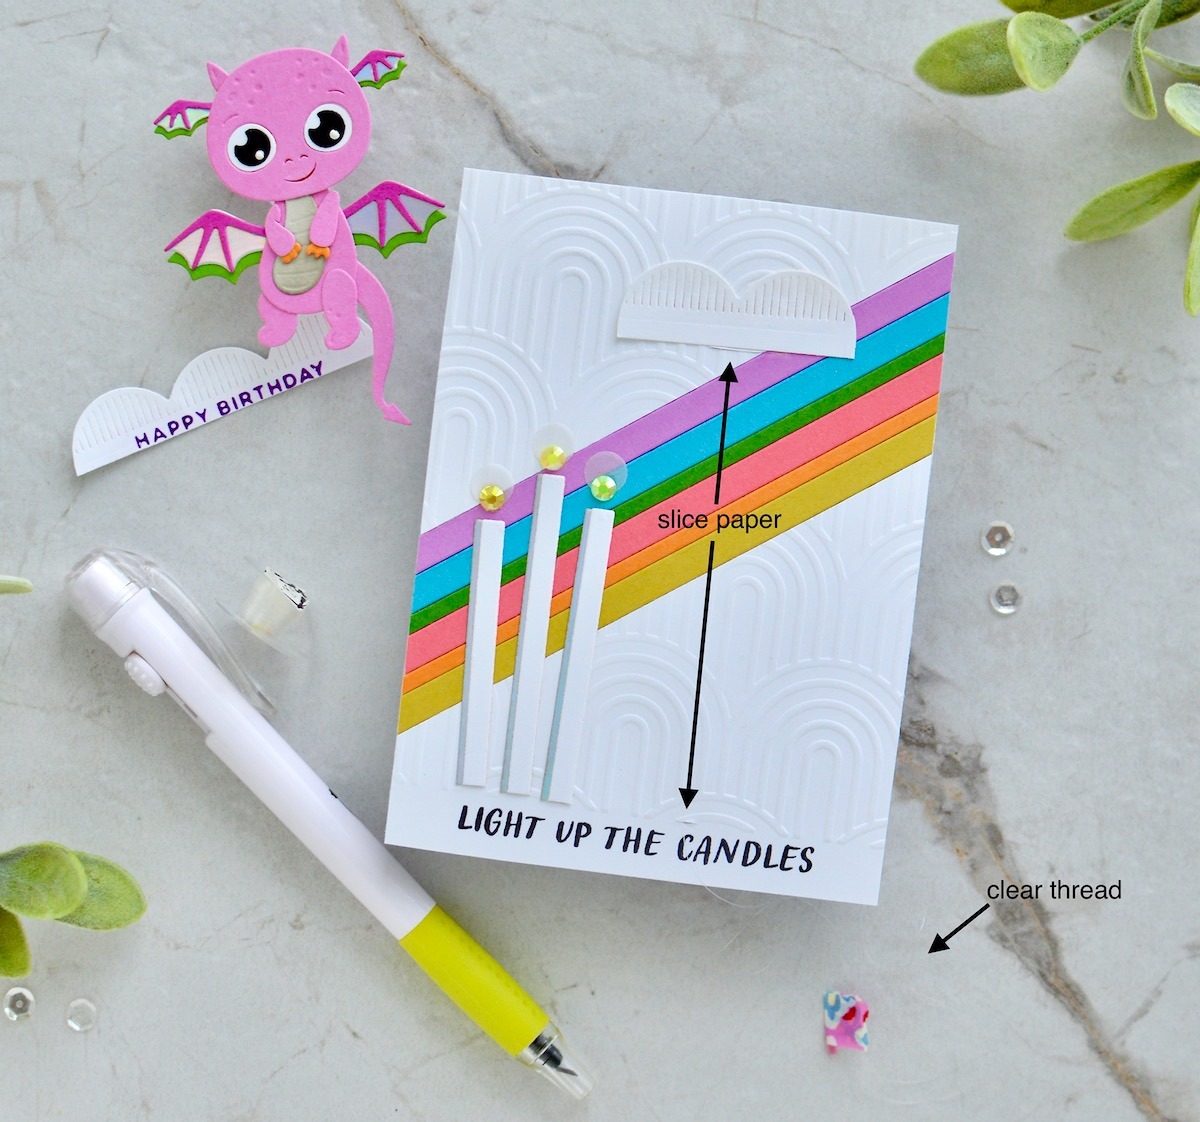
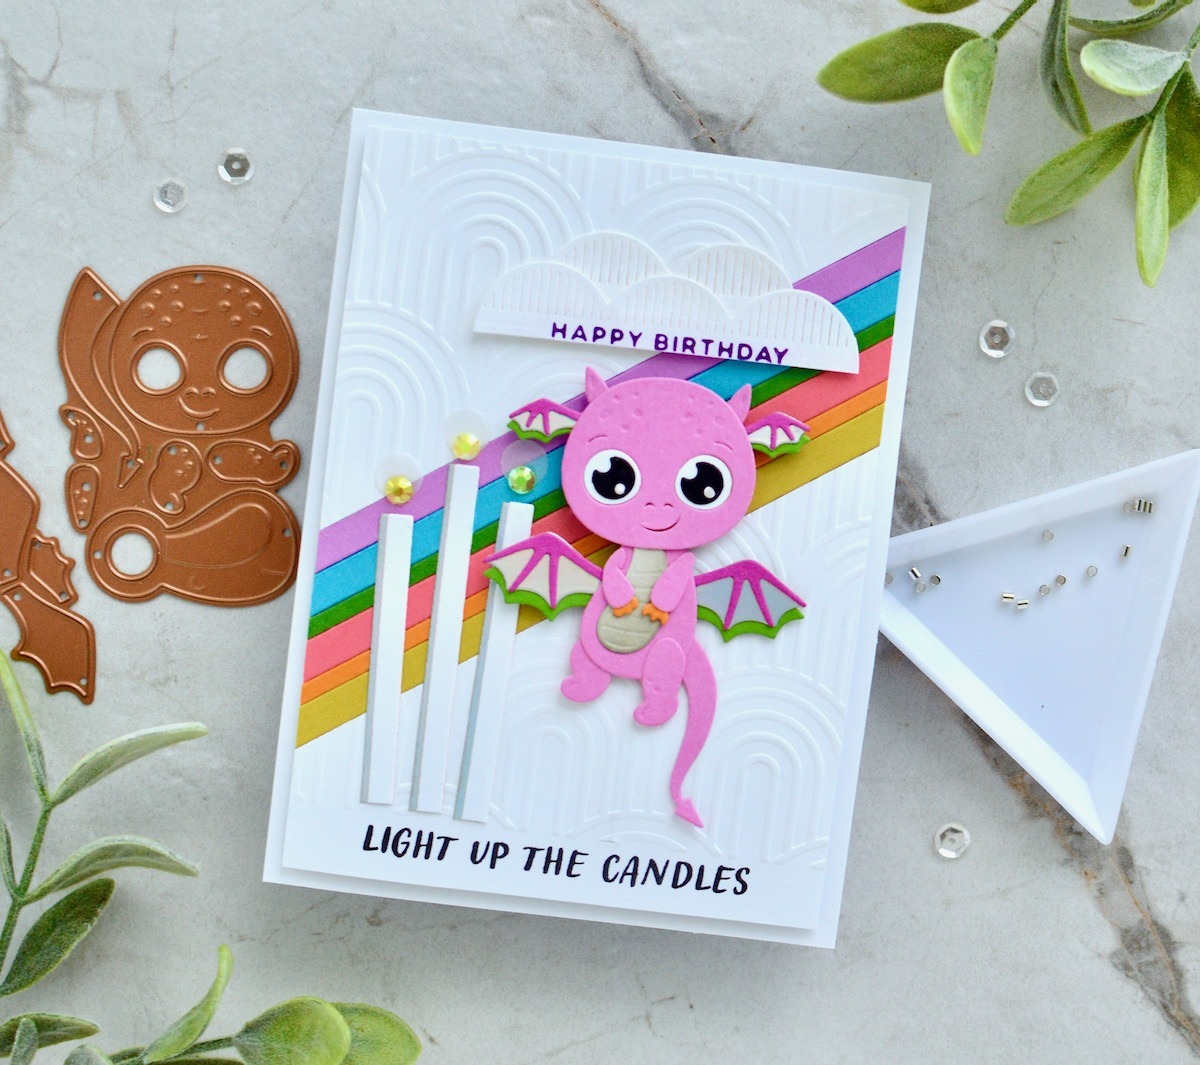
Floating Images: Dancing Images that Float
I have fallen in love with all of the Spellbinders Dancin’ dies—I think it’s so clever to create images, people, animals, and creatures that move on my cards! All the previous card designs in this post using dancin’ images do in fact dance or move! However, for the next two cards I took it a step further. I wanted the entire image to move on the card— like it’s floating! You can watch this dragon float in a quick video on my IG page HERE.
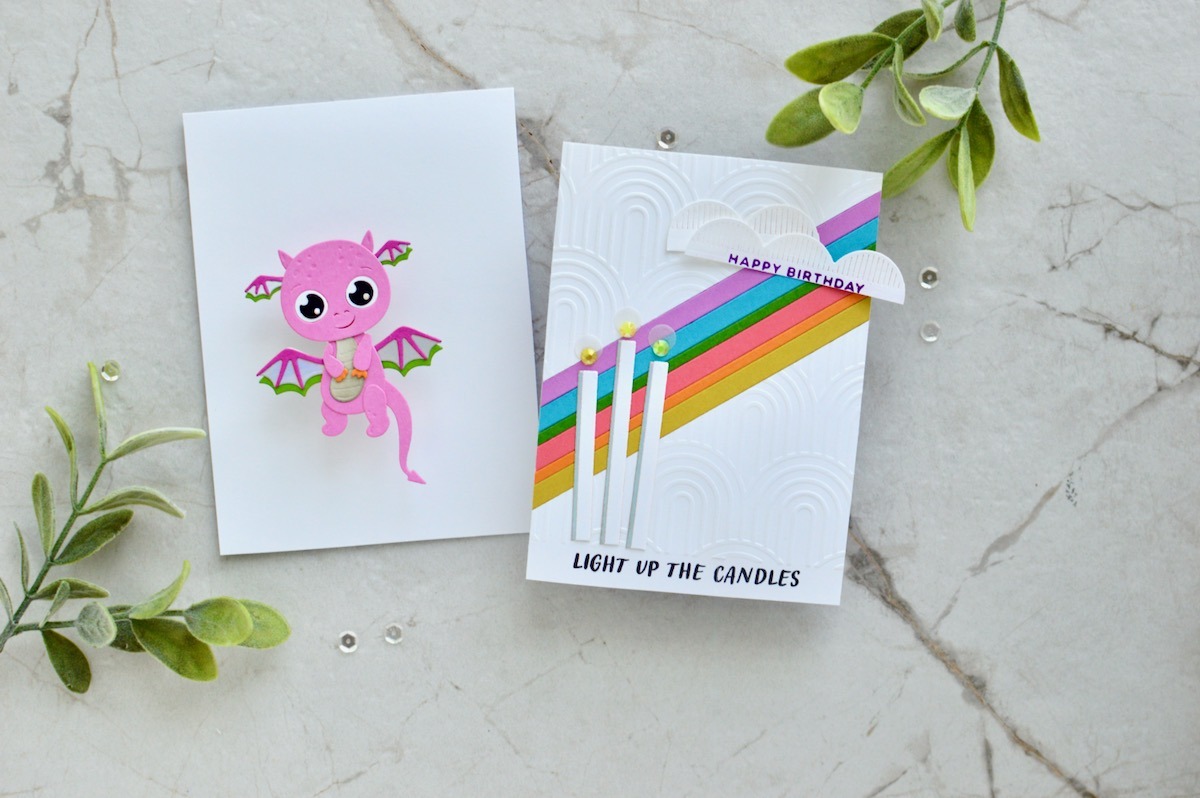
BONUS Card Idea: Here’s another floating dragon card with a tutorial to make it float up and down. The original idea was to have the dragon have fire coming out of it’s mouth to light the candles! LOL! Hopefully you still get the idea of the card design 🙃 TIP: This technique can be used to make the image float side to side or up and down.
- Create card front panel with details using embossing folders, stamping, die cutting, embellishments, foiling the sentiment, and more.
- Create dragon image. **NOTE: Be sure to attach the entire body to the head as the full image will float.
- Attach one cloud piece to the top of the panel and cut two small slits (top and bottom) for the clear thread using a utility knife. Add thread to bottom slit and attach thread to card front panel back using clear glue and washi tape.
- Draw a line on the back of your dragon image and add clasp tubes (for jewelry) to the drawn line. TIP: You can use any tube for this floating image- paper tube, metal tube, jewelry clasp tubes. TIP: The bigger the image the larger or more clasp tubes you will need to use. TIP: Remember to place your tubes either left and right or up and down your die cut image- this will determine which way your floating image goes:)
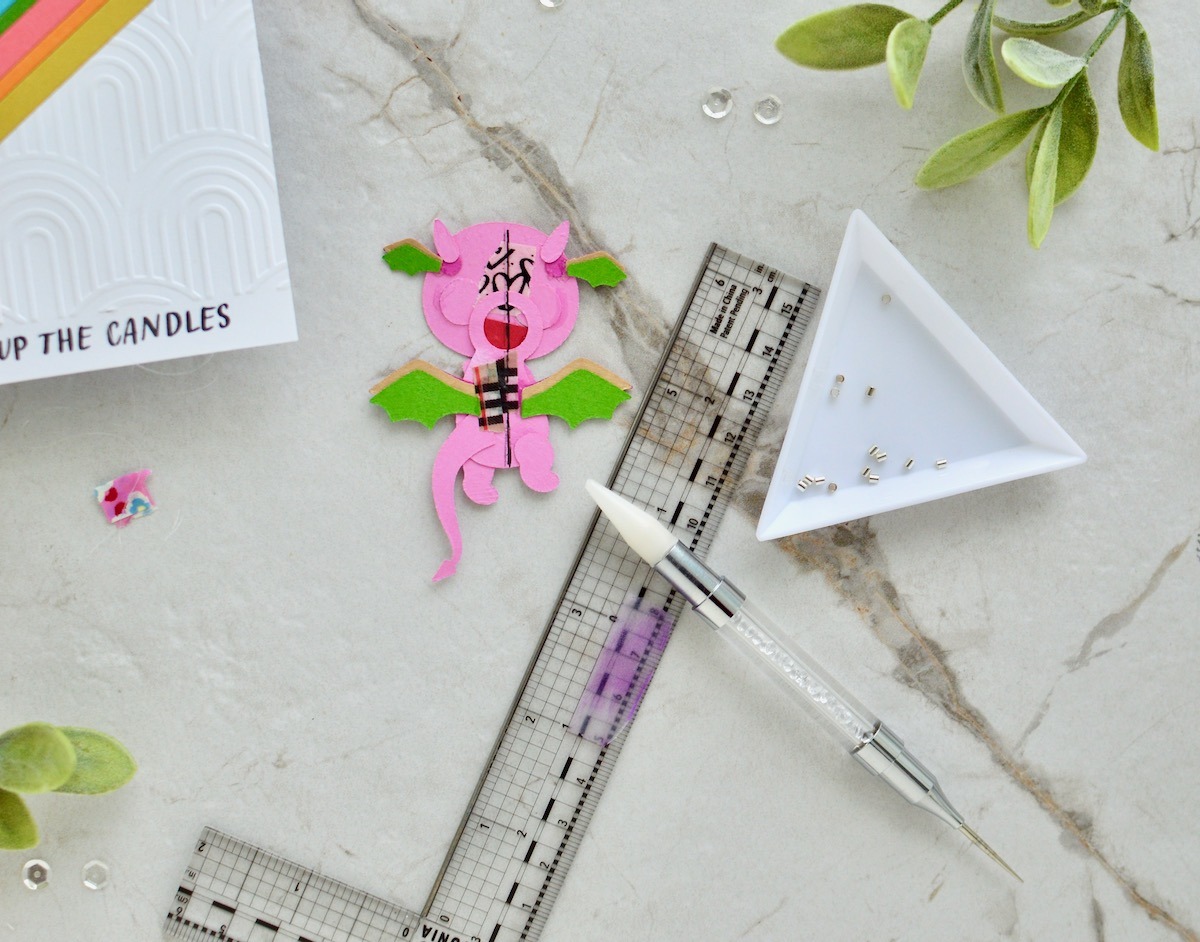
- TIP: Add an extra dab of glue to either side of the tube to make sure it’s secure.

- Thread the free end of the clear thread from the bottom slit through the tubes, and through the top slit. Secure the thread on the back of the card front panel using glue and washi tape. **NOTE: Flip image over prior to attaching end of clear thread to card front panel back!! TIP: Be sure to make the thread super tight so that it will not slack when the image moves.
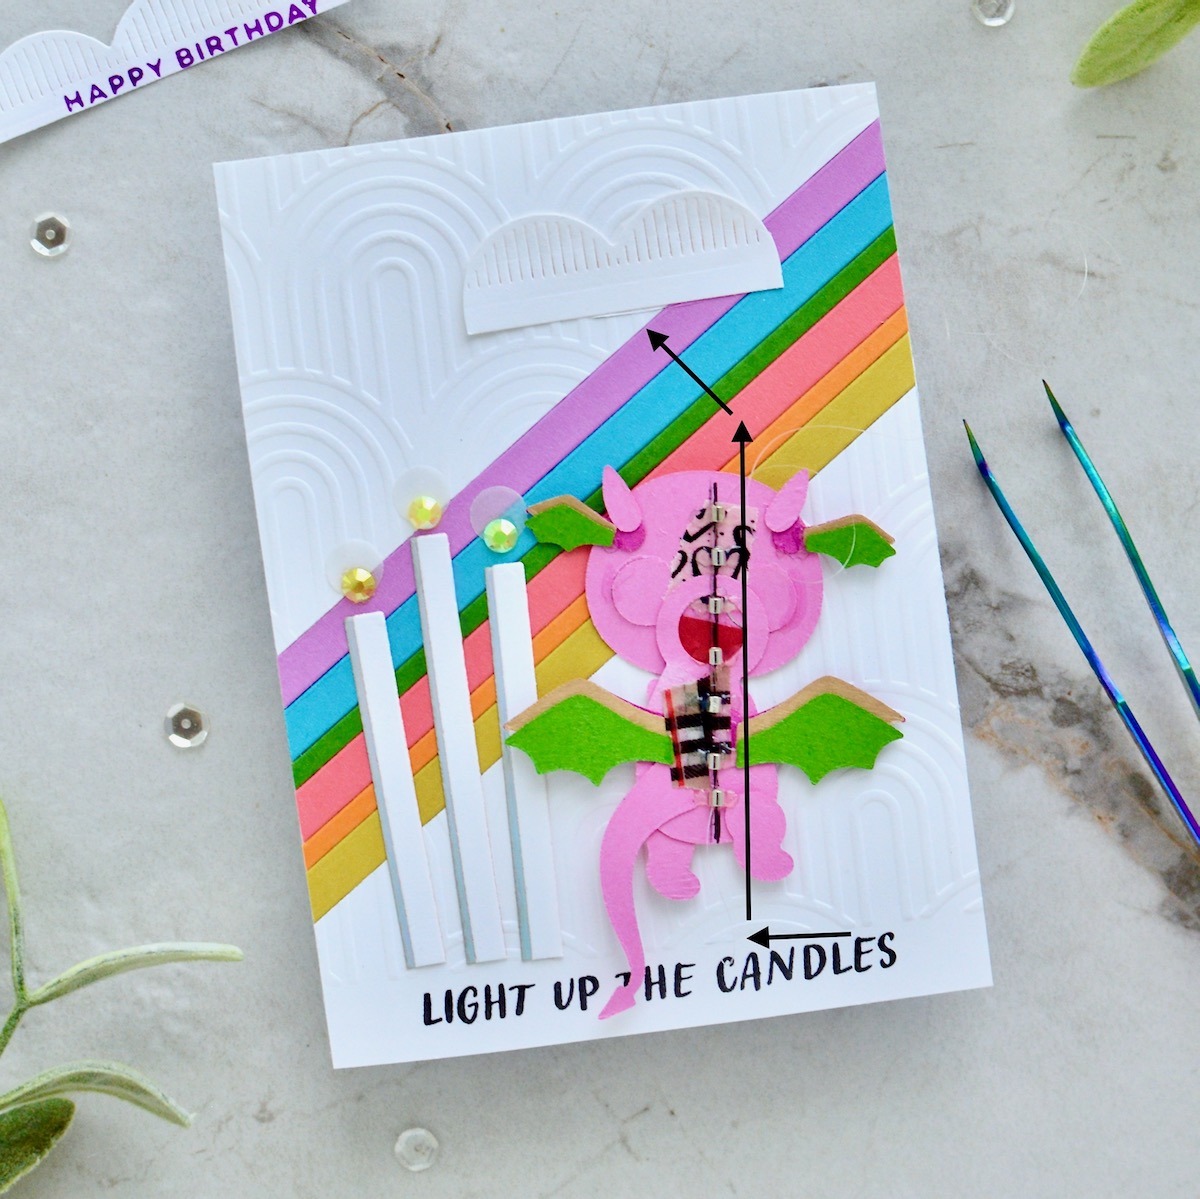
- Add card front panel to card base. DONE! Now slide your dragon up and down to “light the candles”!
BONUS: Swapping Holidays and Stretching Your Stash
This card design was inspired by ICARDINK. When I saw her design, I knew I could recreate it using some of my favorite Spellbinder’s goodies— plus, I am swapping holidays using this card and stretching my stash!
Swapping holidays is easy: This foil plate is from a Halloween collection, and the sentiment is from a Christmas foil plate set! Look through your stamps, dies, foil plates and you will see that you can use them for MORE! **TIP: Take swapping holidays one step further- swap images and use them for other holidays, image designs, etc. You might also see that I used some door step dies from the Open House Door Base to create the candles on the previous card. So fun!!!
Spellbinders Supplies:

WOW! I guess this post was NOT short at all like I planned! LOL! I do have so many ideas and things to share with you- THANKS for making it this far in the post😉
THANK YOU, Spellbinders, for allowing me to share my creations and ideas with all of your friends and fans!
And THANK YOU so much for stopping by and checking out my fresh looks using old techniques!! I hope you were inspired and try some of these ideas on your next creation. Please visit my Instagram page, Savannahland2 or my blog, Savannahland2, for even MORE crafty inspiration.

4 Comments
scrapperatheart
Awesome job Savannah! I loved your post and your cards are just wonderful. Thanks for sharing your tips and tricks with us.
Cindy Condie
Wow! So many fun ideas, and some oldies I have forgotten about that you updated and re-kindled! You have my creative juices flowing and I’m excited to go play! Thanks! Your Cards are all fun and fabulous!
Tina
Thank you so much Spellbinders for always giving us so much inspiration 💕❤️💜🩵💙🙌🫶👏
Monica C
What a great lot of projects. I have the panda die and the glasses and looking very forward to some creative play time. Thank you for the inspiration.