
Creating Beautiful Texture and Adding Fun Shapes To Your Cards
Hello there Spellbinders friends! Lisa Tilson is here with you today on the Spellbinders blog. I’m delighted to be here to show you some fun simple ways to add texture to your cards using embossing folders and I am also using shaped dies to create layers and extra interest to your card designs. The collection in the spotlight today is the beautiful Sealed 3D Botanical Collection. This release features a couple of 3D embossing folders which you can emboss and cut in one pass, two new wax seal stamps along with three sets of nesting dies which are always a fabulous addition to any craft room.
There are no tricky techniques involved in my cards and I hope they show a few of the many ways in which you can use embossing folders and how nesting dies can add fun shapes into your designs.
Sending Love
For my first card, I am using an embossing folder in its simplest form. No inking, colouring or anything. Just a plain and simple emboss to add a textured backdrop to my flowers.

The folder I am using here is the Mushrooms From Me To You 3D Emboss and Cut Folder. I think the option of die cutting at the same time as embossing your folder is a fabulous idea! It means you don’t end up squashing all that lovely textured detail by die cutting it after you emboss. You simply place your card into the folder, and slot the die in where it fits and away you go!
I placed some Barely Peach Color Essentials Cardstock into the embossing folder on one side, and slotted the corresponding die into the section on the other side. I used a little piece of Best Ever Craft Tape to hold my cardstock in place and closed the folder. I ran it through my Platinum 6 Die Cutting Machine using the 3D embossing sandwich instructions and out popped that gorgeous textured panel of loveliness!

Next, I took the Floral Spray Etched Dies and the Autumn Sealed Sprigs Etched Dies and cut some flowers and leaves from Pink Sand, Fruit Punch, Peach Sorbet, Barely Peach and 80lb white card. I adhered the flowers together where required and then created a little arrangement to sit in the right-hand corner of the embossed panel. I popped the light pink flower up with some foam tape and then used Bearly Art Glue to adhere the rest.

I thought it would be fun to create a shaped card base so, I took a 110lb white A2 top folding note card and placed one of the Scallop Labels & Tags Etched Dies down on top. The very top section of the arch die sits outside of the top fold so that when you run it through the die-cutting machine, it does not cut that section and the base stays intact.
Some thin foam tape was then added on to the back of my embossed panel and adhered over the note card.

The sentiment is from one of my favorite sets – Curved Everyday Sentiments Glimmer Hot Foil Plate and Die Set. I love this sweeping curvy design! The sentiments come as two plates, so I foiled one plate using Matte Gold Glimmer Hot Foil and the Glimmer Hot Foil System onto a white card and then cut all the sentiments out in one pass with the coordinating die. For a bit of extra interest, I also die-cut some Champagne Glitter Cardstock with the same die. I adhered both the sentiment and the glitter piece together, slightly offset, and then I glued it down with the right-hand side tucked into the flowers.
To finish the card, I adhered some Gold Mix Color Essential Gems into the flower centers.
Birthday Wishes
For this second card, I added some ink blending and also some shimmer into the mix. The shimmer is subtle and hard to pick up on a photo but it’s very pretty in real life.

I took a panel of Tim Holtz Distress Watercolor Cardstock and using blending brushes, I applied Picked Raspberry, Dried Marigold, and Squeezed Lemonade Distress Inks onto it. I spritzed it with a little bit of water before popping it into the Floral For You 3D Emboss & Cut Folder. I inserted the corresponding cutting die into the other side of the folder, taped the card in place, and then ran it through my die-cutting machine.
I let the panel dry and then took some Hero Arts Unicorn Pigment Ink (white) and ran it gently over the embossed panel. You need a light hand for this and the ink will just catch the most raised sections of the embossed design. I repeated the process a couple of times and let the ink dry.

Once it had dried, I thought it would be pretty to add some gold shimmer onto some areas of the embossing. So, I used the champagne paint in Gansai Tambi Starry Colours, and using a no. 2 round brush I added little dabs of the gold onto the flower centers and also onto the butterfly bodies and antennae. As I mentioned earlier, it’s subtle but it definitely adds a little touch of luxe to the final card!
For my background, I took the Essential Arches Etched Dies and cut an arch slightly larger than my embossed panel. I adhered the embossed panel to it using some thin foam tape and then I added both onto a top folding 110lb A2 note card.
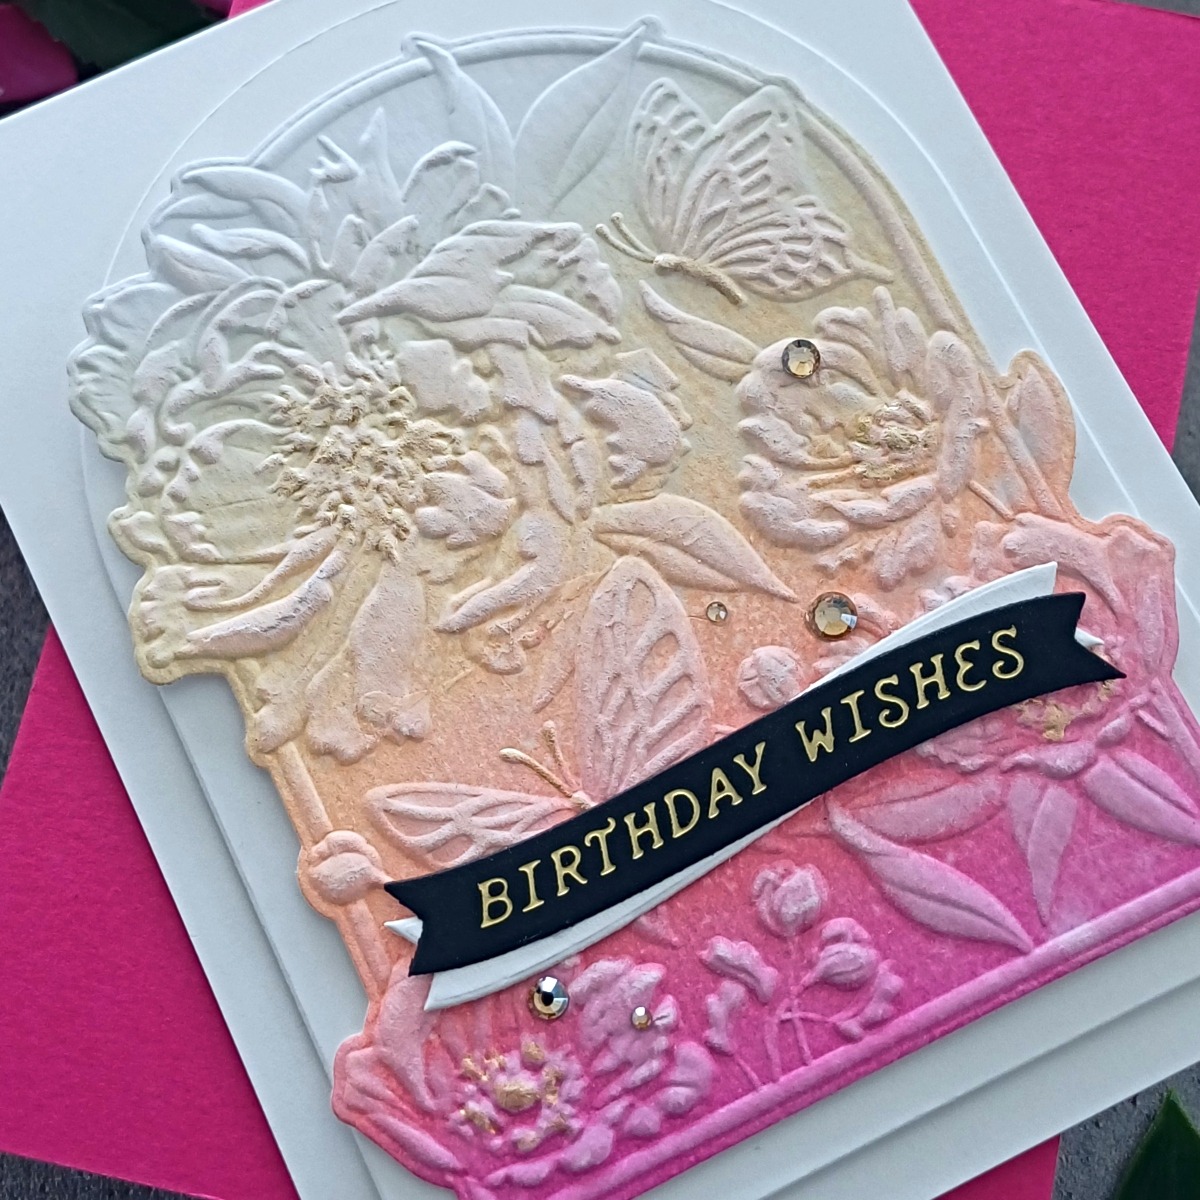
I reached for the same sentiment set as I did for my first card! This set needs to be permanently on my desk! I foiled one of the plates from Curved Everyday Sentiments Glimmer Hot Foil Plate and Die Set onto Onyx card using Matte Gold Glimmer Hot Foil and my glimmer machine. The sentiments were cut out and I also cut out some more white pieces. I adhered them together, at a slight angle and then popped them onto my card using wet adhesive.
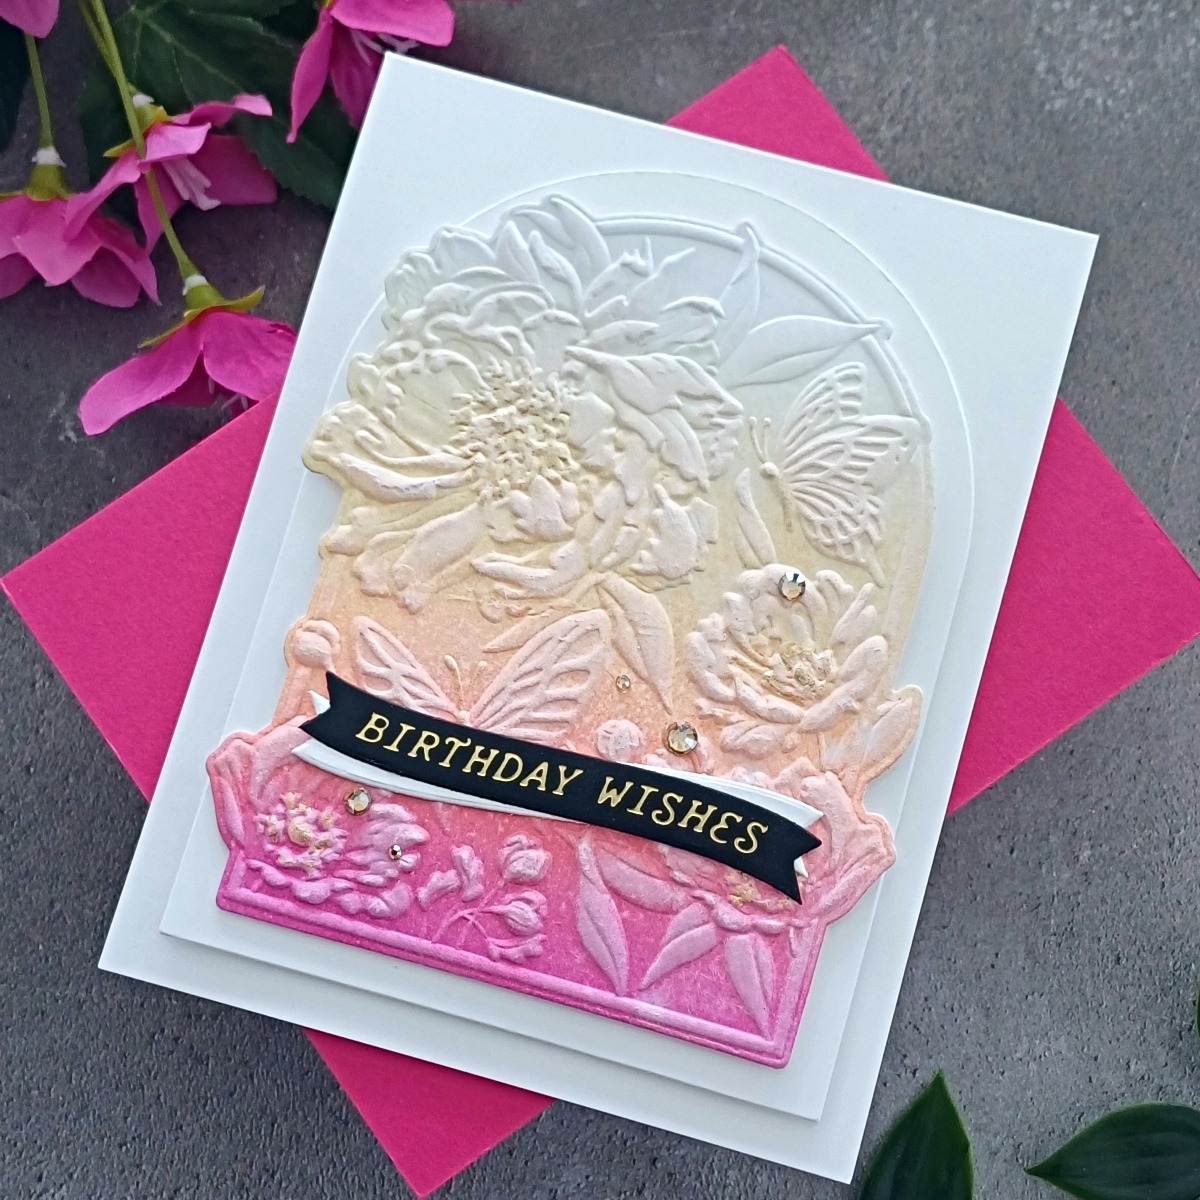
To finish the card, I added some Gold Mix Color Essential Gems.
It’s Your Day
For my third card, I thought I would have a play with one of the new wax seal stamps. The Peony Butterfly Wax Seal Stamp is beautiful!

I made a few of these seals in different colors as I often do when I have my supplies out. It’s always good to have spares on hand! I used Must-Have Wax Bead Mix Pink and the Peony Butterfly Wax Seal Stamp. After I had melted the wax and created the seal, I took a Decocolor Premium Gold Metallic Marker and went over the raised sections on the seal, so that the butterfly and pretty flowers are highlighted in gold.
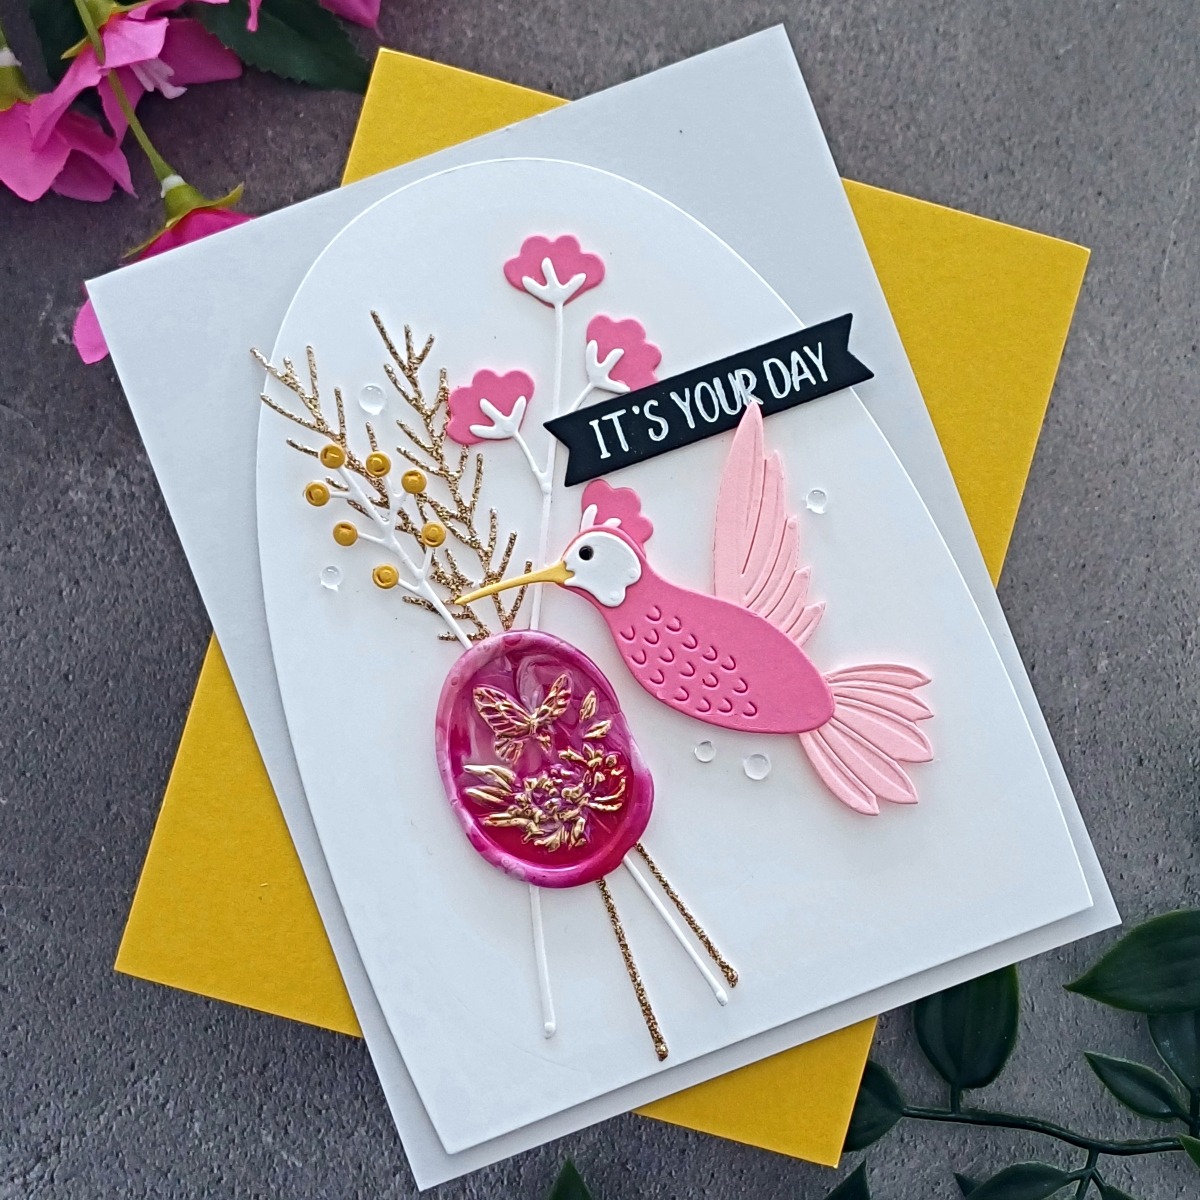
Sometimes I use wax seals as a standalone greeting – they are pretty impactful like that but today I thought I would use the seal in a more traditional way. I die cut the Sealed Botanical Sprigs Etched Dies from white, Fruit Punch, Pink Sand, Tuscan, and Champagne Glitter cardstock. I adhered the elements together and then created a spray which I glued to a white panel that had been cut using an Arch Label & Tag Etched Die. The wax seal was then placed on top using some double-sided tape.

To finish the scene, I die-cut a hummingbird from Delicate Floral Hummingbirds Etched Dies. This was created by cutting Pink Sand, Fruit Punch, Beeswax, and Onyx card. After assembling the hummingbird, I popped it onto my panel with some foam tape. The white arch panel was added onto a note-card which was made out of Fog Color Essentials Cardstock.
The sentiment comes from Cheers To You Sentiments Press Plate and Die Set. I foiled the sentiment plate onto Onyx card using White Glimmer Hot Foil and my glimmer machine. It was cut out with the banner die and then put onto my panel with foam tape.

I finished by adding a few clear raindrops embellishments from my stash.
So that brings us to the end of my cards. I hope that you like them and they give you some ideas of how to use your embossing folders and shaped dies. If you would like to see more of my cards, I would love to have you join me over on my blog, Instagram, Facebook, or YouTube. In the meantime, thank you so much for joining me here on the blog today. I hope that you have a wonderful day!
Spellbinders Supplies:

Other Supplies
Neenah Solar White Classic Crest 80 & 110lb card, Tim Holtz Distress Watercolor Cardstock, Gansai Tambi Starry Colours, Fine Tip Waterbrush, Distress Inks Picked Raspberry, Dried Marigold and Squeezed Lemonade, Hero Arts Blending Brushes, Hero Arts Unicorn Pigment Ink, Tweezers, Thin Foam Tape, Nuvo Light Mist Spray, Embellishment Wand, Raindrops Embellishments, Double-Sided Tape
2 Comments
Helen B
What an amazing set of cards! The embossing folder is lovely whether or not it’s colored. The nesting die components give each card a special touch. tfs
Sheryl
Absolutely beautiful cards, awesome job.