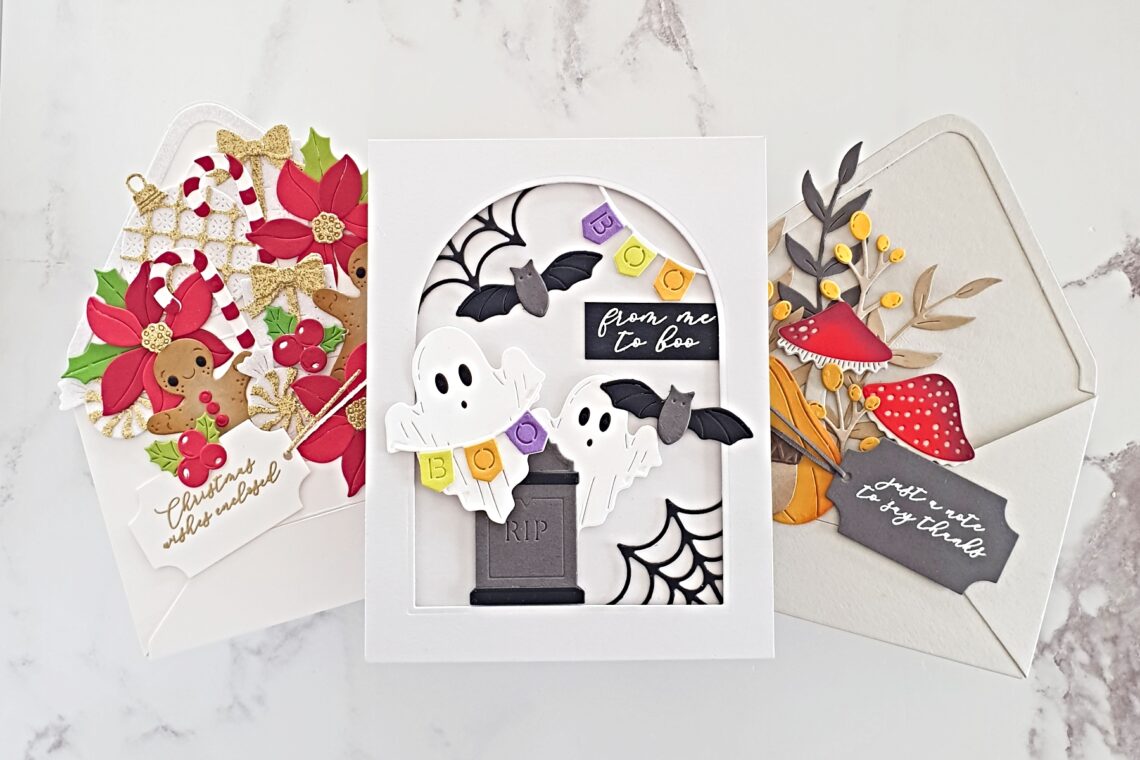
Envelope of Wonder Collection – A Trio of Ideas from Lisa Tilson
Hello everyone, this is Lisa Tilson from My Card Trip and I am delighted to be a guest on the Spellbinders blog today. I will be featuring the super fun Envelope of Wonder Collection and have three cards to share with you. This collection consists of four different envelope collections plus an accompanying clear sentiment stamp set along with a Press Plate and Die Set. I use two of the envelope collections as they were intended but my third card shows how you can use them on a A2 sized card. These sets are good fun with lots of options for filling the envelope – either to bursting point and also in a more clean and simple way.
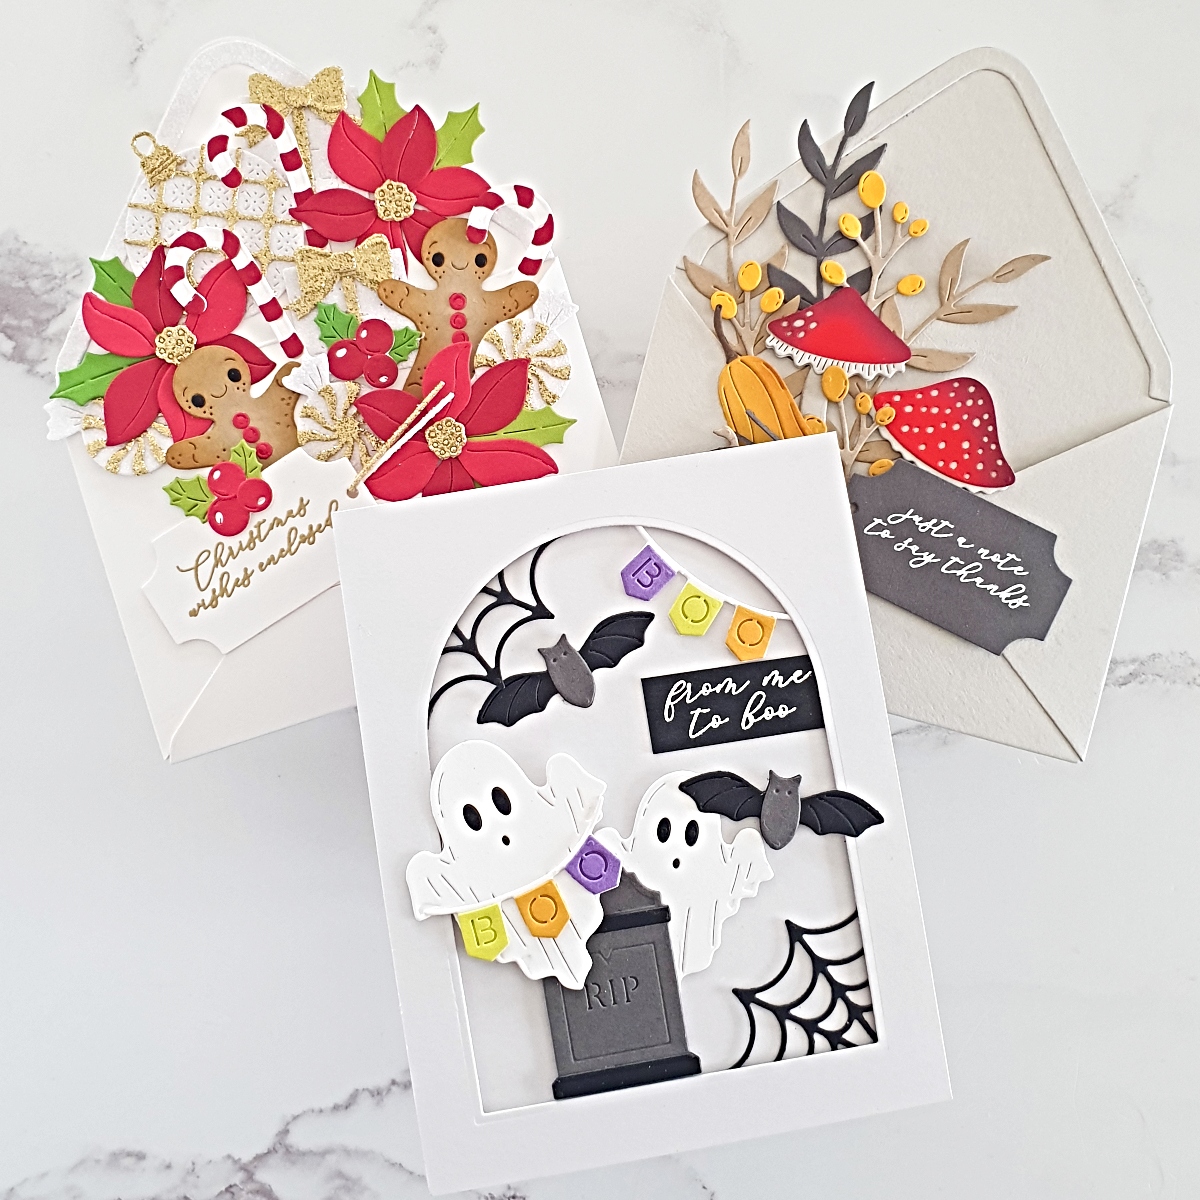
Just A Note To Say Thanks
My first card uses the Autumn Wonder Etched Dies and I have created an offset bundle of Autumnal delights in my envelope.
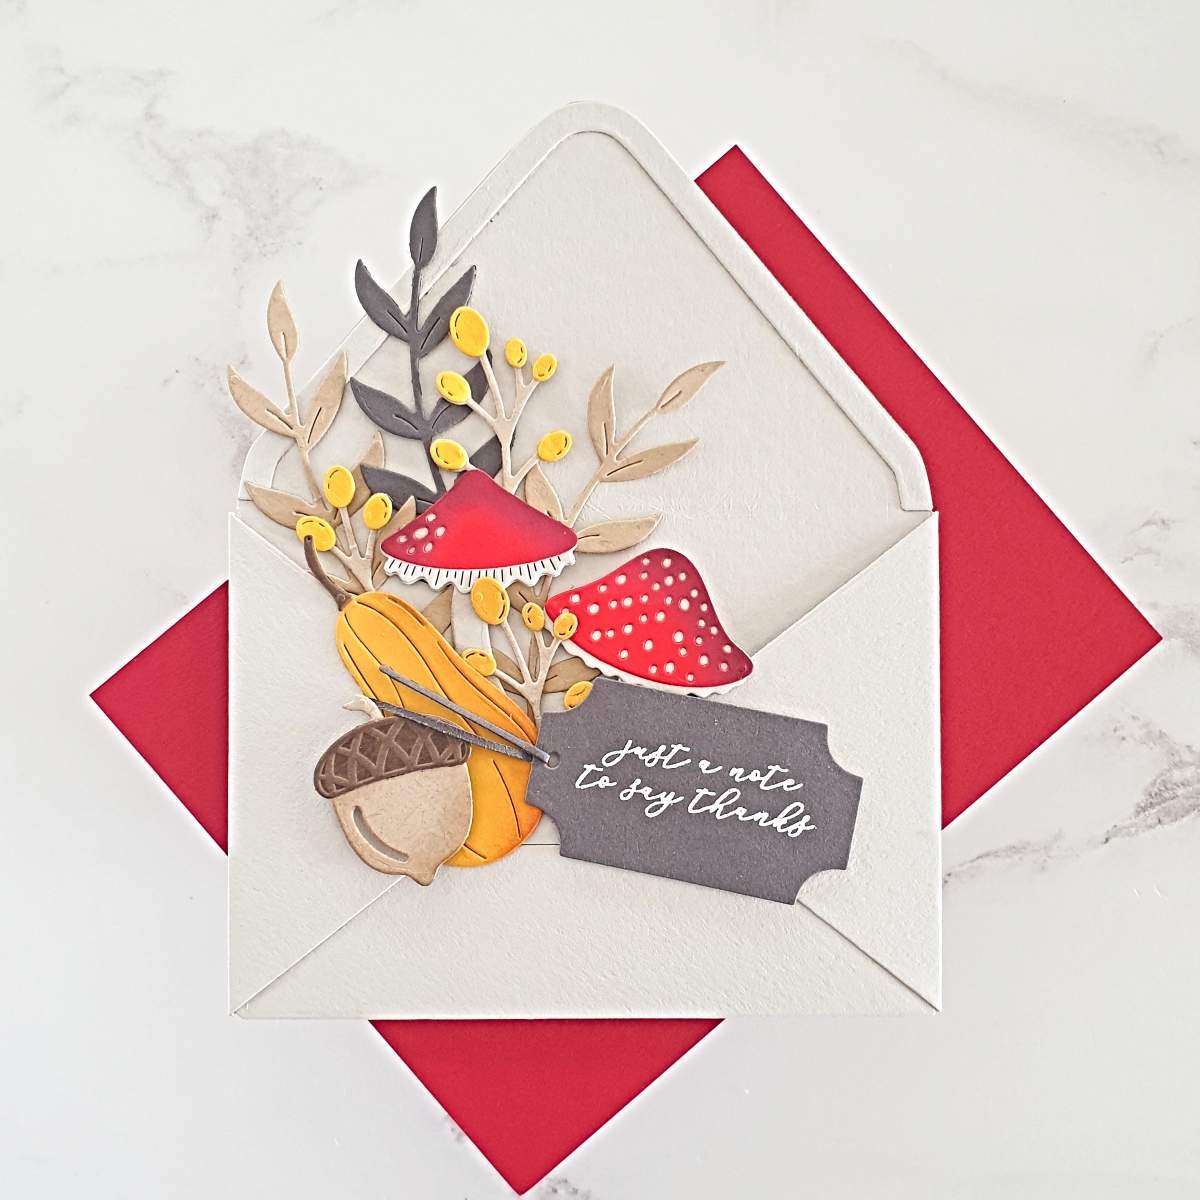
Start off by creating your envelope using the Envelope of Wonder Etched Dies. This die is simple to put together, just make sure that you use strong adhesive when gluing the pieces together so it holds up when you add your images. I went for a neutral cardstock that would blend well with my autumn-themed die cuts.
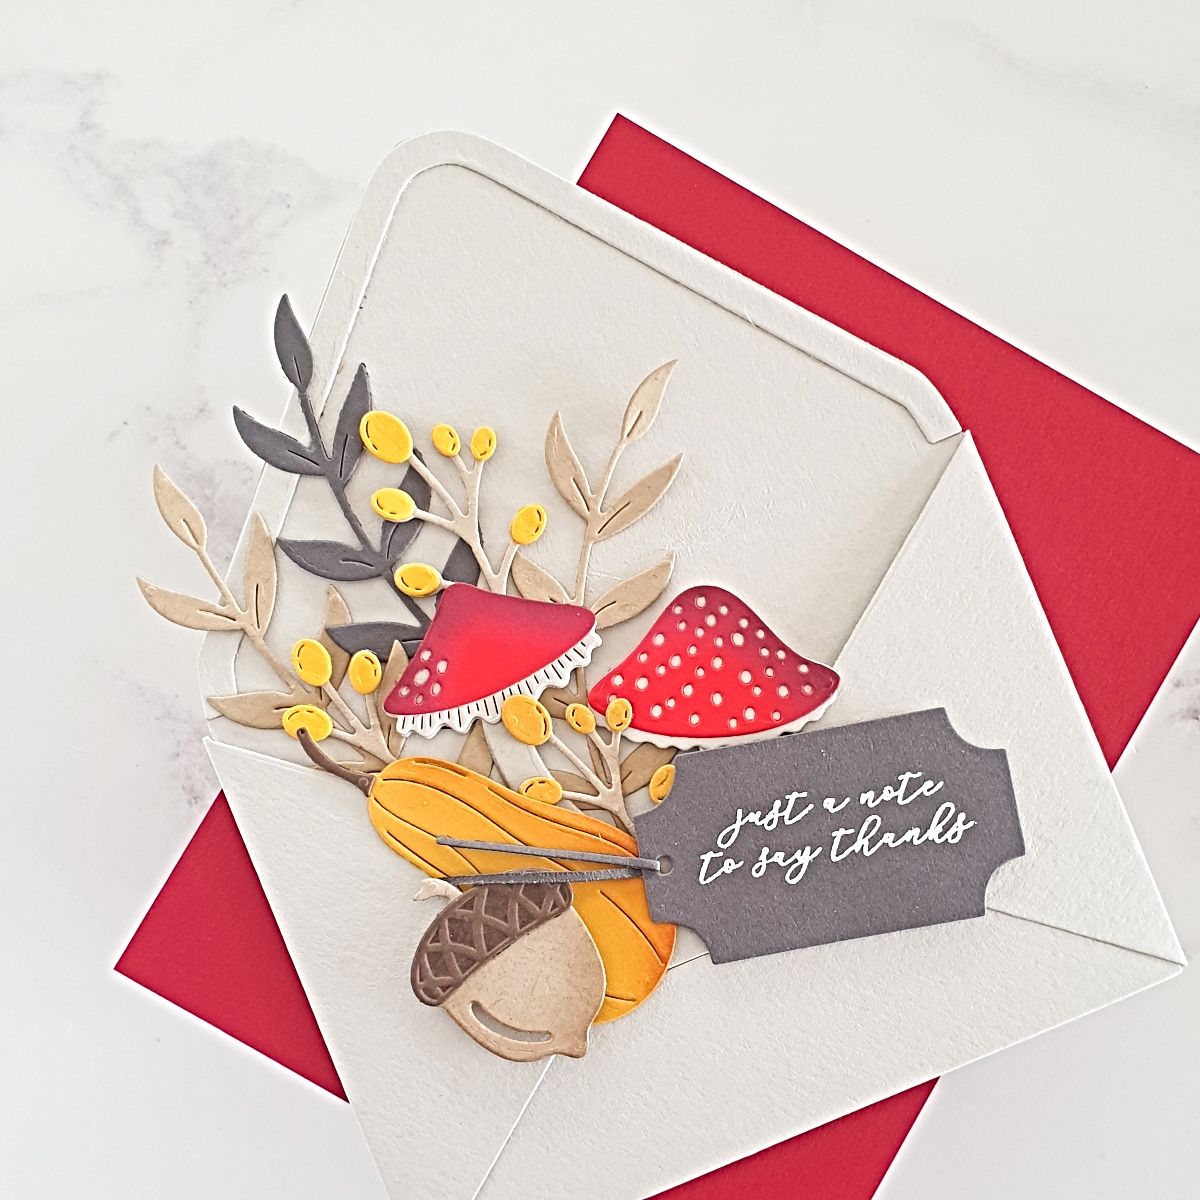
Next, I picked out my cardstock colors and then I die-cut the different elements that I thought I would use including some extras that would be helpful as fillers. I used colored card from my stash along with Tuscan and Saffron Color Essentials Cardstocks. I added ink blending using Lumberjack Plaid and Ground Espresso Distress Inks to my mushrooms, Rusty Hinge Distress Ink to my gourd, and Ground Espresso Distress Ink to my acorn. I adhered all the pieces together where needed and set them to one side. I then picked a suitable sentiment from the Envelope of Wonder Sentiments Clear Stamp Set and stamped it onto some dark grey card using sticky embossing ink. I applied white detail embossing powder and heat set before trimming it out with the tag die from the Envelope of Wonder Etched Dies. I also die-cut the tag strings at the same time and threaded them through the hole in the tag, securing them in place.
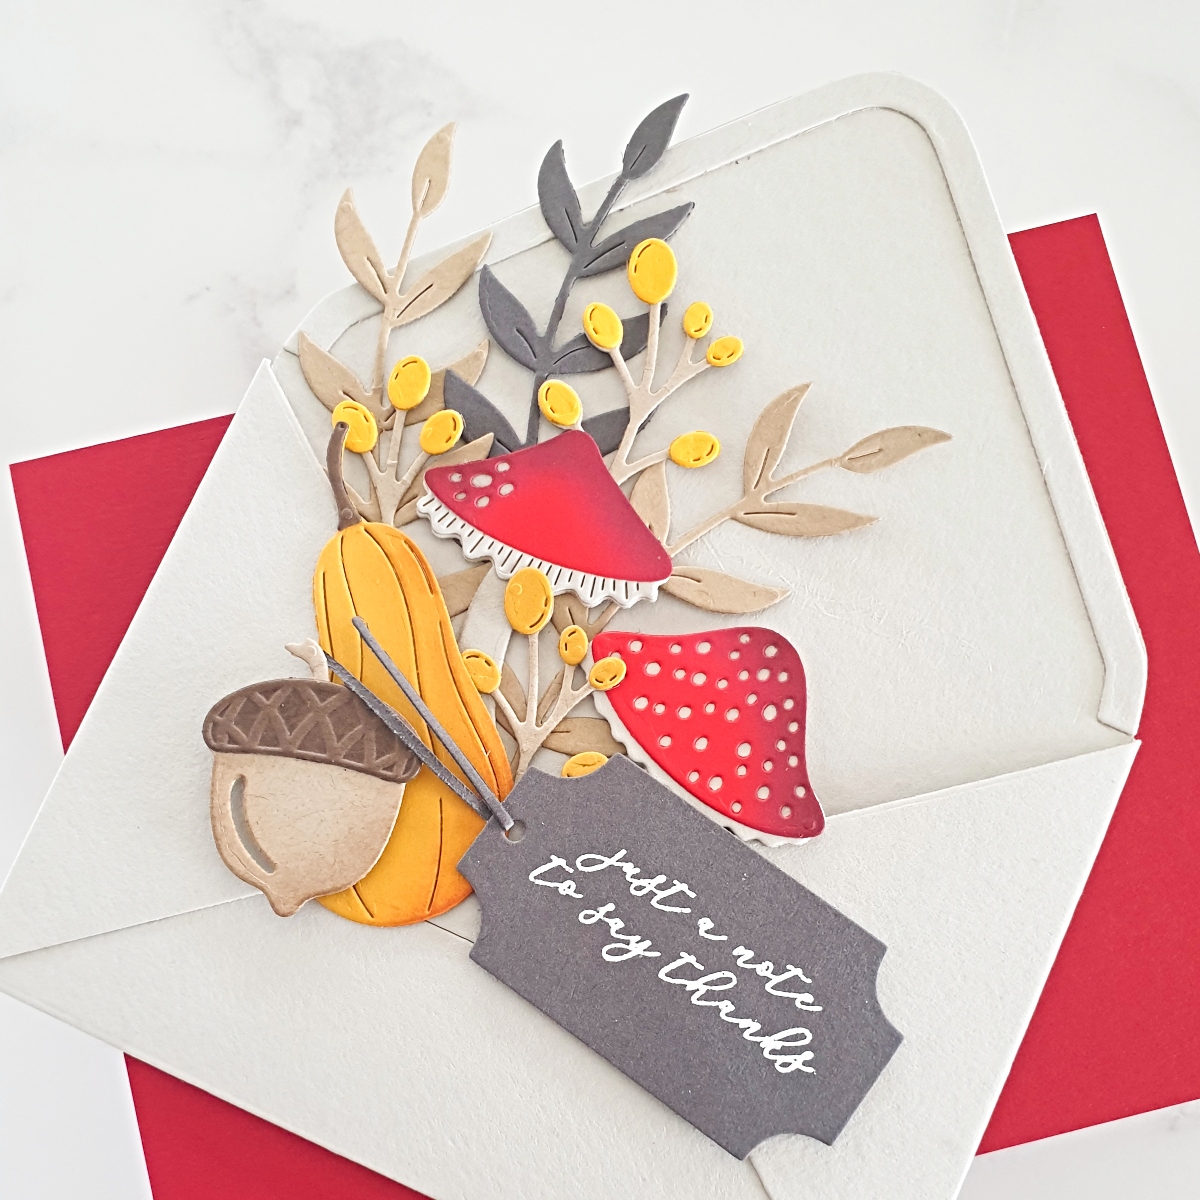
The fun part starts when pulling your arrangement together. Once I was happy with all of my image placements, I took a photo and then dismantled all of it! Using my photo as my guide, I adhered each of my die cuts back into the inside of the envelope, or along the outer edge. When adding my sentiment tag, I popped some thin foam tape onto the back first.
I left the top parts of the leaves and mushrooms free from glue as I like them to look a little bit airy and it also adds some more interest to the final design.
Card 2 – From Me To Boo
My second card shows you how to use your images in a different way and I used quite a lot of the different die options from the Halloween Wonder Etched Dies to create my spooky but sweet scene.
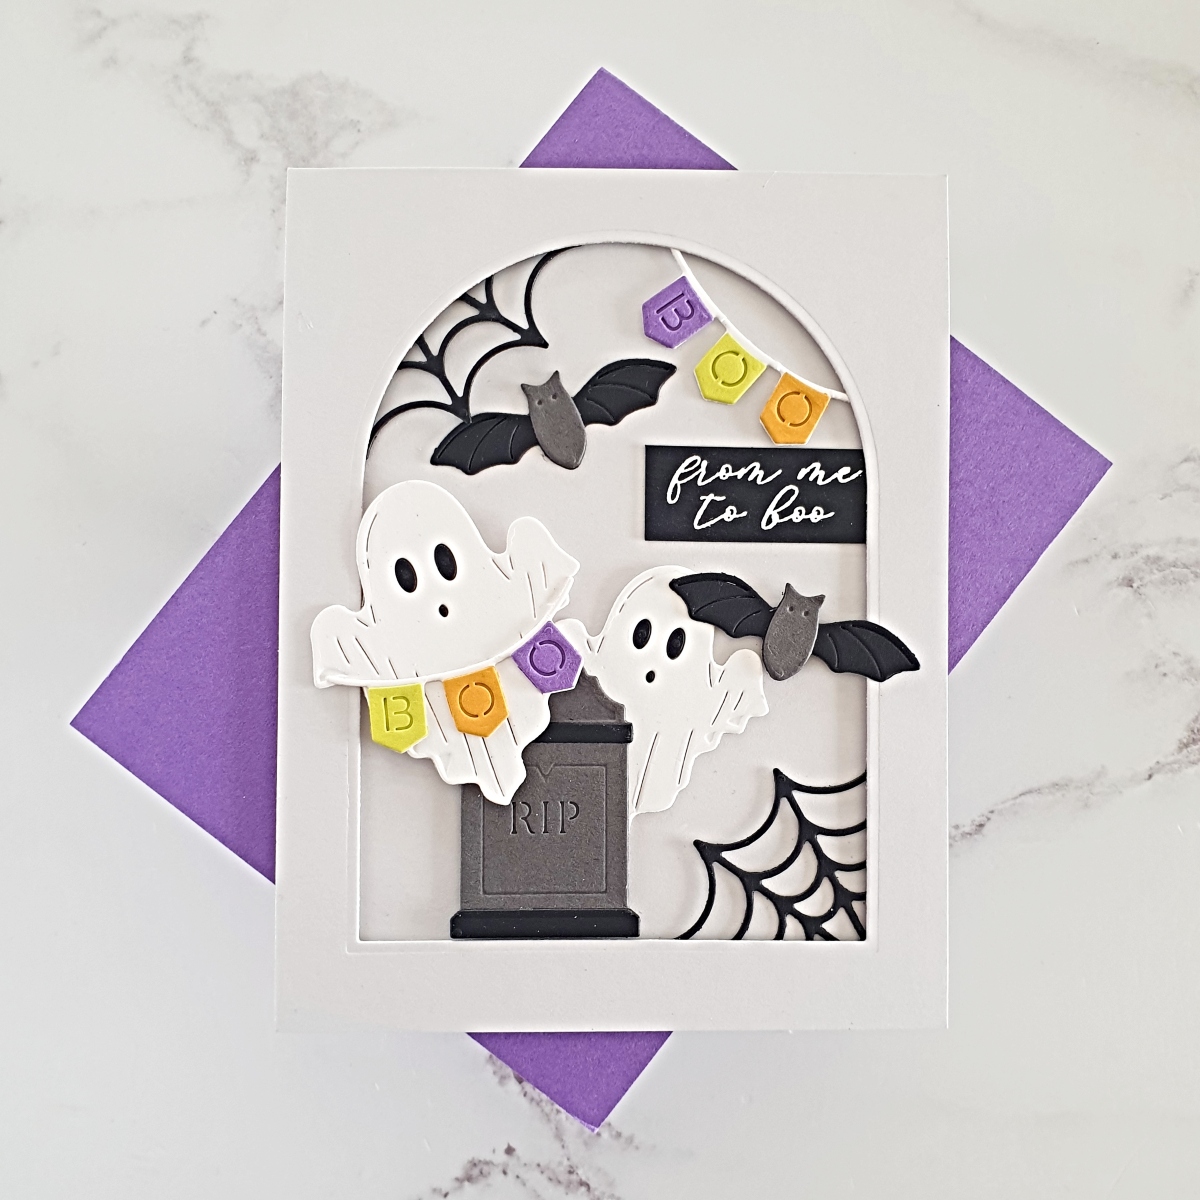
As I did with the first card, I started by pulling out all the different colored card I thought I would use. A few were discarded along the way but it’s good to have options! I die-cut all the different elements that I knew I would need, plus a few that I wasn’t sure about so I could play about with different arrangements. The die cuts were all adhered together and set to one side.
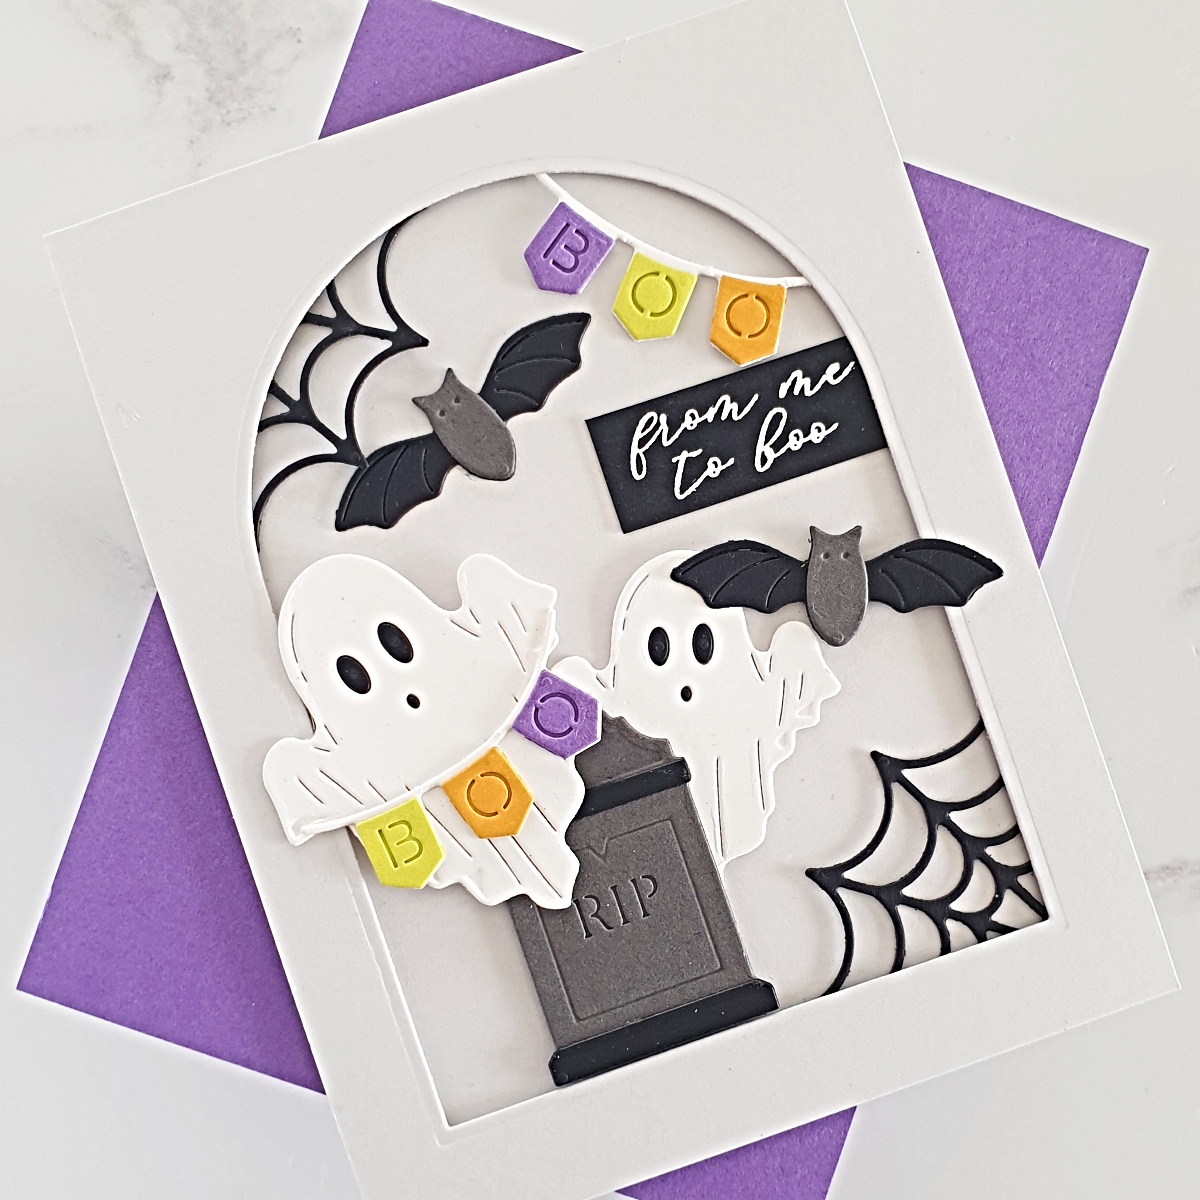
I created an American A2-sized top folding notecard from Fog Color Essentials Cardstock. I also cut an A2 panel of fog card using one of the arched dies from Essential Arches Etched Dies. I began by gluing the cobwebs and one of the boo garlands behind the arch before I popped some thin foam tape onto the back of the arch panel and added it to the base card.
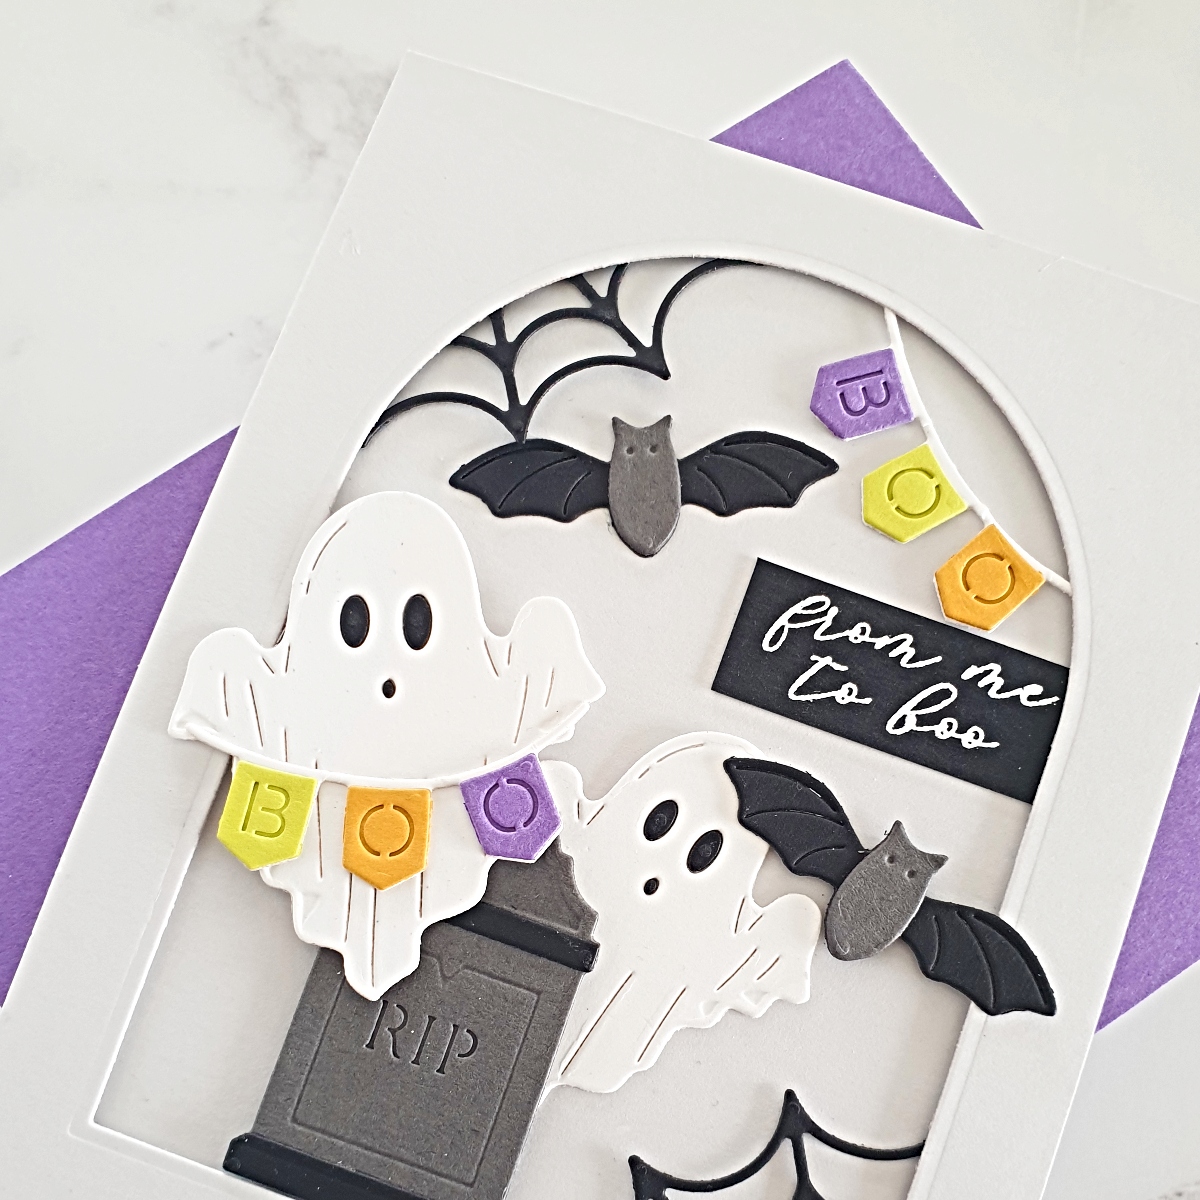
The remaining elements were inserted into the scene either with foam tape or just directly into the arch with wet adhesive. I thought it would be cute to add a boo garland onto the ghost and it fits just perfectly! To finish, I stamped a sentiment from Envelope of Wonder Sentiments Clear Stamp Set onto a black card with sticky embossing ink. I applied white detail embossing powder and heat set it. It was trimmed and popped inside the arch.
Although I went with a traditional card here, I thought it would be great fun to add the bats and a few ghosts onto thin acetate strips and have them appear to be flying around outside of the envelope. That’s for another day!
Card 3 – Christmas Wishes Enclosed
My final card is a “go big or go home” option using the Envelope of Wonder Etched Dies and the Christmas Wonder Etched Dies.
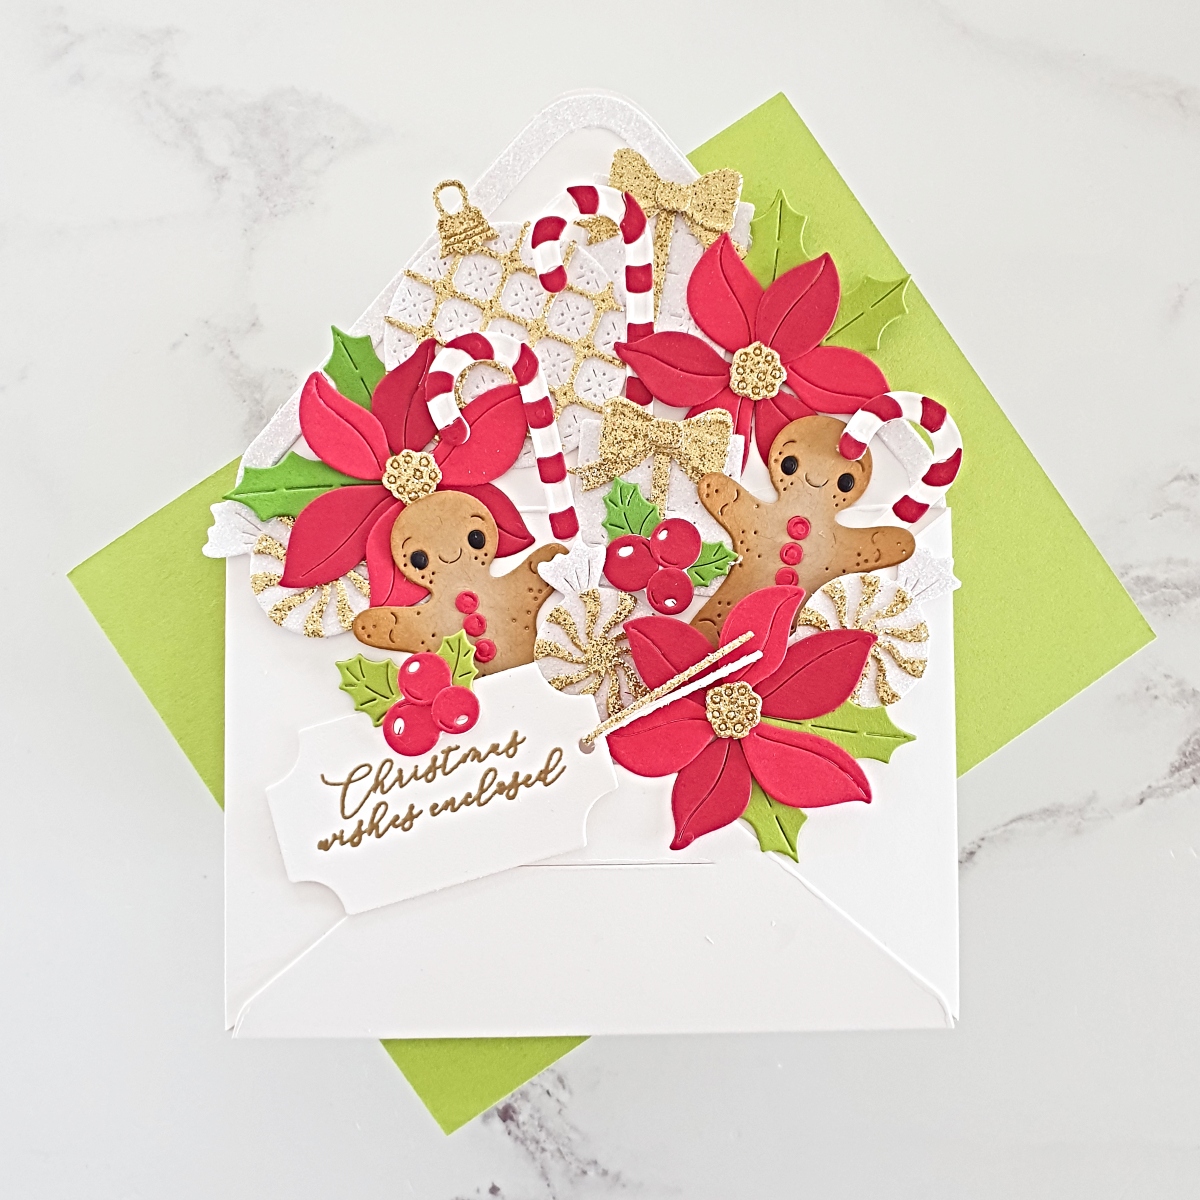
This time I created my envelope mostly from plain white card, but I did add some white glitter card to the inside of the top flap. There is lots of sparkle in this card and I went with a traditional red, green, gold, and white color palette. I pretty much used all the dies in the set and I die-cut several flowers, candy canes, gingerbread men, and sweets. So, this envelope is bursting with glittery fun! I added a little bit of ink blending onto the gingerbread men so that they didn’t appear quite so flat and I used Brushed Corduroy Distress Ink for that.
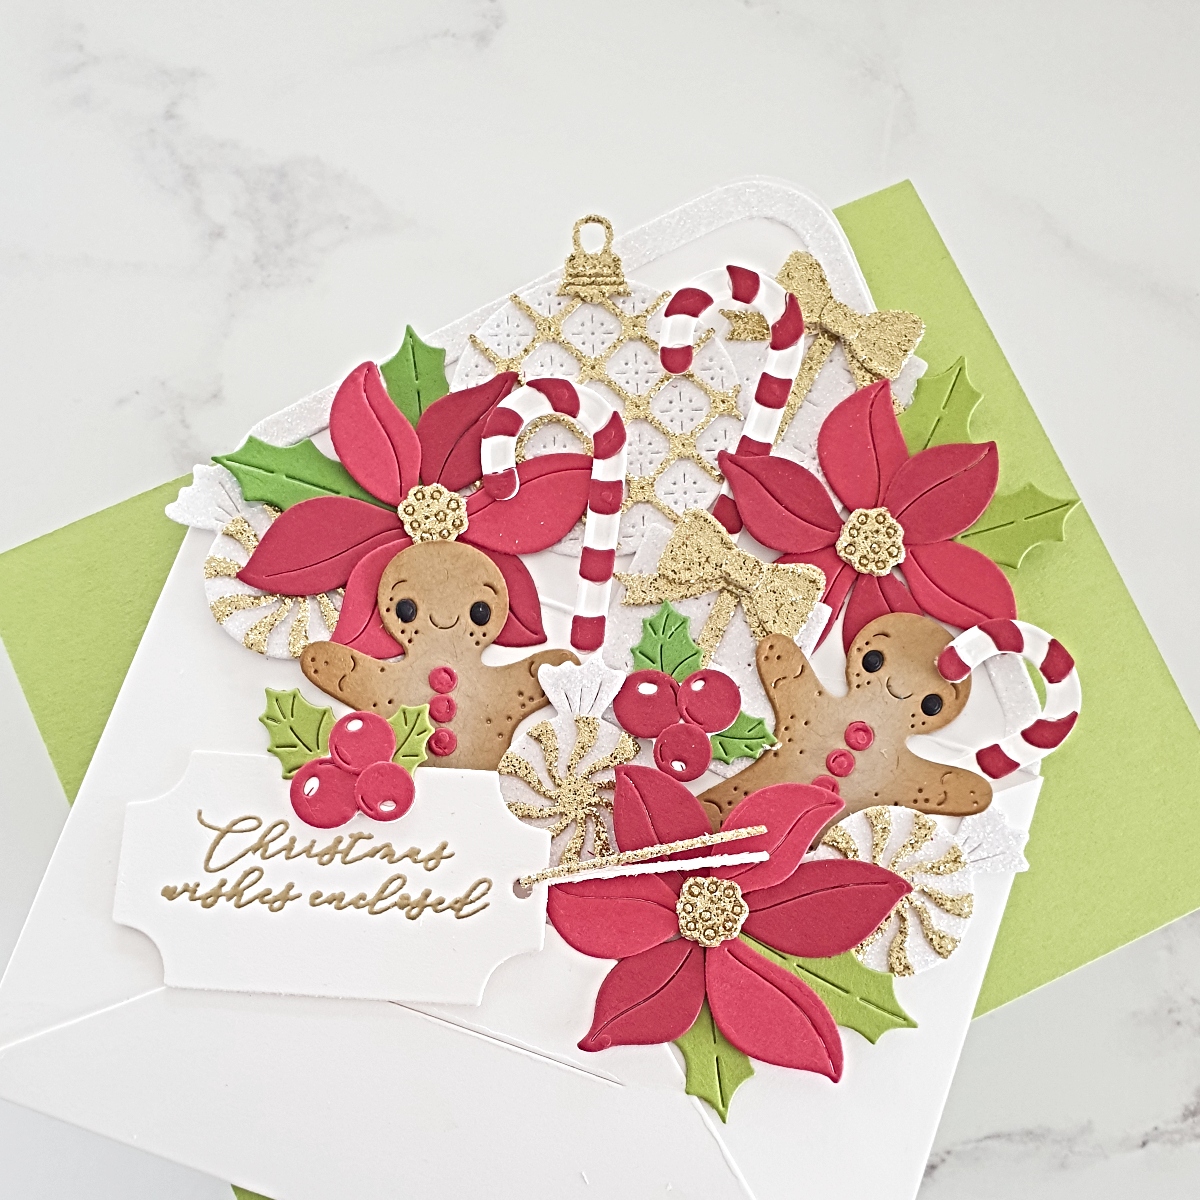
It did take me some time to come up with my final arrangement as there was a lot to pack in but I started building it up by placing the three poinsettias followed by the two gingerbread men, as they were the largest of the die cuts. All of the other elements were added gradually and I opted to have a few of them spilling outside of the envelope as well. Once again, I took a photo before taking everything back out and reassembling it with glue. This part goes pretty quickly once you know your design.

To finish up, I stamped the “Christmas Wishes Enclosed” sentiment from Envelope of Wonder Sentiments Clear Stamp Set using sticky embossing ink. I applied gold embossing powder and heat set it before trimming it out with the tag die from Envelope of Wonder Etched Dies.
That brings us to the end of my cards. I hope that they have inspired you to create these unique envelope cards which are sure to be a really fun surprise for the recipient. Thank you for your visit today and happy crafting!
Spellbinders Supplies:

Other Supplies
Neenah Solar White Classic Crest 80lb/110lb, thin foam tape, tweezers, embellishment wand, die cutting machine, wet adhesive, Hero Arts White Detail Embossing Powder, MISTI, other colored cardstock from stash, Versamark Ink, Hero Arts Gold Embossing Powder, Hero Arts Glitter Paper Holiday Sparkle, Hero Arts Glitter Paper Basics, Hero Arts Blending Brushes
FSJ June 2018 Bloom Box – Set Sail!
Cardmaking Inspiration | Happy Birthday Card with Elena