Adding Color to Better Press with Inks, Foils, and Pencils!
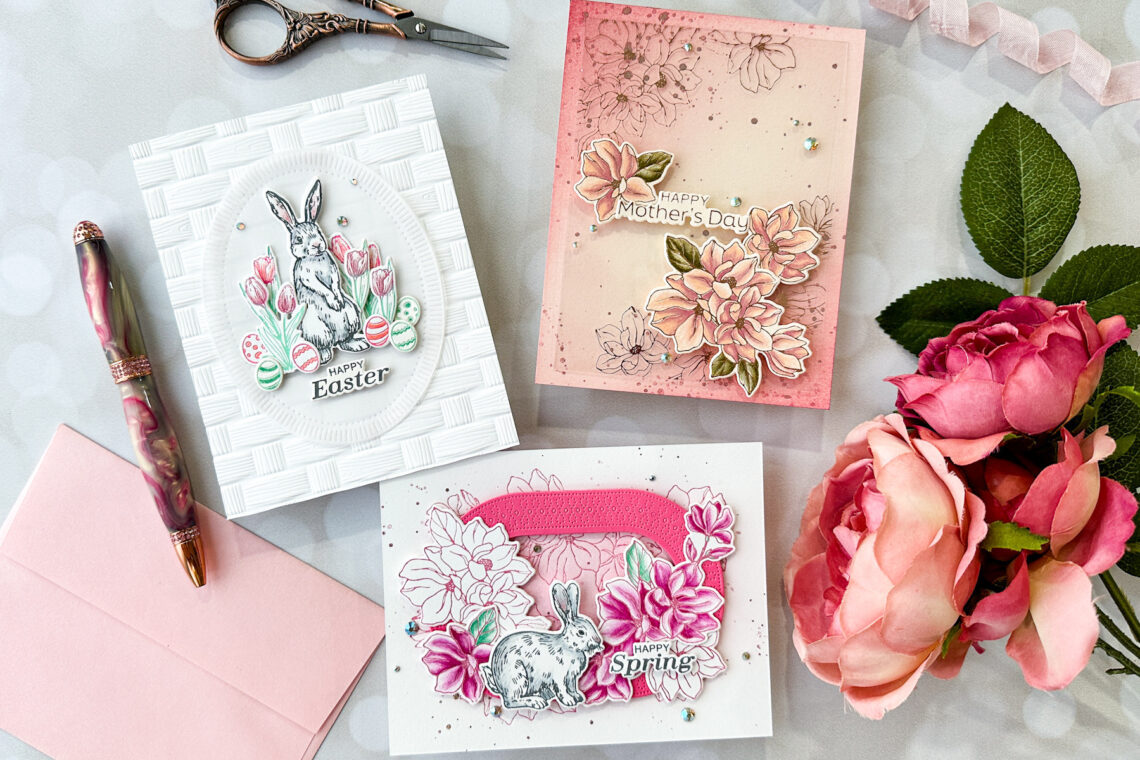
Hi friends! Emily Midgett from Sixth Street Sundries is here with you today on the Spellbinders blog, and I’m so excited to be featuring these beautiful new images from the Simon Hurley Spring Sampler Better Press collection! These images are classic and utterly reminiscent of springtime, featuring some storybook bunnies that are channeling Beatrix Potter’s Peter Rabbit illustrations, an embossing folder that adds beautifully subtle and neutral basket texture, and some elegant magnolia images that are gorgeous with or without coloring. I have three projects to share with you today upon which I have added lots of color with both inks and colored pencils, so let’s get started with the details!
My favorite attribute of the Better Press products is that these images can be used with both the Better Press system as well as the Glimmer Hot Foil system, making the Better Press plates super versatile! I chose to employ both techniques today to create these springy projects, adding some extra color and detail with my Luminance colored pencils. The Better Press letterpress paper is marvelous for use with colored pencils, featuring just enough “tooth” to make pencil work a breeze.
For my first project, I wanted to create a crisp, colorful, but still relatively simple project by allowing the colorful inks in the new Tropical and Jet Set Mini Better Press Ink Sets to do a lot of the work for me!
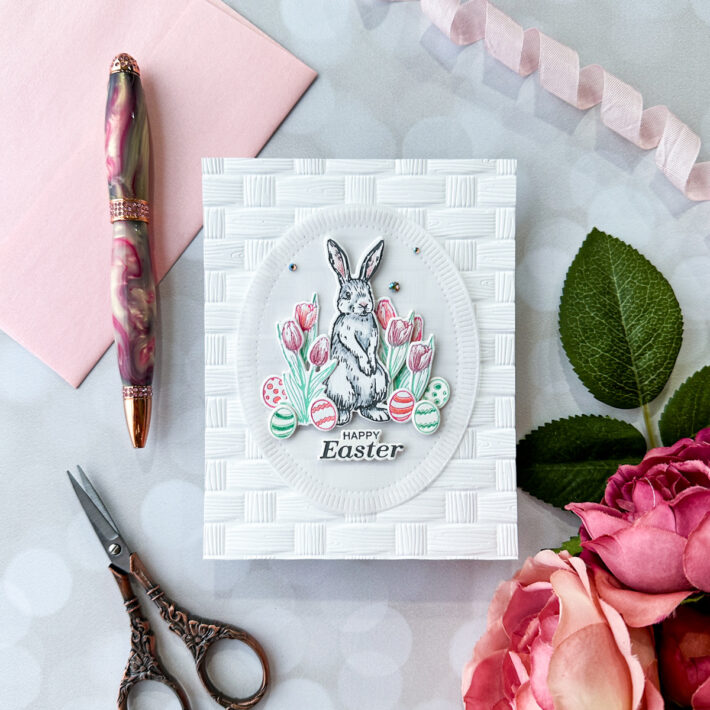
- Impress the images from the Spring Bunnies set using a variety of ink colors. Tip: to create the two-tone flower images, simply use the corner of your mini Better Press ink pad to have more control over where your ink is applied on the Press Plate. The viscosity of the ink will allow you extra time to add multiple colors of ink without worrying about it beading up!
- Die cut the images using the coordinating dies from the Spring Bunnies Press Plate set.
- Use colored pencils to add simple shadows to the detailed bunny and tulip images.
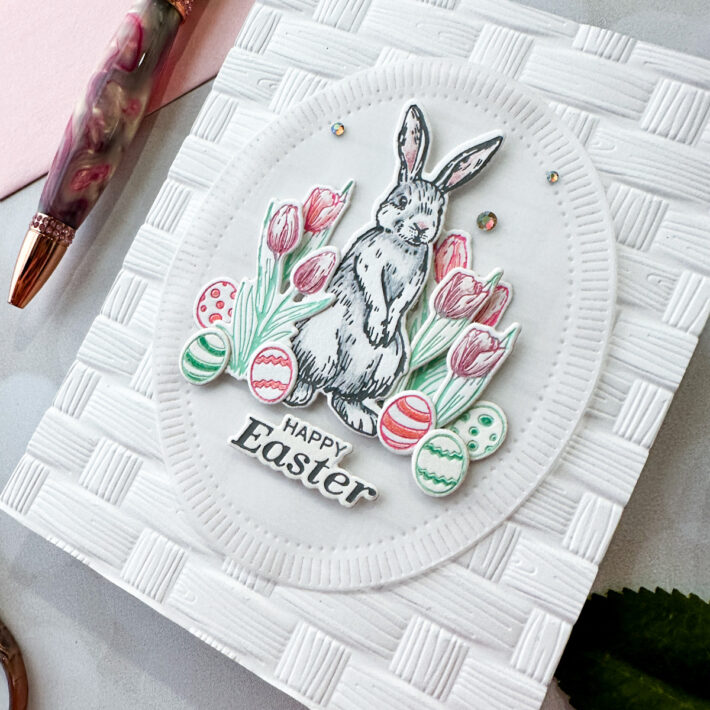
- For the background, emboss an A2 panel of white cardstock using the Woven 3D embossing folder.
- To ground the letterpress images and create a space for the springtime scene, die cut a Fluted Oval from some vellum.
- Adhere the bunny in the center of the oval using foam adhesive, then build the scene around the bunny, adhering some flowers and eggs with liquid adhesive and some with foam tape to add extra dimension.
- Adhere the oval to the embossed background panel using liquid adhesive, hiding the adhesive behind the solid die cuts.
- Embellish with some Aura AB gems for sparkle!
For my second card, I again employed the Better Press system to create this colorful, springy card, pairing the sweet bunny from the Spring Bunnies with the beautiful floral bouquets in the Spring Magnolias set.

- Impress the bunny and magnolia images into Porcelain Better Press paper using Garnet and Thunder inks from the Jet Set mini Better Press Ink set. Die cut with the coordinating dies.
- Add shadows to the bunny using a light gray colored pencil, blending the edges out with a white colored pencil.
- Add color to some of the magnolia images with a dark pink pencil, deepening the color on the petals tucked underneath the others to create contrast and shadow.
- Leave other magnolia die cuts plain with only the colored outline.
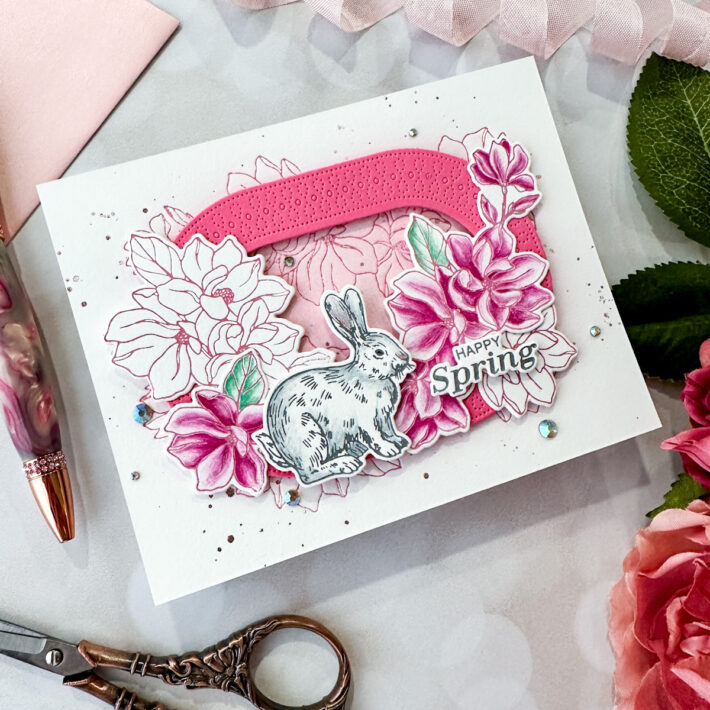
- Impress the Spring Magnolias in a circular pattern on the center of an A2 panel of Porcelain Better Press paper using Garnet ink, then blend a halo of Garnet ink in the center using a blending brush. Splatter the panel with sparkly pink watercolors.
- Die cut a decorative oval from Fruit Punch cardstock using the Infinity Punch & Pierce Plate, then pop it up in the center of the pressed, blended, and splattered background panel using foam adhesive.
- Arrange the floral and bunny die cuts on the oval, popping the bunny and sentiment up with a double layer of foam adhesive for extra interest.
- Tuck a few Aura AB gems around the arrangement for extra sparkle.
For my last project, I used the Spring Magnolias Better Press Plates as hot foil plates with my Glimmer Machine, pairing the images with some beautiful pale peach cardstock and acetate to create this unique, tone-on-tone card.
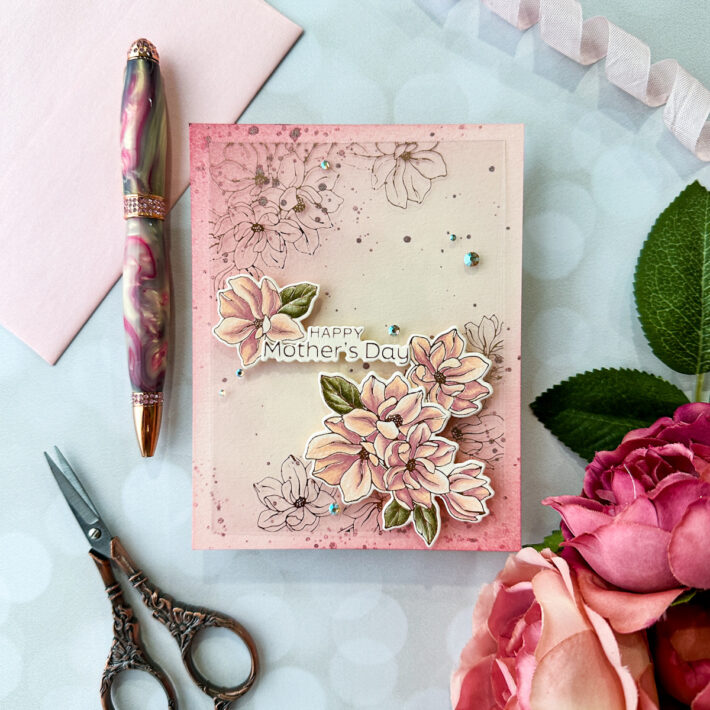
- Hot foil the magnolias onto the corner of a panel of Glimmer Heat Resistant Acetate using Blush foil. The super smooth surface of the acetate makes it so easy to hot-foil these detailed images!
- Hot foil the magnolias from Spring Magnolias onto some Barely Peach cardstock from Spellbinders, again using Blush hot foil.
- Hot foil the “Happy Mother’s Day” greeting from Spring Magnolias with more Blush foil, then die cut with the coordinating die.
- Use colored pencils to add color and shadows to the floral images and die-cut them with the coordinating dies.
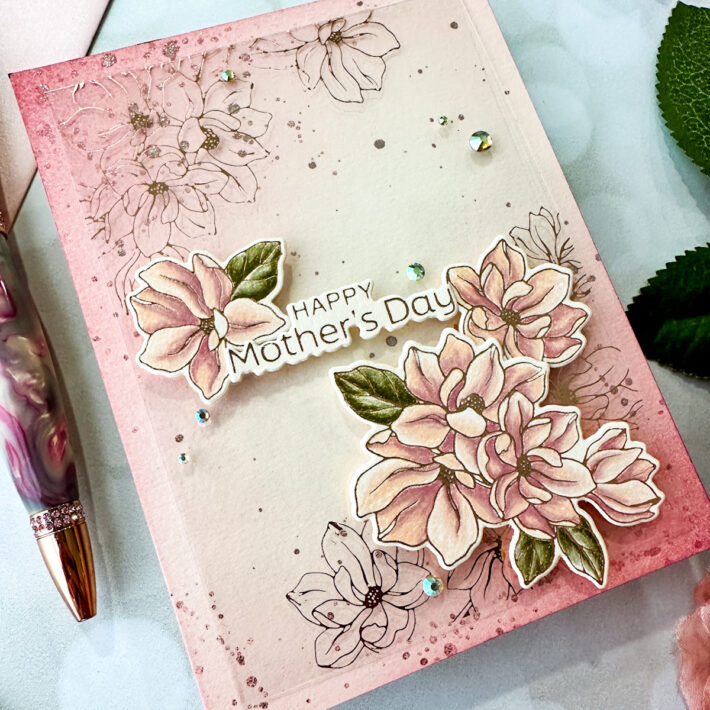
- Using a blending brush, blend Garnet ink on the corners of a full-sized A2 panel of Barely Peach cardstock in the corners that coordinates with the hot foiled magnolias on the acetate panel, then splatter with sparkling pink watercolors.
- Trim the acetate panel down ¼” on each side.
- Center the acetate panel on the blended and splattered card front, then arrange the die cut and pencil-colored magnolias on the acetate and adhere with foam tape.
- Tuck the “Happy Mother’s Day” greeting from Spring Magnolias amongst the magnolia die cuts.
- Flip the acetate panel over and add more foam adhesive to the back of the solid die cuts, then center on the blended and splattered panel.
- Embellish with a few Aura AB gems for added sparkle and elegance!
Well, that’s all for my projects today! It’s so much fun to find new ways to use these Better Press plates to make them super versatile and even more full of value.
To see more of my work, you can check out my blog EmilyMidgett.com or on Instagram @eamidgett. Thank you so much to Spellbinders for having me as their guest, and thank you for reading! Have a marvelous day!
Spellbinders Supplies:

Other supplies
Caran D’Ache Luminance Colored Pencils, handmade glitter watercolors

One Comment
Becky Green
LOVELY WORK, Emily! I especially like your Mother’s Day Card!