Cultivate Your Cardstock Green Thumb with New Propagation Garden from Annie Williams!
Hi friends! Emily Midgett from Sixth Street Sundries is here with you today, and I’m very happy to be a guest here on the Spellbinders blog! My husband often jokes that the only way I can grow anything green is on a card, which is 100% accurate. I have purchased and been given many a beautiful plant in my lifetime only to have them sadly wither away. So many people began creating their own miniature greenhouses during the pandemic, and so it makes sense that Spellbinders designed the Propagation Garden product suite to celebrate those lucky folks with green thumbs! I have created a trio of projects with the new products featuring a rich gold-and-green color palette. Let’s get started with the details!
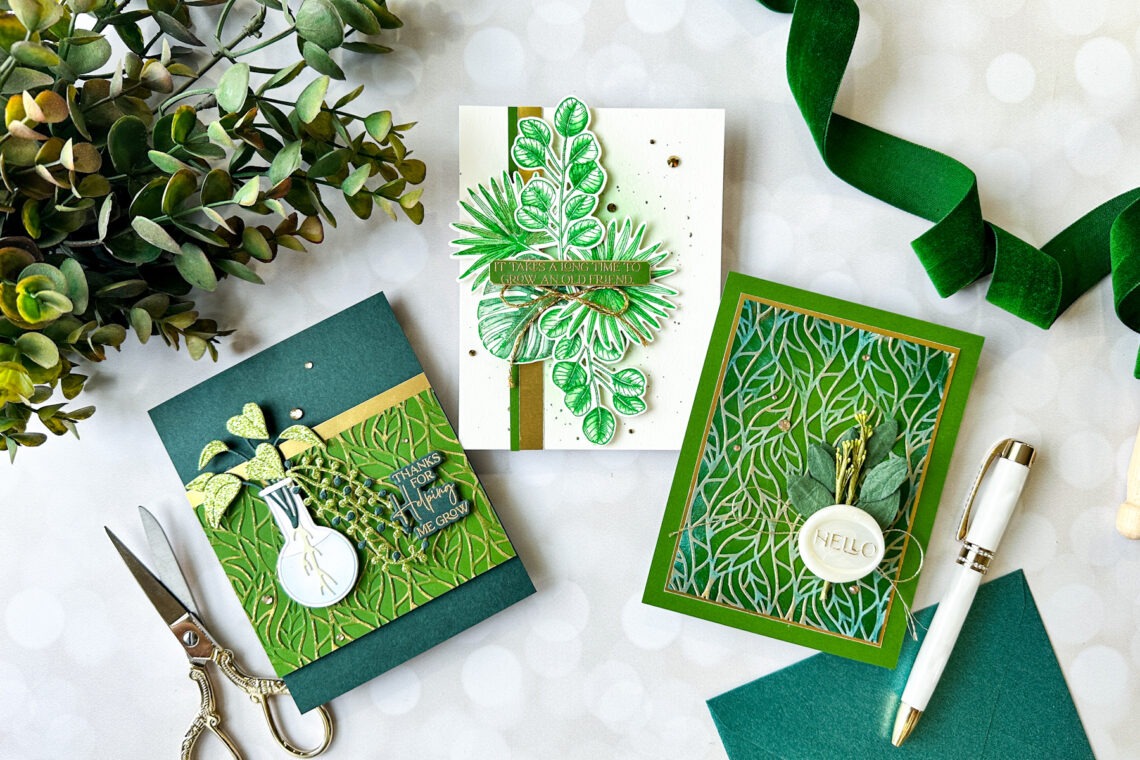
Green and gold sometimes can be reminiscent of St. Patrick’s Day for me, but I found the combination utterly luscious when paired with the delicate die cuts and Better Press plates in the new Propagation Garden product suite. I pulled out Fern and Forest cardstock from Spellbinders, along with some shining Gold Mirror cardstock and then a few glittery coordinating accents from my stash to create this coordinating trio.
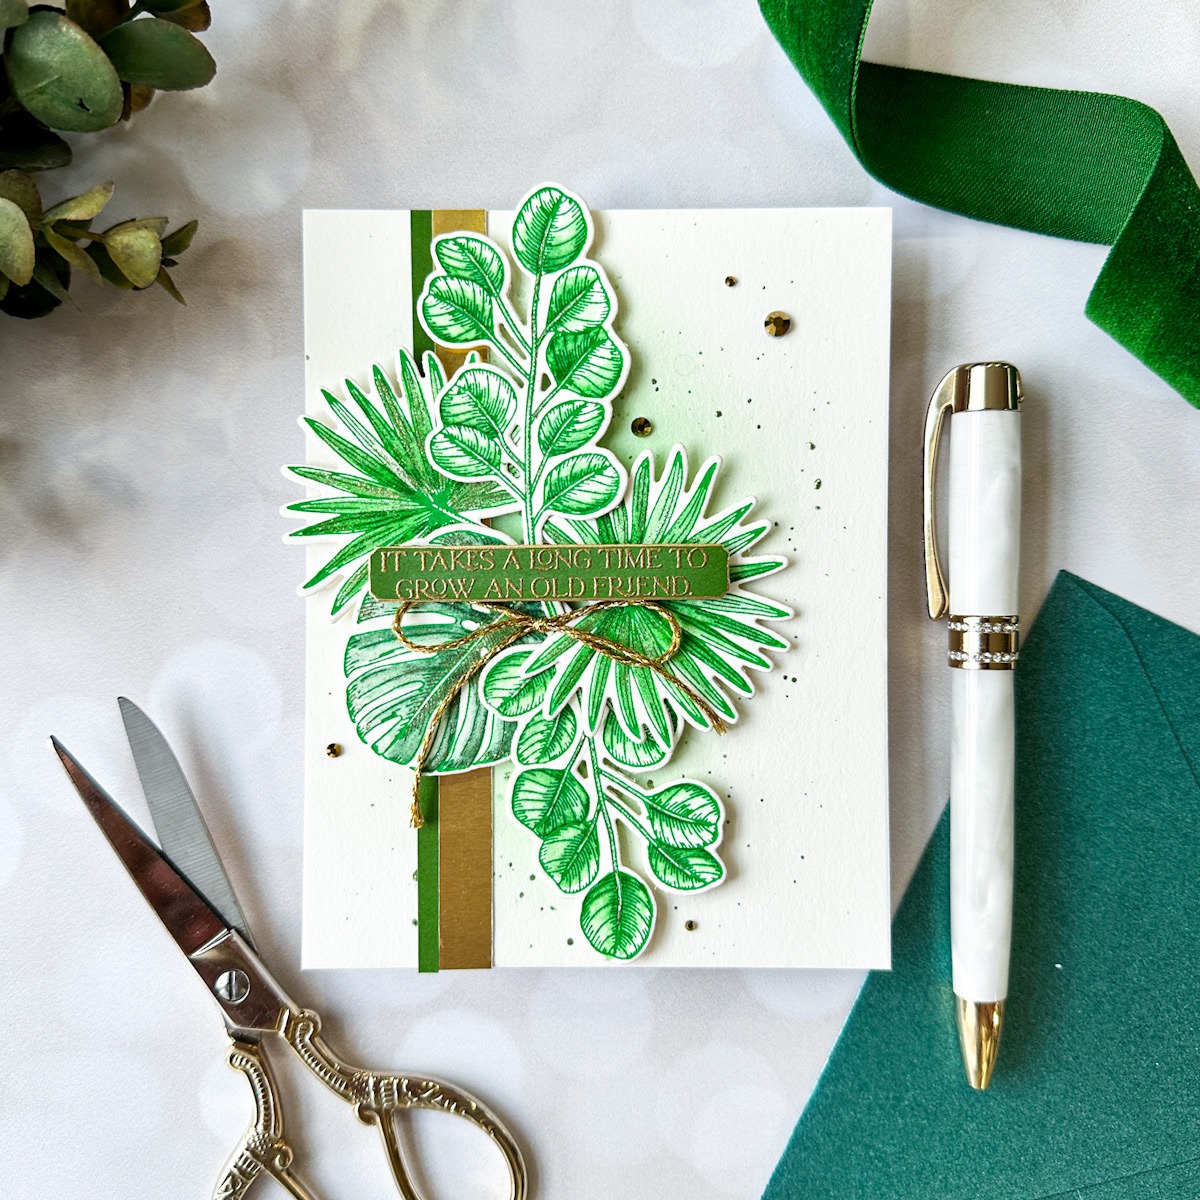
My first card uses the beautifully detailed new Tropical Leaves Better Press Plate and the waterproof nature of the Better Press inks! I used my pan watercolors to add some vivid greens to the letterpress images, creating this eclectic “bouquet” of foliage.
- First, impress the different leaf images from the Tropical Leaves Press Plate set onto Porcelain Better Press Paper using Leaf Better Press Ink.
- Using your favorite watercolors, add shadows and details to the letterpress images, creating an almost no-line look with the tone-on-tone colors.
- Die cut the images with their included coordinating dies.
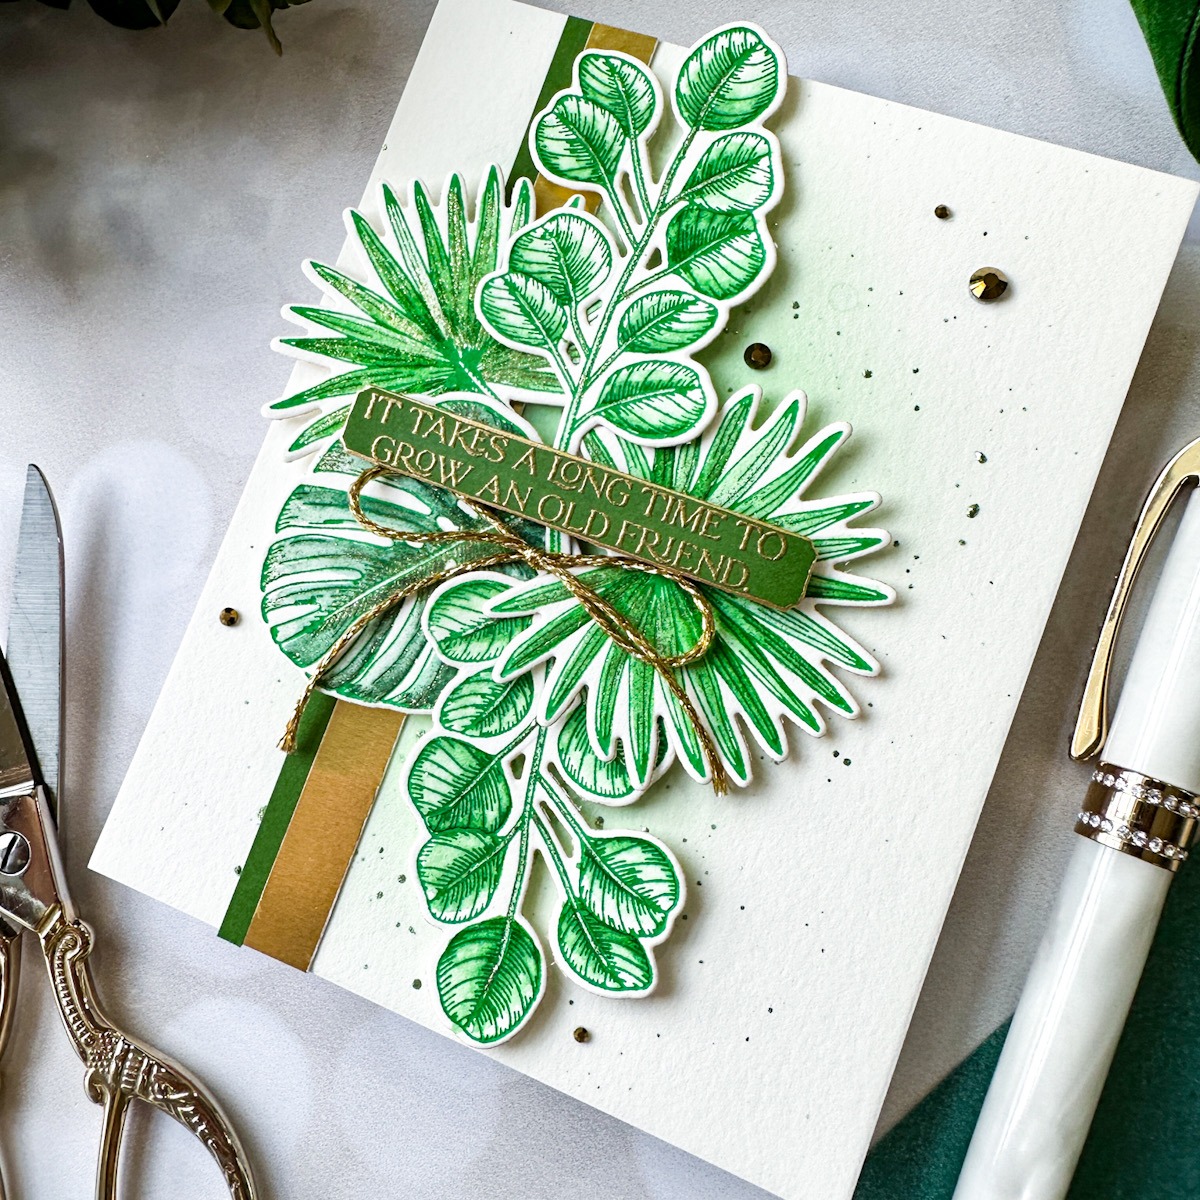
- To create the card base, use a blending brush to blend some of the Leaf Better Press Ink on an A2 panel of the Porcelain Better Press Paper, then splatter with metallic gold watercolors.
- Trim down a strip of Metallic Gold Mirror cardstock as well as a thinner strip of Fern cardstock and adhere to the blended card front, orienting the strips to the left of the panel.
- Arrange the foliage die cuts on the card front and adhere with foam adhesive, allowing them to “radiate” out from a central point.
- Heat emboss and die cut a greeting from the Propagation Garden Sentiments set using gold embossing powder on Fern cardstock, then run a metallic gold leaf marker around the edge of the die cut for a gilded effect.
- Add a shimmering gold cord ribbon and some golden gems for added sparkle.
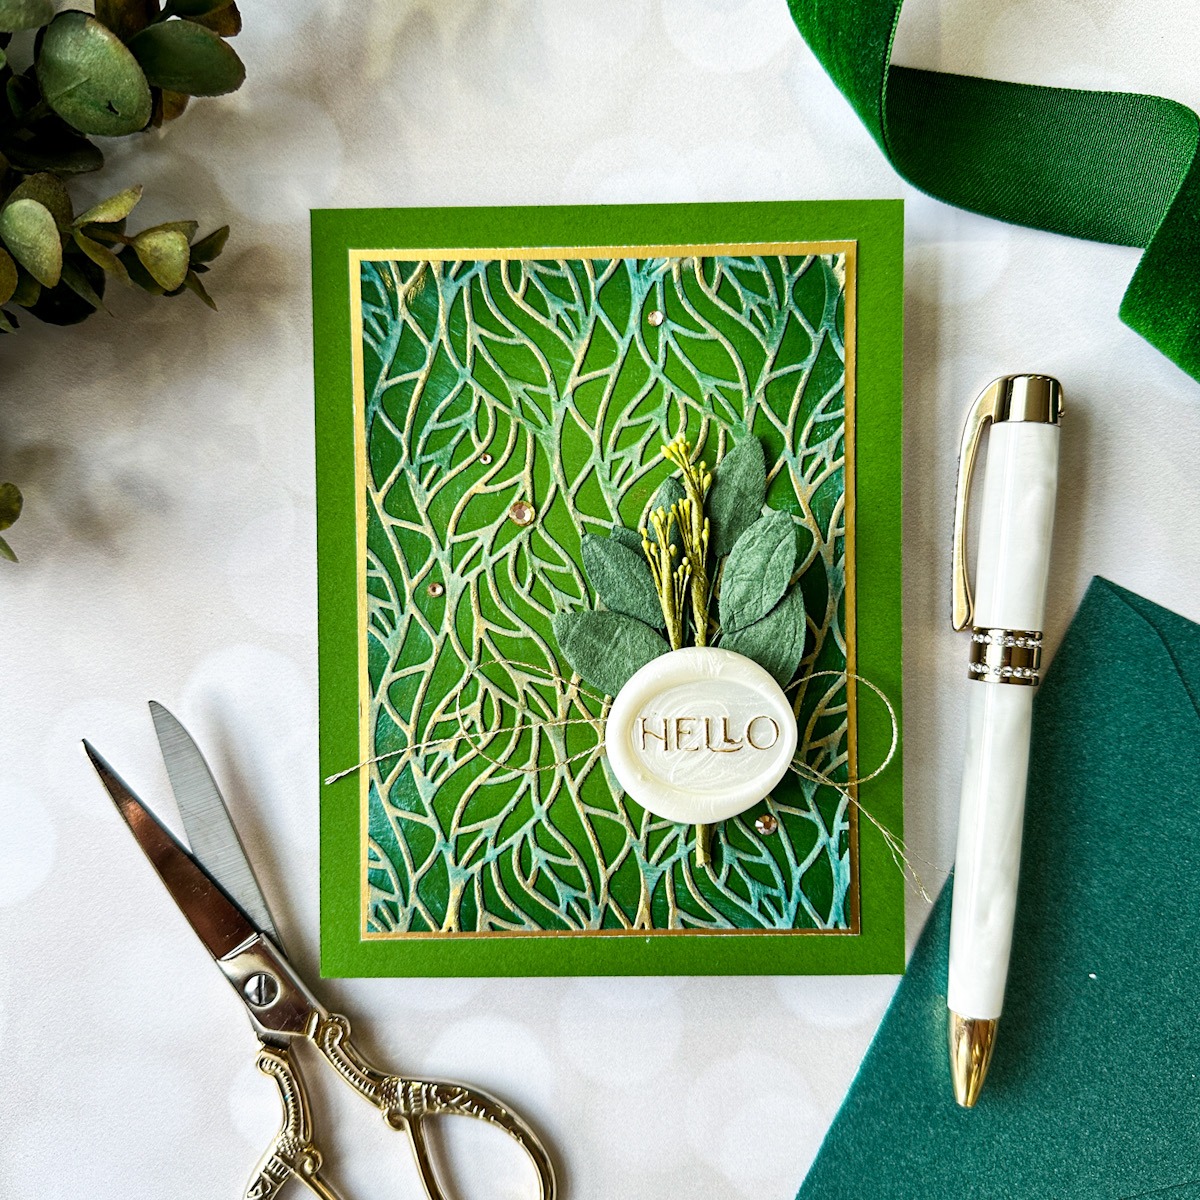
This next card takes advantage of the lovely details on the new Leafy Helix embossing folder, embellishing with some ink blending and swipes of pigment ink.
- First, trim down a panel of 3 ¾” x 5” Fern cardstock and ink blend some coordinating deep green ink around the edges with a blending brush.
- Run the blended panel through your Platinum 6 with the Leafy Helix folder.
- Lightly swipe a white pigment ink pad over the raised design on the panel, then swipe a metallic gold pigment ink pad directly over the white ink, creating a multi-colored effect on the pattern.
- Trim a piece of Metallic Gold Mirror cardstock to be the tiniest bit larger than the blended panel, matting the patterned piece with a thin gold frame.
- Adhere both pieces to an A2-sized Fern card front using strong double-sided tape.
To allow the embossed background to be the star of the show, a simple “hello” greeting on the new Hello Wax Seal from the Propagation Garden collection is almost all that you need!
- Using white pearl wax beads, create the wax seal with the Hello Wax Seal.
- Once hardened, use a gold marker to lightly embellish the raised sentiment and create a luxurious contrast between the letters and the smooth pearlescent background.
- Using a Wax Seal Adhesive Circle, arrange some leaf die cuts or pre-made leaf embellishments (found in the floral section of my local craft store) and a metallic gold twine bow and adhere behind the wax seal.
- Adhere the embellished wax seal to the front of the card with your choice of adhesive.
- Embellish the card front with Gold Mix Adhesive Gems for one last touch of sparkle.
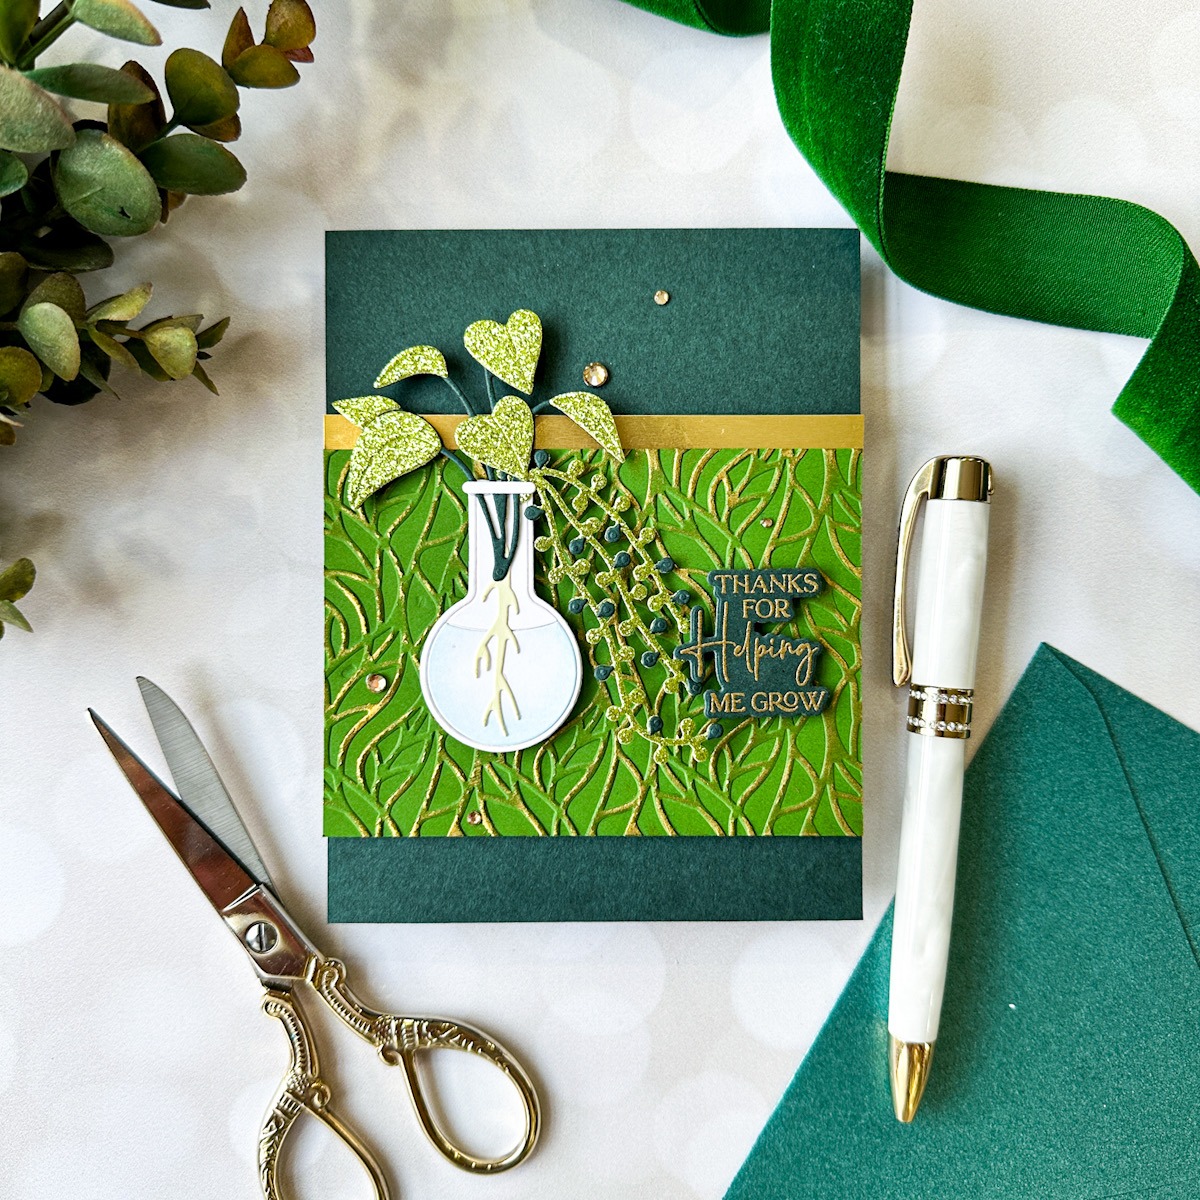
For my final project, I put to use some of the intricate die cuts from the Laboratory Glassware and Propagated Plants sets to create this detailed little planter with the accompanying sentiment, perfect for a teacher gift!!
- Die cut the details from the Laboratory Glassware and Propagated Plants, cutting the individual leaves from green glitter cardstock and lightly blending some pale blue ink around the edges of the “water” die cut.
- Adhere all of the die-cut pieces together with liquid adhesive.
- Heat emboss a greeting from Propagation Garden Sentiments using gold embossing powder on Forest cardstock, then die cut with the coordinating die.
- Run a panel of Fern cardstock through your Platinum 6 using the Leafy Helix embossing folder, then swipe a gold pigment ink pad over the top of the raised images to help them stand out and add some luxurious shimmer to the background.
- Trim the embossed panel down and cut a strip of gold mirror cardstock.
- Adhere the embossed panel and the gold strip to an A2 Forest card front using liquid adhesive.
- Pop up the planter using foam adhesive and tuck the sentiment next to the gracefully floating vines.
- Add some gold gems for added sparkle!
Well, that’s all for my projects today! Thanks so much to Spellbinders for the chance to play with these beautiful new products. If you’d like to see more of my work, you can check out my blog at emilymidgett.com. Thanks so much for stopping by today, and have a marvelous day!
Spellbinders Supplies:

Other Supplies
Simon Says Stamp Kale Ink, Hero Arts Dusty Blue ink, Altenew Antique Gold Pigment Ink, pan watercolors, metallic watercolors, foam adhesive, green glitter cardstock, gold embossing powder,
Fun Floral Cards with the BetterPress Spring Collection
BetterPress Christmas Collection – Card Inspiration with Annie Williams