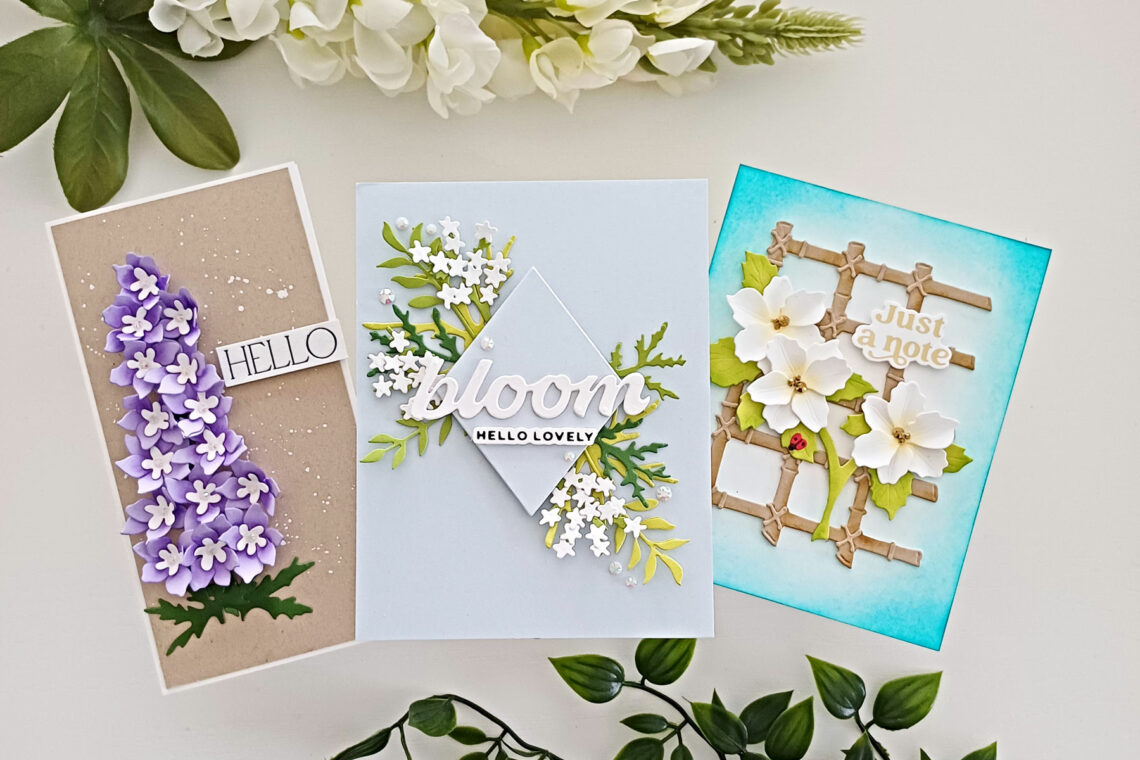
Spring Has Sprung – 3 Ways To Create CAS and Contemporary Floral Designs
Hello there! This is Lisa from My Card Trip and I am delighted to be a guest here on the Spellbinders blog. Today I am sharing some ideas using the newly released Through The Arbor Garden Collection and I have three cards to show you. This is the latest collection from Susan Tierney-Cockburn and it includes five new floral etched die sets, along with a couple of embossing folders and a background die. As a keen amateur gardener, I was pleased to see a few of the die sets were for flowers we already have in our garden!
So, let’s kick off with the first of my three cards.
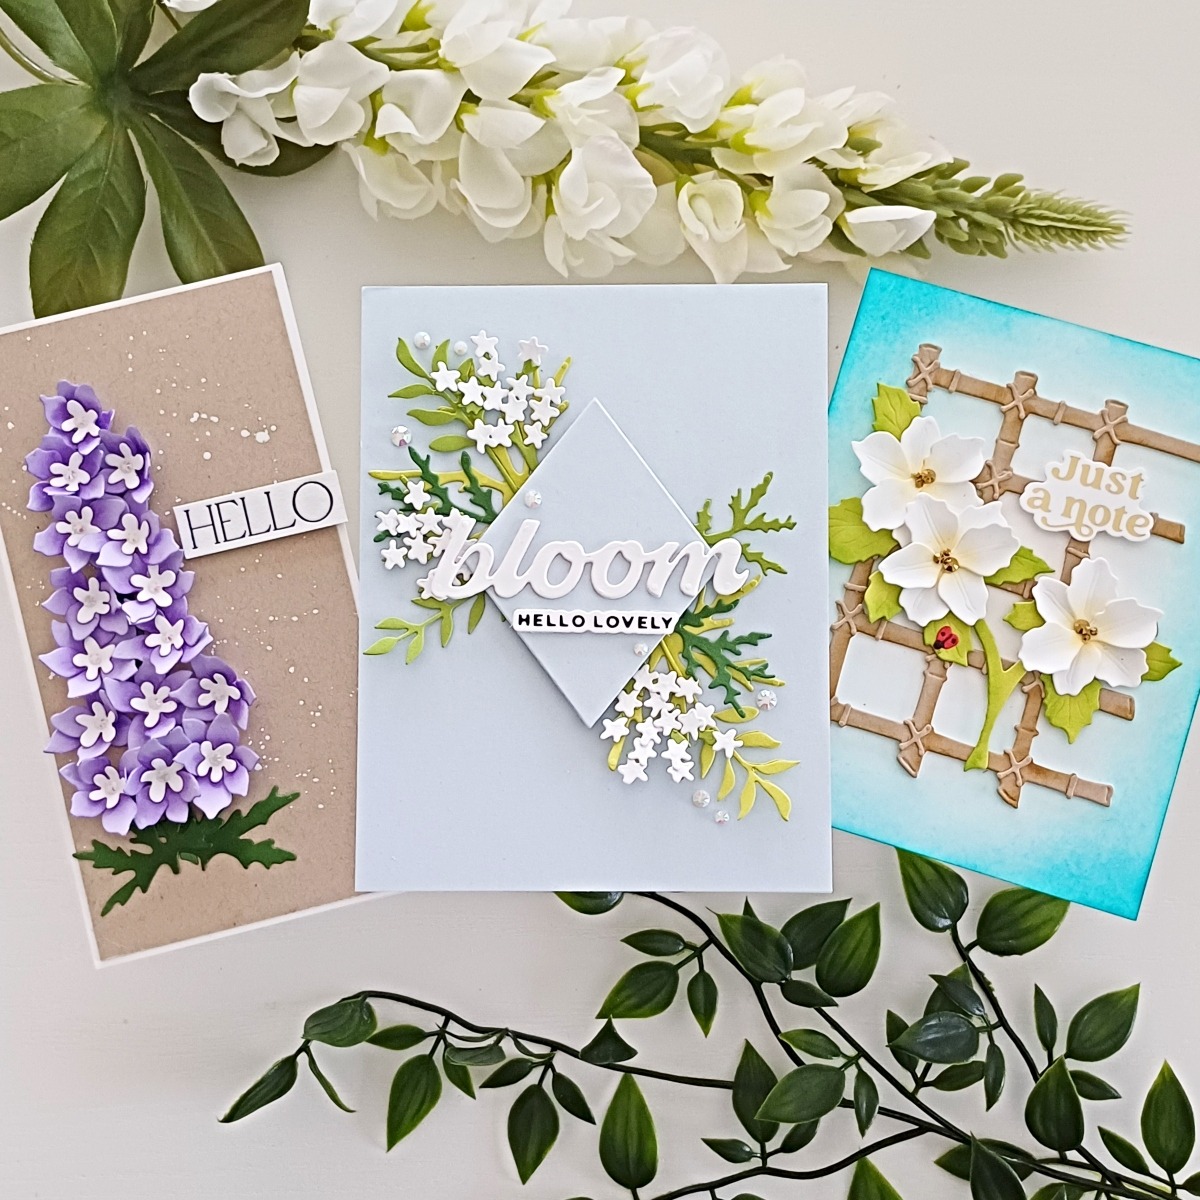
Bloom
My first card features the Queen Anne’s Lace and Ladybugs Etched Dies and I have given my card a modern twist by arranging them around a diamond.
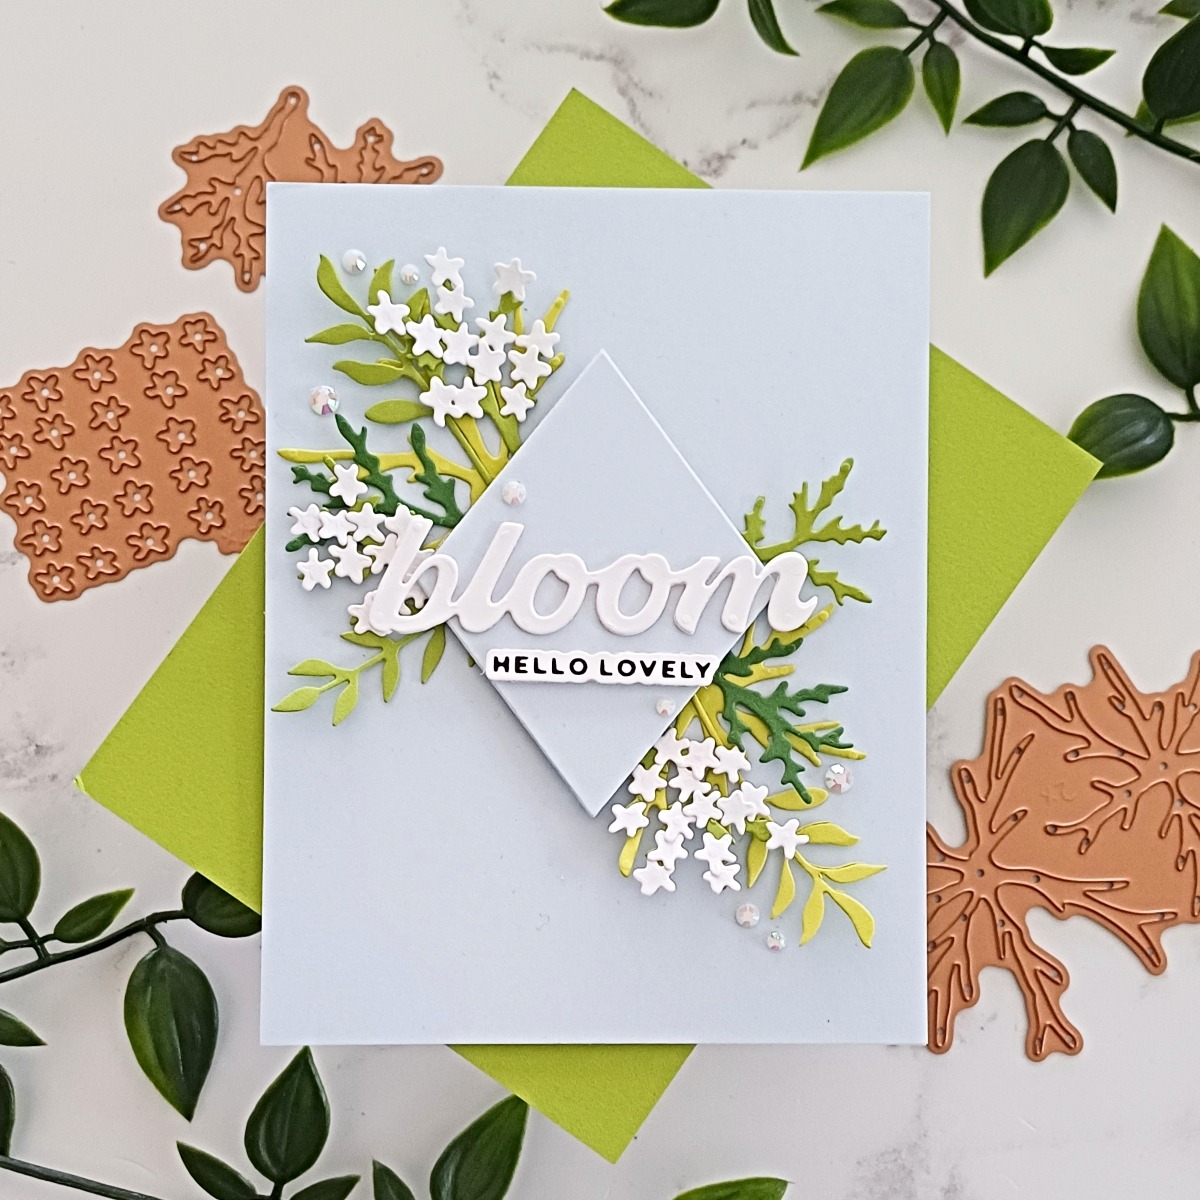
I started off by die-cutting all the flower and leaf elements from Queen Anne’s Lace and Ladybugs Etched Dies. There is a die in the set that you can use to cut lots of the small white flowers in one go and you have a couple of different leaf options too. I used Fern, Rainforest and Peridot Color Essentials Cardstock for the leaves and plain white card for the flowers. I also die-cut a few additional foliage options from Sealed Wildflowers Etched Dies. This helped me to fill out my arrangement a little bit more and to allow me to stretch the whole display further across the card panel. I adhered the lacy white flowers randomly onto three of the leaf stems using Bearly Art Glue. The white flowers are dainty and little so a pick-up tool is your best friend whilst working with these!
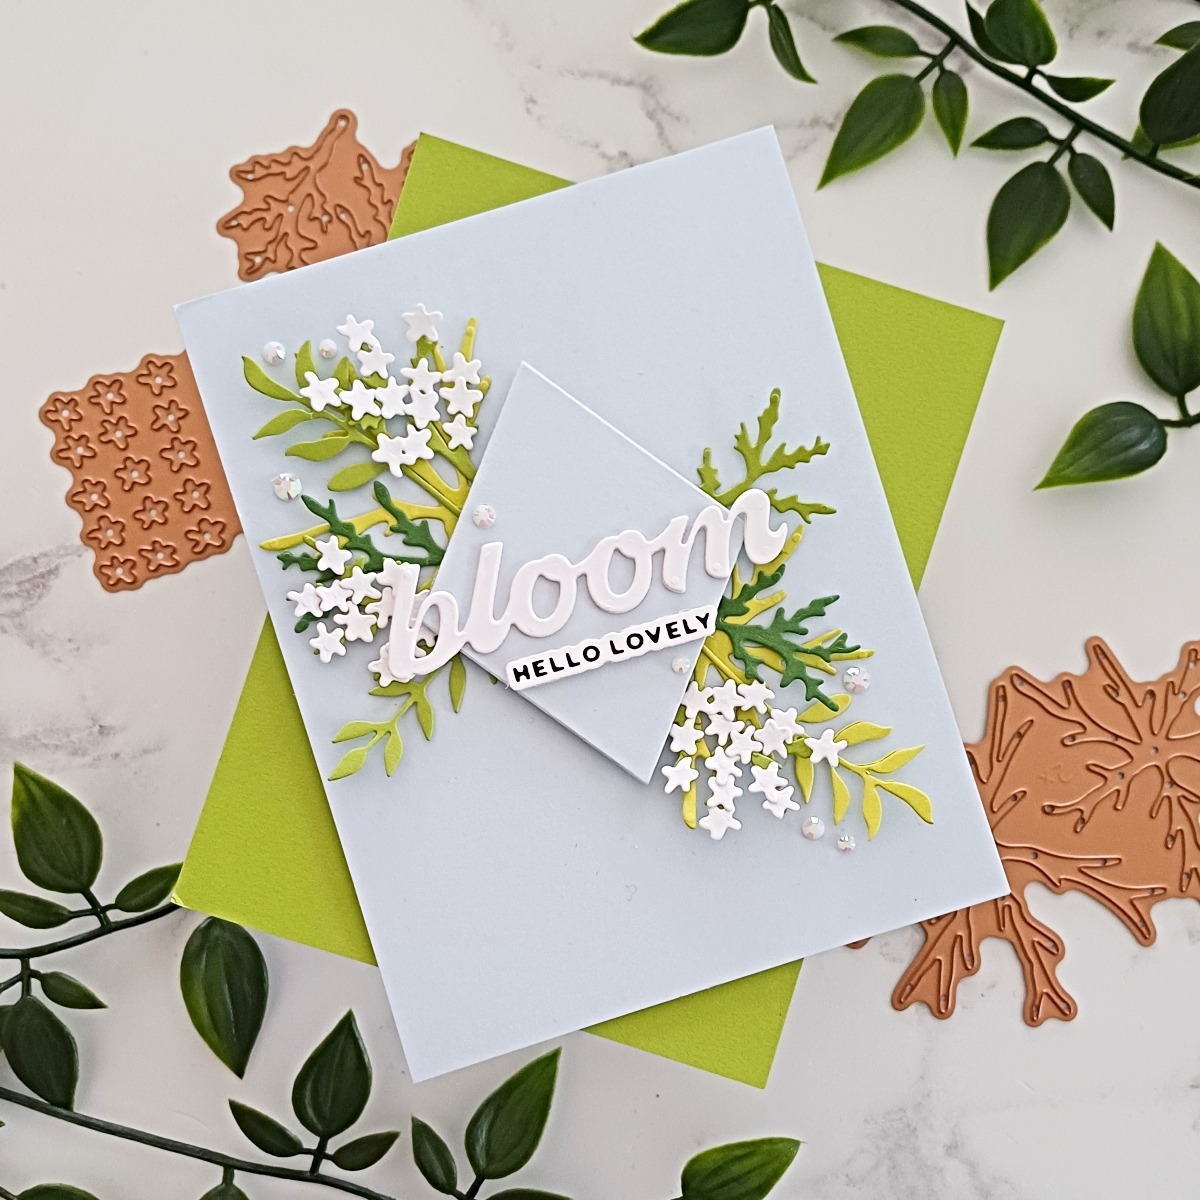
I then took a piece of Glacier Color Essentials Cardstock and the Essential Diamonds Etched Dies. Using a Platinum 6, I die-cut a smallish diamond and popped a couple of layers of thin foam tape onto the back of it, towards the centre. This allows me room to insert all my flowers and foliage behind it. I added the diamond onto an A2 panel of Glacier which had been adhered to a top folding white 110lb A2 note card.
I then simply arranged my flowers and leaves around the diamond and glued them in place one by one. I almost always start by creating the arrangement, taking a photo, dismantling it, and then gradually assembling everything back in place. If I don’t do it this way, I often come a cropper!
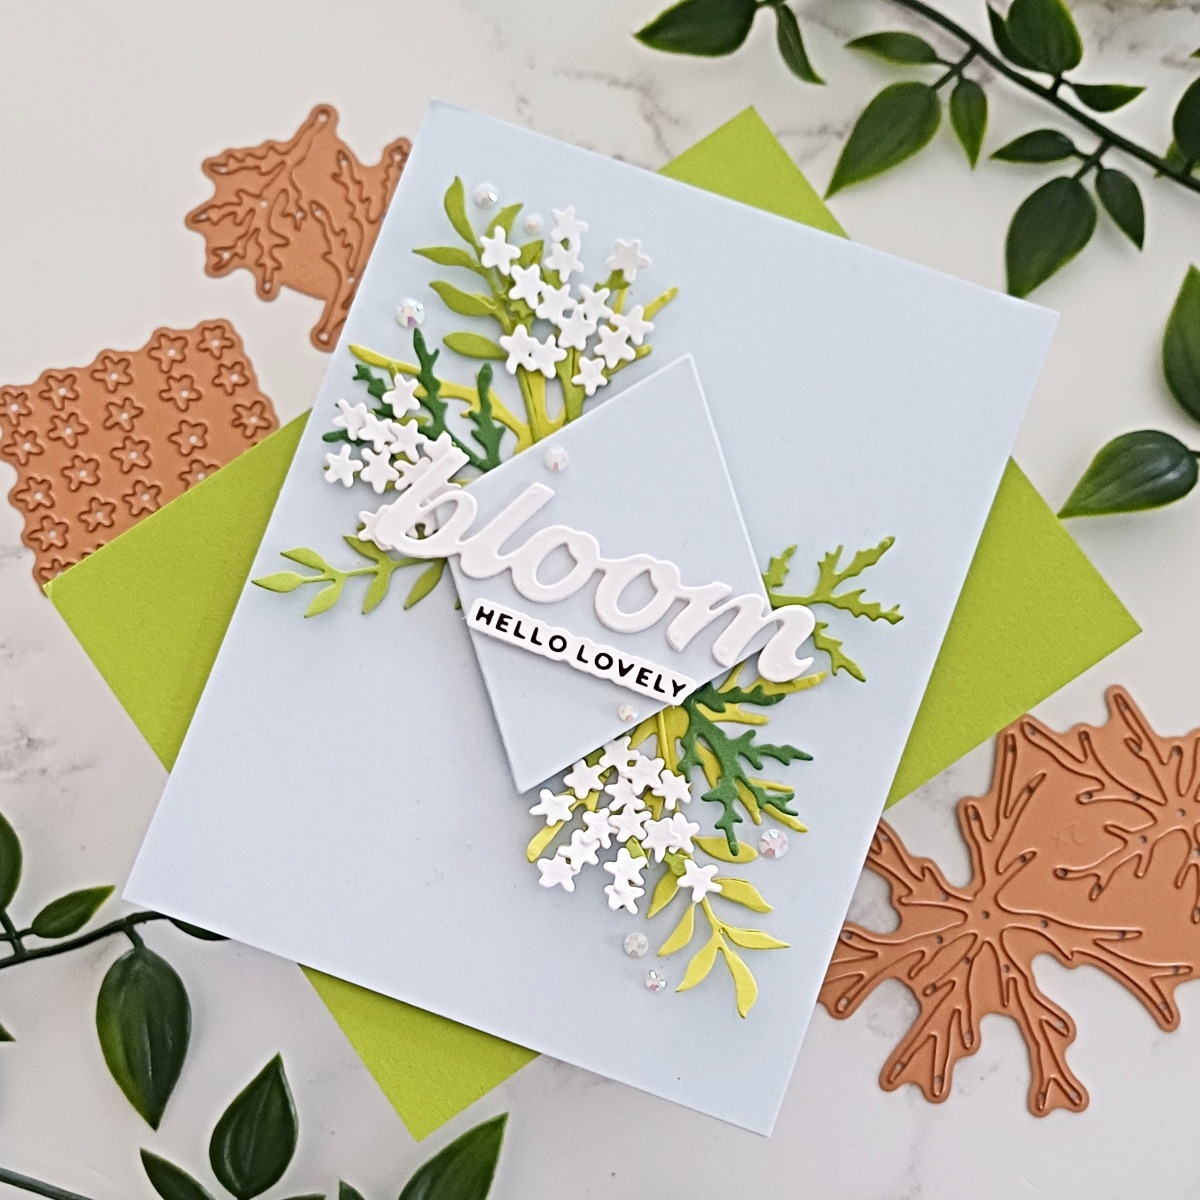
For my sentiments, I used two sets. The Fresh Picked Sentiments Etched Dies for “bloom” and for the sub-sentiment I used Making Me Smile Sentiments Glimmer Hot Foil Plate and Die Set. For stability, the word “bloom” was cut twice from white card and adhered together. The “hello lovely” has been foiled with Black Glimmer Hot Foil onto a white card using the Glimmer Hot Foil System.
I added the main sentiment directly onto the diamond and the sub-sentiment has a little foam tape behind it. To finish, I added some pretty iridescent jewels from my stash. These were placed around the leaves and a few were also added onto the diamond itself.
Just A Note
For my second card, I used dies from three different sets. I really love the Bamboo Trellis Background Etched Dies and thought I would pair the Mock Orange Etched Dies with it. We have had at least one philadelphus in every garden we have owned and it is one of my most favorite flowers. The gorgeous abundant white flowers and the heavy scent make it a winner each time! Plant one around a seating area and I promise you won’t regret it.
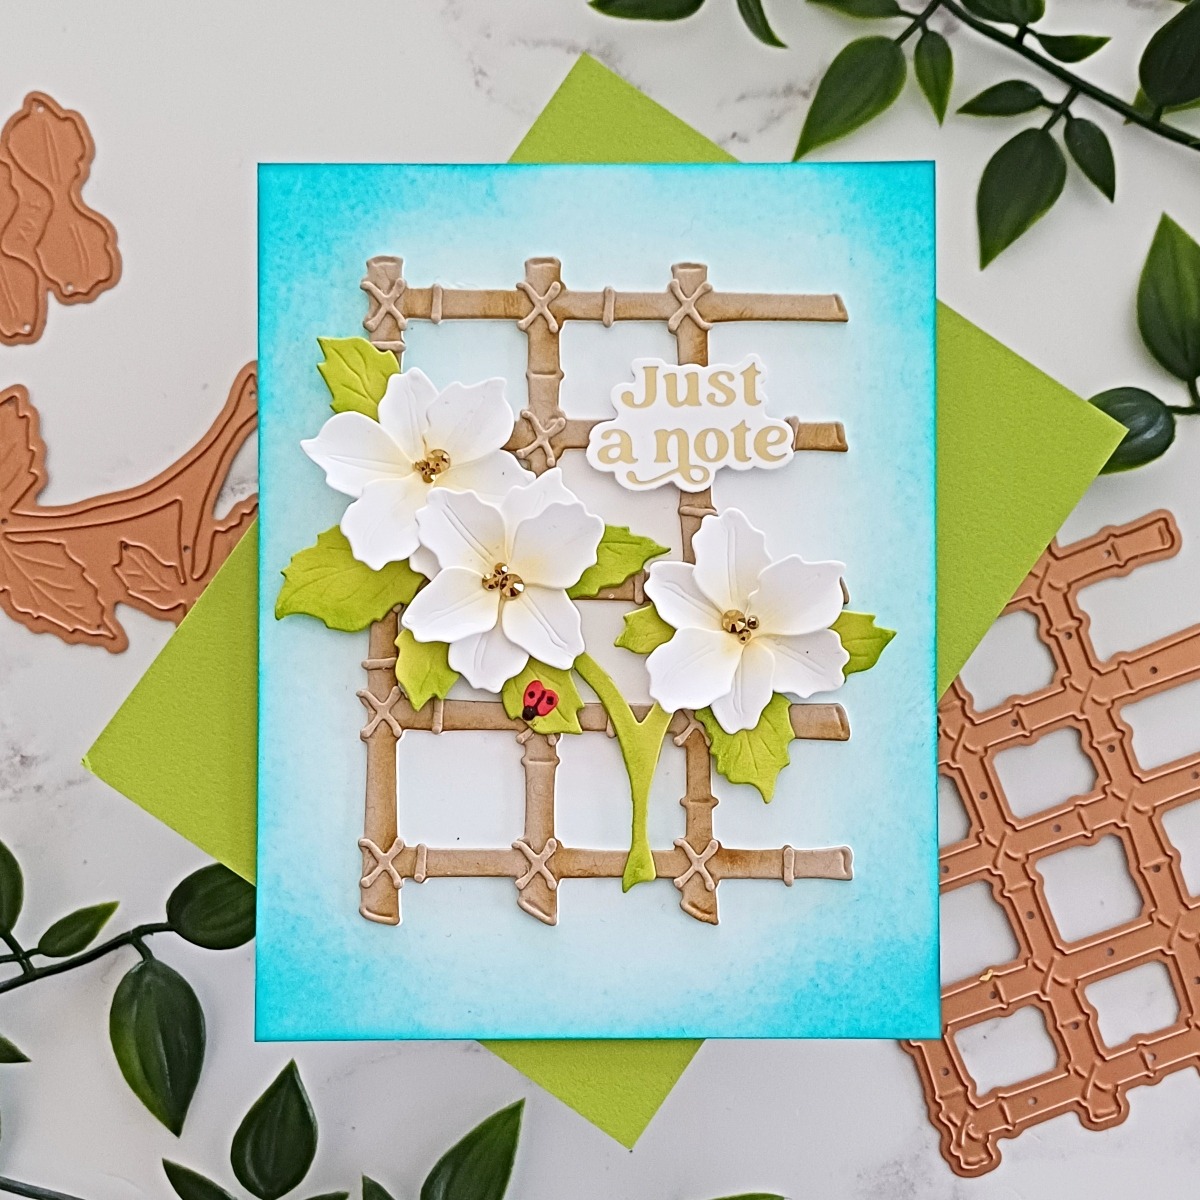
I die cut the main bamboo trellis from some wheat-coloured cardstock three times. The little extra notches on the canes and “string” that ties the canes together really bring this die to life. They were also cut from the same wheat card and added to the trellis using Bearly Art Glue. Using a small blending brush I added some extra colour to the trellis using Brushed Corduroy Distress Ink. I then adhered the top piece of trellis to the other two so that is has some dimension.
The leaf spray was die cut from Peridot Color Essentials Cardstock and I added some extra color to it using Mowed Lawn Distress Ink and a shader brush. The philadelphus flowers were simply die-cut from white card, and had Wild Honey Distress Ink added to their centres. Each flower is created from two different dies and when adhered together you get the full five-petal flower. I shaped each of the petals using my fingers, glued the two sections together, and then set them aside to dry.
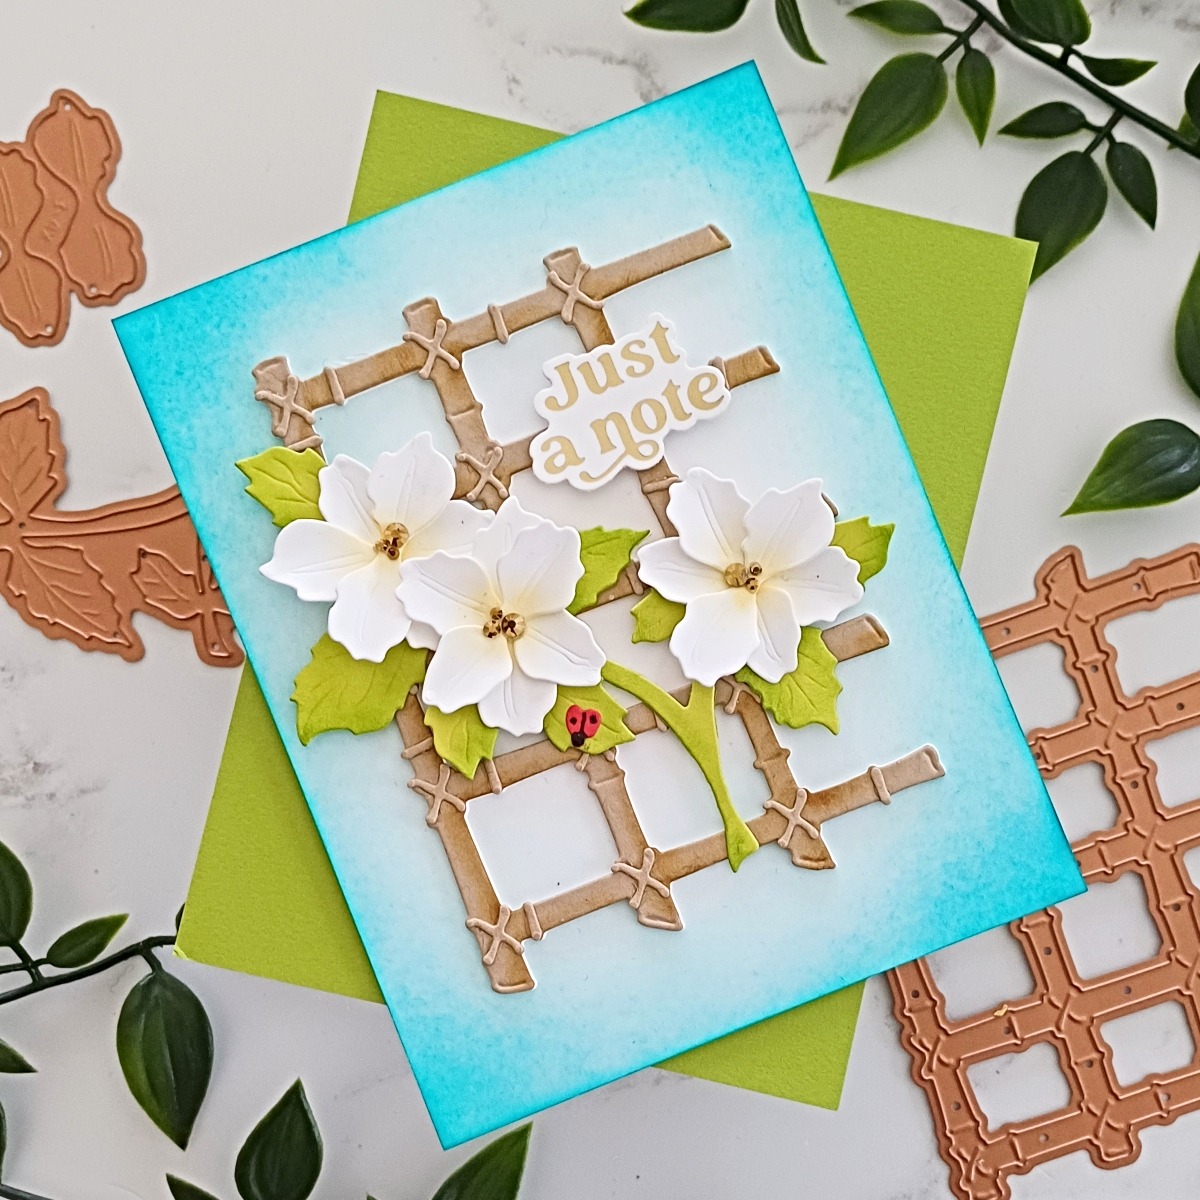
To give my card a big pop of color I blended some aqua/teal inks onto a panel of 80lb white card, fading the color out towards the center. The trellis and flowers were then adhered on top.
At this point, I thought it would look pretty to add a pop of red. (I always love red and aqua as a combination!) So, I die cut the smaller of the two ladybirds from Queen Anne’s Lace and Ladybugs Etched Dies from red card. I used a black 0.3 Copic Multi-liner to add the spots, head, and center line detail, shaped it a little bit using my fingers, and then added it onto one of the leaves.
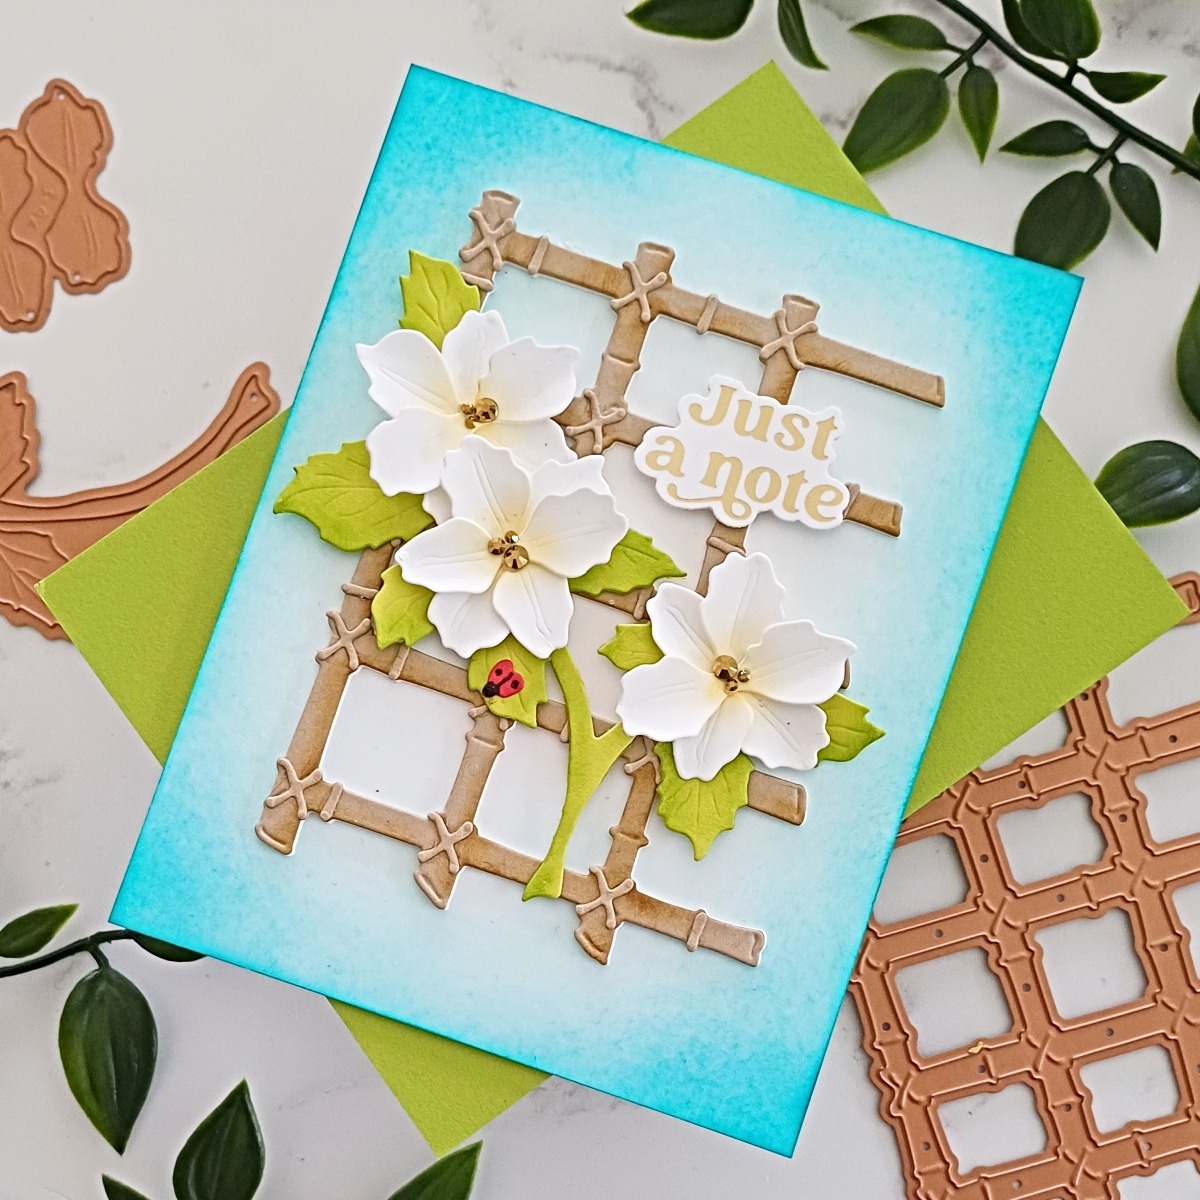
To finish the card, I foiled a sentiment from Must-Have Sentiments Glimmer Hot Foil Plate and Die Set using Matte Gold Glimmer Hot Foil. I added some foam tape onto the areas where the bamboo didn’t intersect it and adhered it down. To finish the card and add a little bit of sparkle, I put some different-sized Gold Mix Color Essential Gems into each of the flower centers. There are stamens that you can die cut and add some color to, but I wanted to add a little bit of bling onto mine.
Hello
For my final card, I used the Delphinium Etched Dies and I thought this flower would work well on a mini-slimline card. I haven’t been very successful with delphiniums in our garden as the slugs here in the UK absolutely love them and they are therefore eaten the minute they pop up from the soil! Our current garden is also exposed and windy so they wouldn’t stand a chance here but I still love to see the tall spires wafting in a gentle breeze….in someone else’s garden!
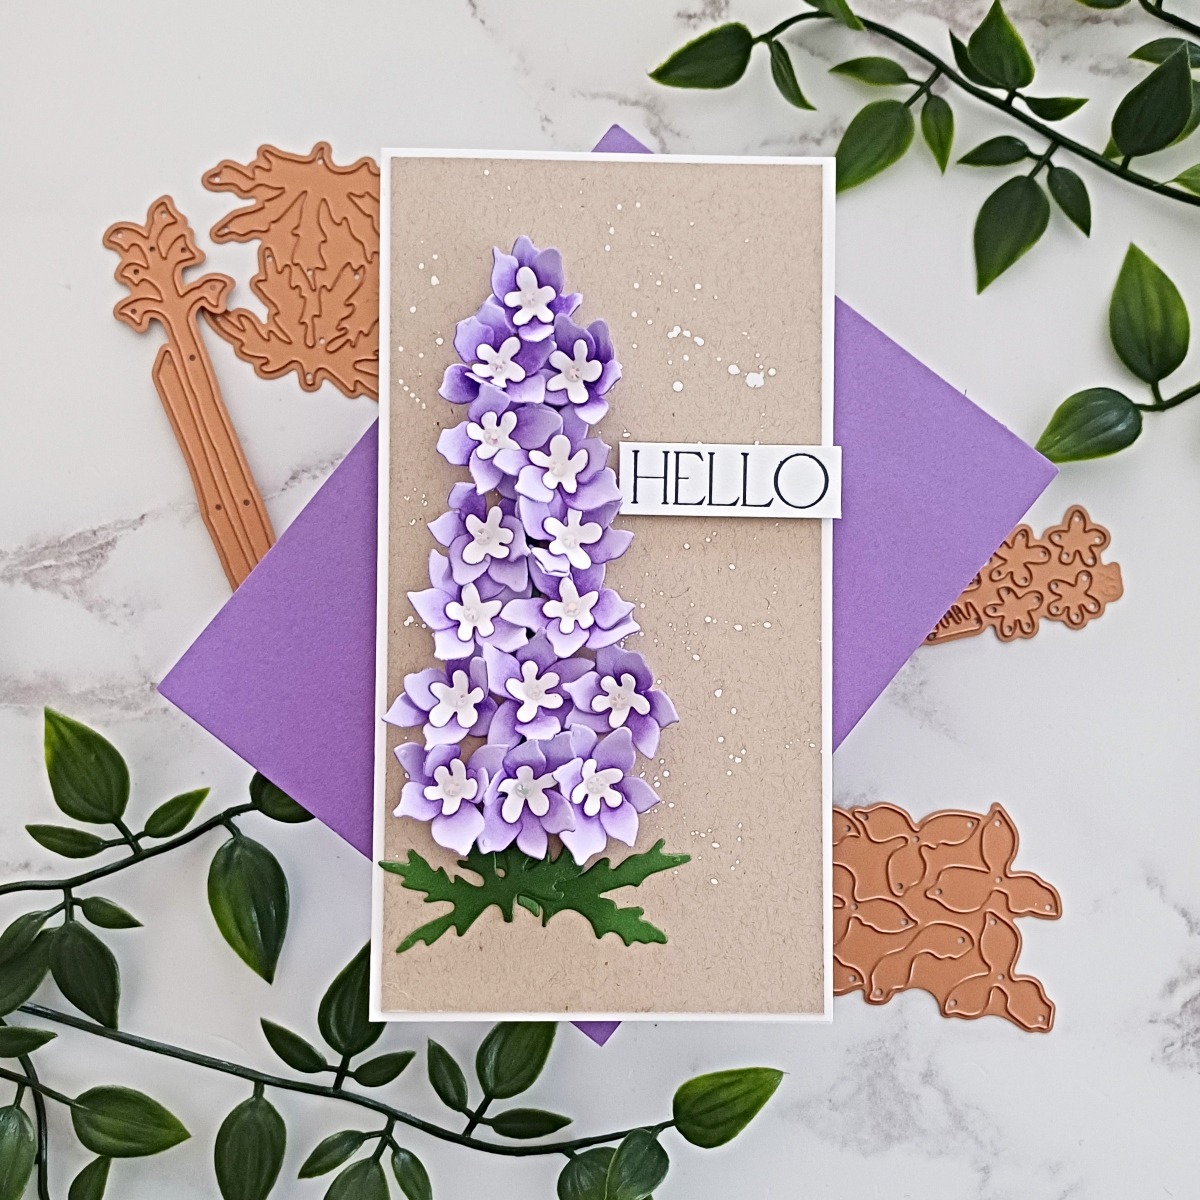
I die-cut the flower multiple times from Purple Mist Color Essentials Cardstock and the centers from the white card. Using a small shader brush I applied Wilted Violet Distress Ink onto each of the flower pieces and then shaped them with my fingers before adhering them together and letting them dry. I used a little ball tool to give the white centers some shape so they could be placed more easily into the larger flowers. They were glued into the centers of the purple flowers and then I also added a small iridescent jewel into the middle of each. Again, you can add a stamen in here I like to add gems when I can.
The leaves at the bottom were cut from Fern Color Essentials Cardstock and given some extra interest courtesy of a little Rustic Wilderness Distress Ink.
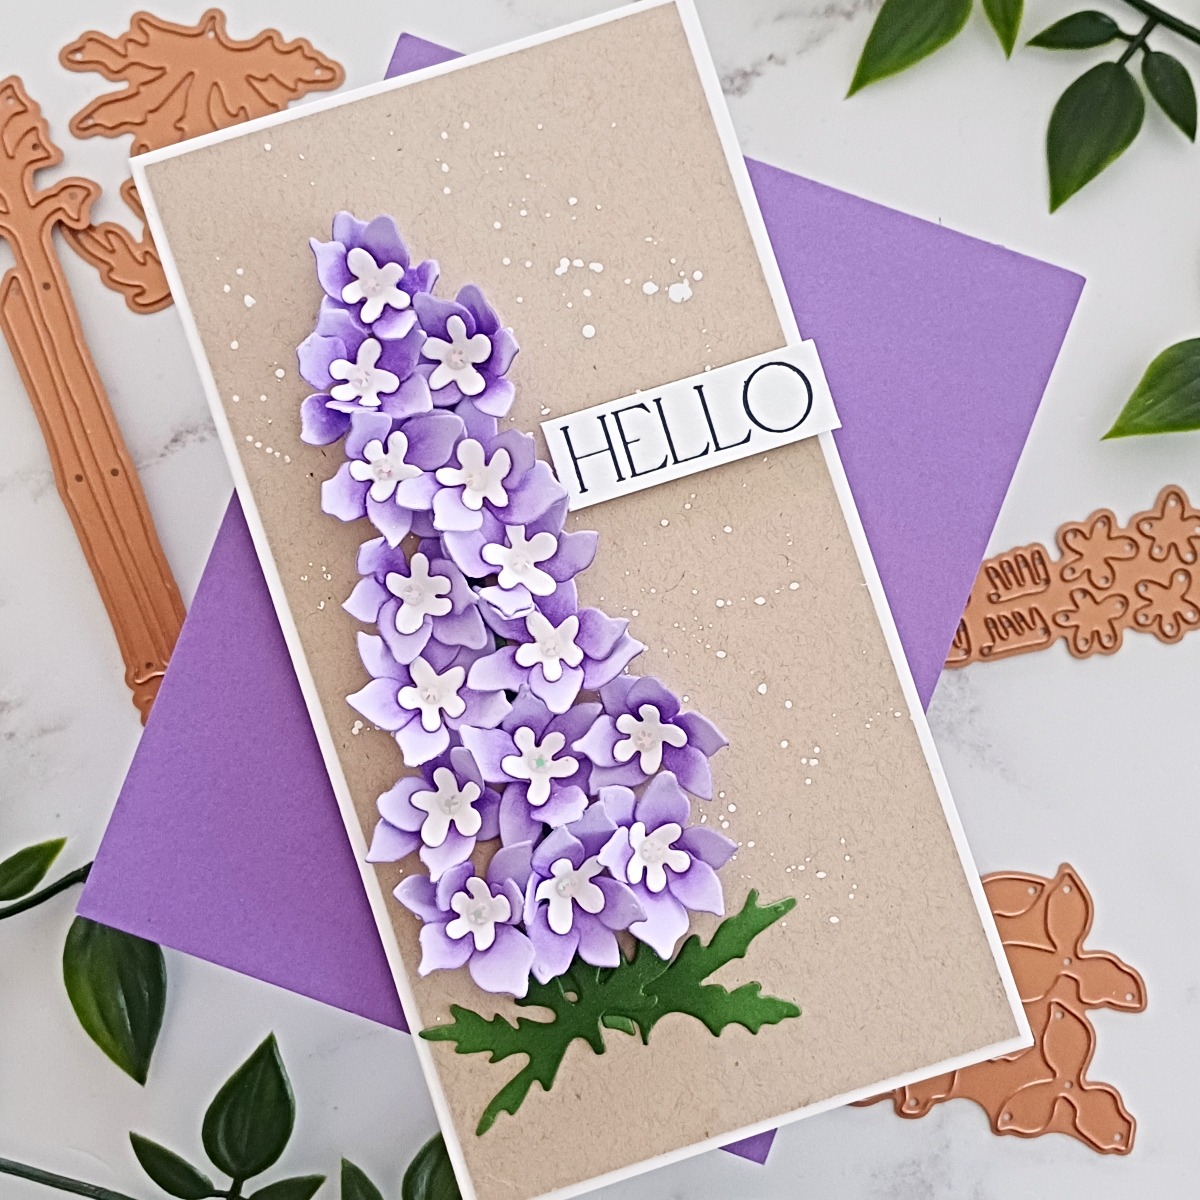
For my background, I took a panel of Neenah Desert Storm 80lb cardstock and I splattered some white gouache over it using a No.2 round brush. I left it to dry and then trimmed it down and matted it onto a side folding mini slimline note card which measures 7” x 6.5”, and scored at 3.5”. The leaves were then added towards the bottom and I gradually adhered each of the flowers one by one moving towards the top. To fit my card size, I didn’t have the flowers reach a sharp point but rather a more flattened top. You can definitely find delphiniums that have a more rounded top so I thought this shape worked out well on my size of card.
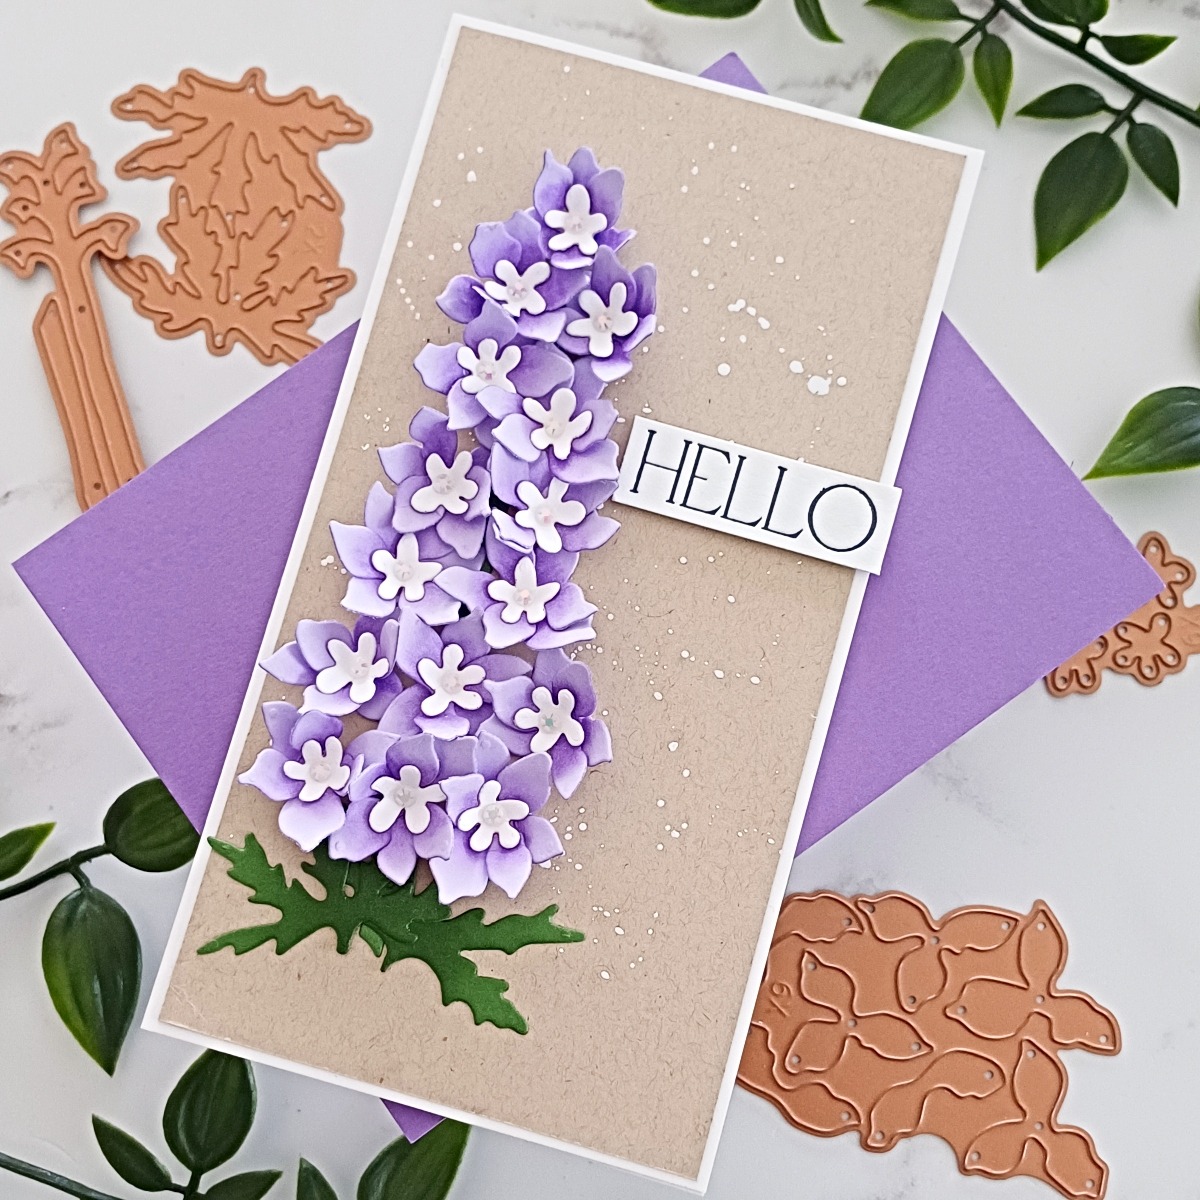
To finish off, I added a sentiment from A Friend Like You Bouquet Press Plate. I pressed the plate onto Porcelain Cardstock using BetterPress Black Ink and the BetterPress Letterpress System. It was trimmed down and added to my card using some foam tape. I just love the feeling of a pressed image or sentiment; it has become fascinating and magical to me. Just like revealing a foiled image or watching the powder melt when heat embossing. It’s the little things in life that keep you wanting to create more. And buy even more! Well, at least that is the case for me.
That brings us to the end of my cards. I hope that you have enjoyed seeing how I have used this beautiful new collection of floral gorgeousness from Susan. I liked seeing how I could create with the dies both in a modern contemporary way versus a more traditional style.
If you would like to see more of my cards, I would love to have you join me over on my blog, Instagram, Facebook or YouTube. In the meantime, thank you so much for being with me here on the blog today, I hope that you have a really great day!
Spellbinders Supplies:

Other Supplies
Neenah Solar White Classic Crest 80lb and 110lb card, Neenah Desert Storm 80lb card, Winsor & Newton White Gouache, Concord & 9th Wheat Cardstock, Hero Arts Cherry Cardstock, Tweezers, Embellishment Wand, Thin Foam Tape, Lucy’s Cards Bridal Mix Jewels, Blending Brushes, Distress Ink Rustic Wilderness, Distress Ink Wilted Violet, Distress Ink Mowed Lawn, Distress Ink Brushed Corduroy, Distress Ink Wild Honey, Copic Multi-liner 0.3, Waffle Flower Shader Plus Brushes, Waffle Flower Grip Mat, Altenew Sweet Dreams Dye Inks.
FSJ Buzzworthy Project Kit is Here!
Folk Art Inspiration | Rosemal Heart & Nordic Tree Highlight with Emily