Mixing Embossed Layers for Unique and Elegant Cards
Hi there, this is Annie Williams and I’m excited to be back on the blog today to share a couple of cards with tons of texture thanks to the new Sealed 3D Botanical Collection from Spellbinders. The beautiful 3D Emboss & Cut folders, new 3D wax seal stamp designs, and unique nested shape die sets in the collection inspired me to create three cards with tons of color and texture.
Colorful Floral Congrats Card
When embossed panels serve as my focal point on a card, one of the easiest ways to make them pop is to get a little inky. Here I combined a beautifully detailed (and inked) vignette made using the Floral For You 3D Emboss & Cut Folder with a subtly textured background for this fun congrats card.
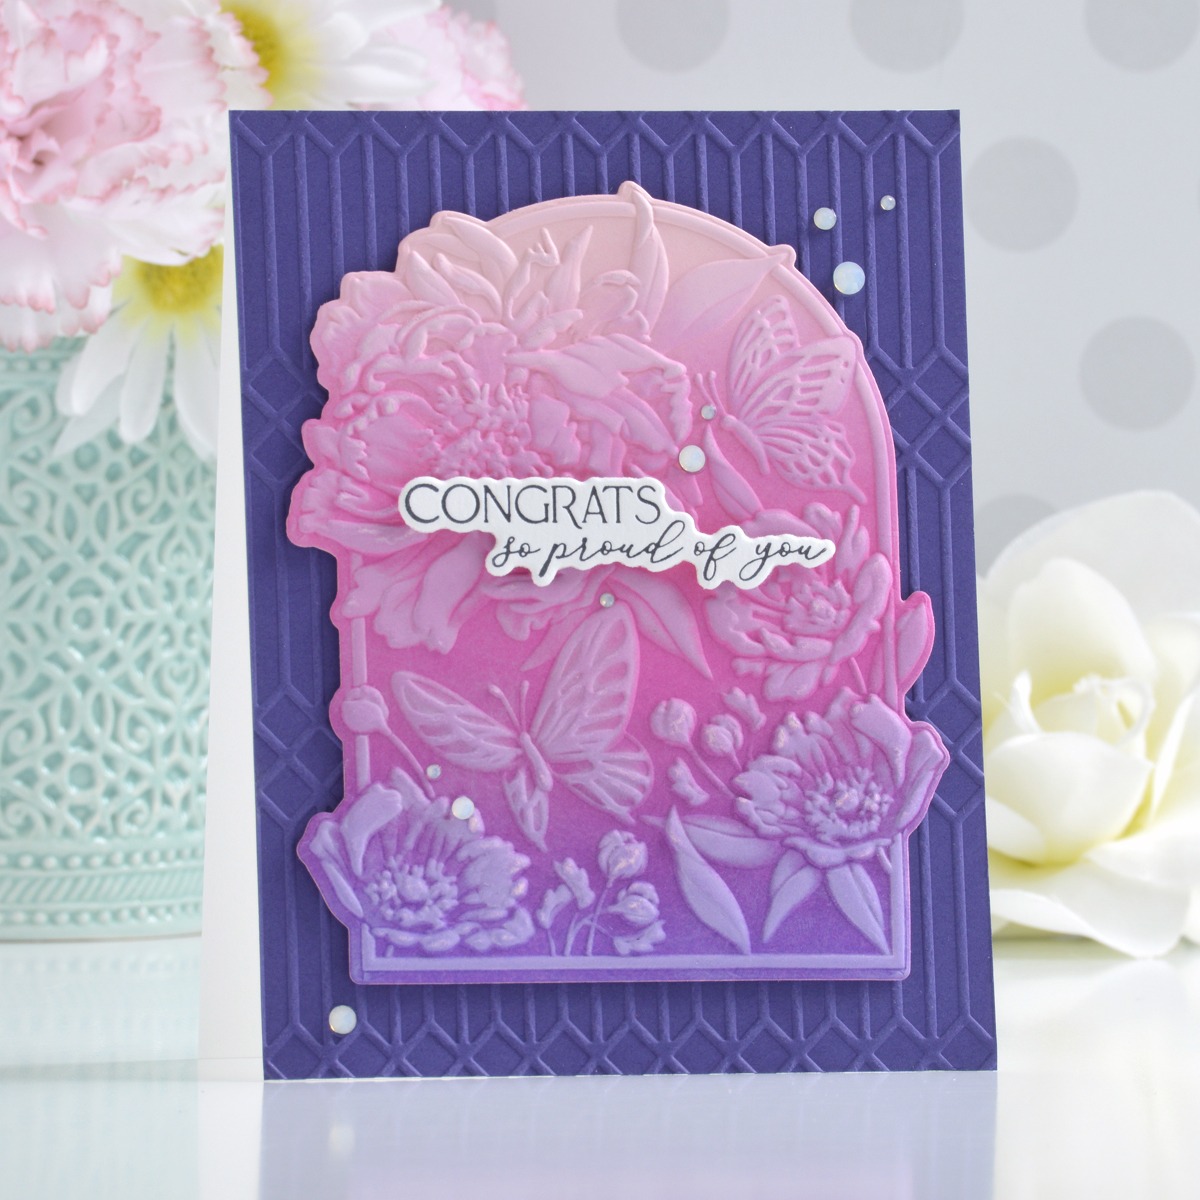
Trim to piece of Pink Sand Cardstock to about 4.25” x 5.5” and blend Wilted Violet and Picked Raspberry Distress Ink over the bottom two-thirds of the panel. Lightly mist the backside of the panel and emboss it using the largest vignette on the Floral For You 3D Emboss & Cut Folder. Once embossed, gently rub a white pigment ink pad over the raised surface to bright out the design even more.

Trim a piece of Royal Amethyst Cardstock to 4.25” x 5.5”, emboss it with the Columns Embossing Folder, and adhere it to a top-folding A2-sized white card base. Pop the inked and embossed panel up in the center of the card base with foam adhesive. Add a sentiment pressed onto Porcelain Cotton Cardstock using BetterPress Black Ink and the You Are Everything Sentiments Press Plate Set. Embellish with Crystal Mix Gems.
Monochromatic Just Because Card
Sometimes a design is so pretty it needs no color at all though! Here I misted and embossed Porcelain Cotton Cardstock with the medium vignette from the Floral For You 3D Emboss and Cut Folder and the impression was so intricate and beautiful that I decided to leave it white to let it shine instead.

Lightly mist Porcelain Cotton Cardstock and emboss it with the medium vignette from the Floral For You 3D Emboss & Cut Folder. Since I was keeping my focal point white, I opted for a very subtle pattern on my background panel. Trim a piece of Glacier Cardstock to 4” x 5.25”, emboss it with the Tiny Dots Embossing Folder, wrap Dark Blue Satin Ribbon around the center, and adhere to a top-folding A2-sized white card base with foam adhesive. Pop the embossed vignette up in the center of the card with more foam adhesive.

To accent this simple and monochromatic card, I pressed a sentiment onto Porcelain Cotton Cardstock in Cosmic Sky BetterPress Ink using the You Are Everything Sentiments Press Plate Set. I also added a wax seal that I created using two wax bead colors. First I melted Pastel Blue Wax Beads, poured them onto the Peony Butterfly Wax Seal Stamp, and scraped it off while still hot with a palette knife. Once cooled, I pressed the wax seal stamp (containing the previously hardened light blue wax) into melted Ink Wax Beads to create the bicolor seal. To finish off the card, I added some Crystal Mix Gems.
Colorful Mushroom Thanks Card
And of course, I had to try adding ALL the color after adding no color at all to my embossed focal point! Here I embossed BetterPress cardstock with the Mushrooms From Me To You 3D Emboss & Cut Folder and colored the entire design with water-based markers for a colorful thank you card.
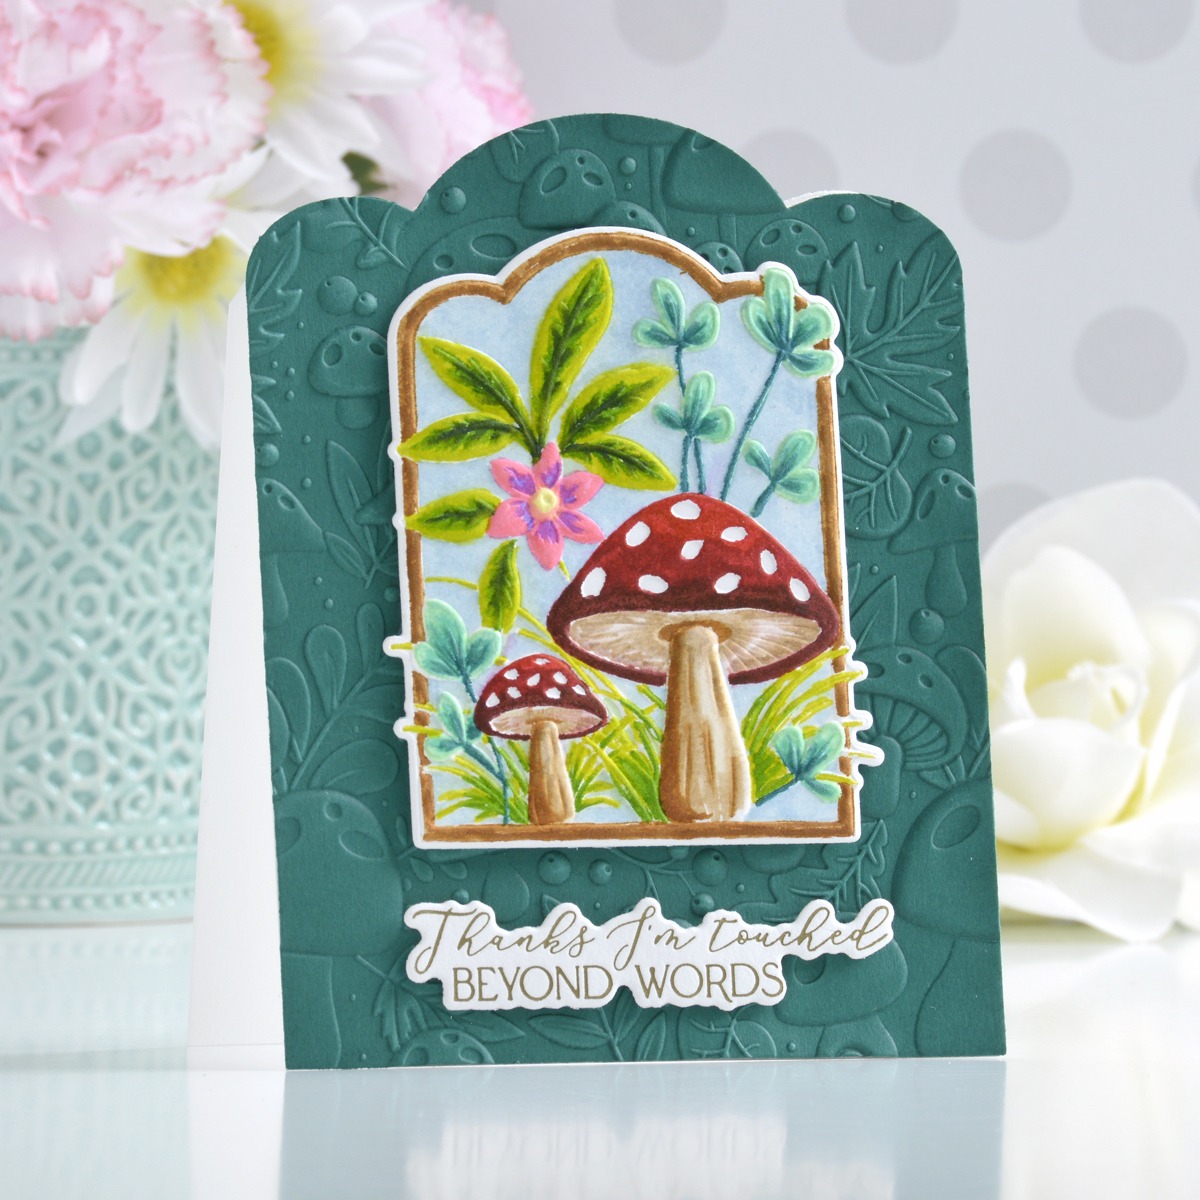
Lightly mist Porcelain Cotton Cardstock and emboss it using the medium tag shape on the Mushrooms From Me To You 3D Emboss & Cut Folder. Color the tag in completely using Zig Clean Color Real Brush Pens (I love their tiny brush tips for coloring detailed images like this!). Press a sentiment onto Porcelain Cotton Cardstock using Bark BetterPress Ink and the You Are Everything Sentiments Press Plate Set.

Die cut Blue Spruce Cardstock using the Scallop Labels & Tag Die Set and emboss it with the Mushroom Harvest 3D Embossing Folder. Create a shaped white card base by scoring and folding a top-folding A2-sized white card base and placing the same size die just over the top fold before running it through your diecutting machine several times to cut both layers. Adhere the embossed background panel on top of the shaped card base with a tape runner and pop the image and sentiment up on top with foam adhesive.
Spellbinders Supplies:

Other supplies
White heavyweight cardstock, Wilted Violet and Picked Raspberry Distress Ink, foam blending tools, white pigment ink pad, Zig Clean Color Real Brush Pens, palette knife, tape runner, foam adhesive.
I hope you enjoyed these pretty cards with lots of texture and thanks so much for stopping by today. You can find more inspiration over at my blog AnnieBWills.com or on Instagram.
Boho Birthday Cards by Spellbinders with Karen Reátegui

Easy Elements In a Row Card