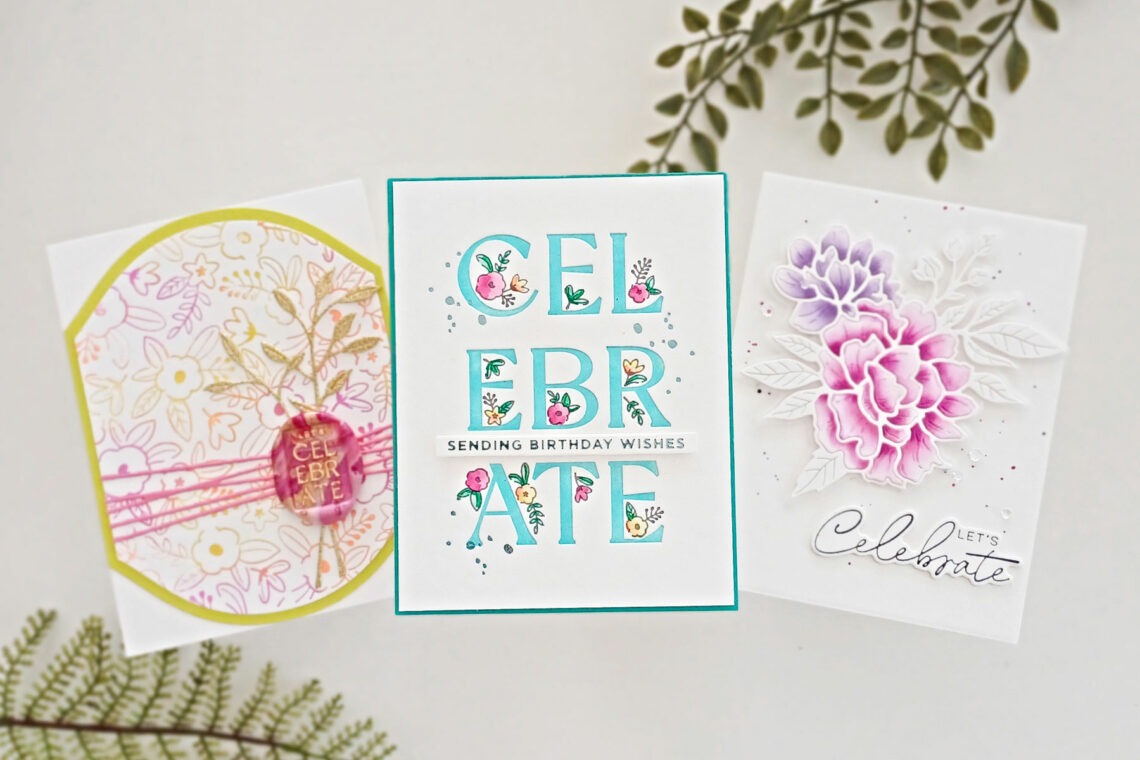
Make Your Blooms Bloom and Create Three Pretty Floral Cards
Hello there! This is Lisa from My Card Trip and I am happy to be back here on the Spellbinders blog with you. Today, I am sharing three ideas using the beautiful new collection from Yana Smakula. This collection is called Let’s Celebrate and it’s definitely a reason to do just that! You’ve got some gorgeous new press plates, a die set, and a wax seal, along with the latest in the line of BetterPress Registration Press Plates. There is also a coordinating layering stencil set for the new BetterPress Registration set if you want to add some more options for using it.
I had a blast creating with these products! So, let’s get started with my first card.
Celebrate – Sending Birthday Wishes
For this card I am using the Celebrate Flowers Registration Press Plate which I love! You may remember that Spellbinders released a Christmas foiling set last year called Joyful Glimmer Hot Foil Plate which was so very beautiful. Well, this new press plate is similar in style and equally as lovely.
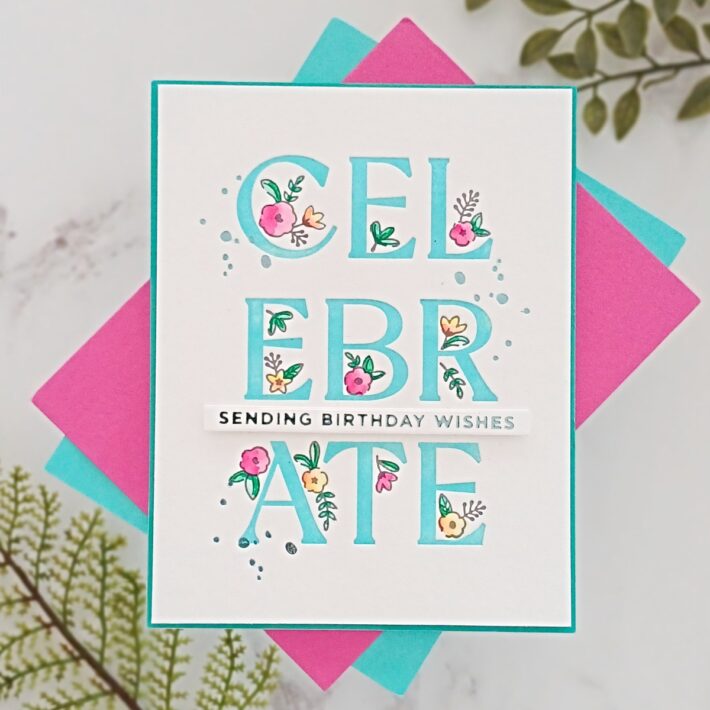
I started off by laying down the printed mylar registration template onto my BetterPress LetterPress System magnetic platform. I used some tiny pieces of Best Ever Craft Tape to secure it in place. I then took the “Celebrate” plate from Celebrate Flowers Registration Press Plate and lined it up according to the template. It was then inked up with Teal Topaz BetterPress Ink. I taped a panel of A2 Porcelain Cardstock onto the underside of my platen (clear top plate), snapped the platen onto the magnetic platform and then ran the whole system through my Platinum 6. I repeated the process to make sure that I got a good coverage of ink on the letters.
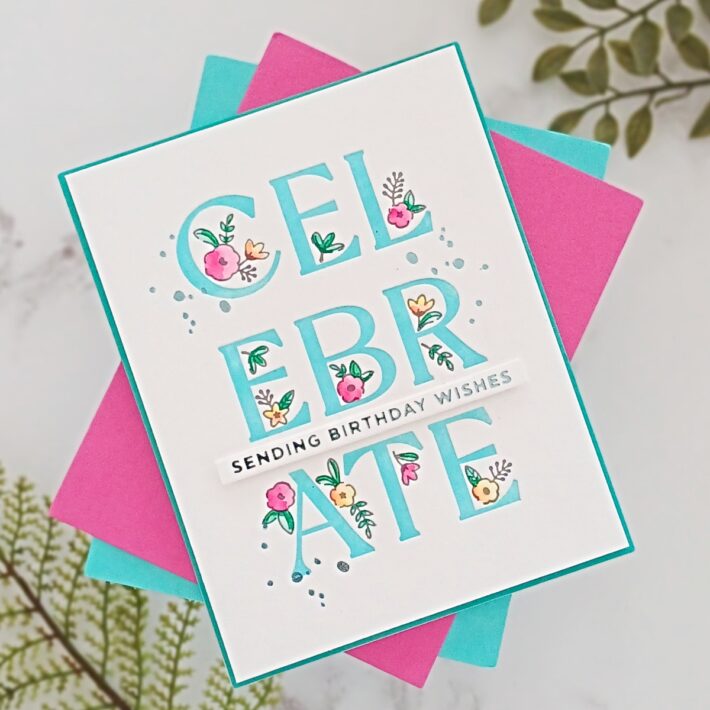
For the floral accents, you need to line up the second plate according to the guide. This time I inked the plate up with Thunder BetterPress Ink and ran it through my die-cutting machine. Those beautiful little floral accents line up perfectly! As the BetterPress Inks are waterproof, I watercolored the flowers with Karin Markers using Ocean Teal for the leaves, Gold and Magenta for the flowers, and then a tiny bit of Orange Red over the yellow flowers, just to add some contrast.
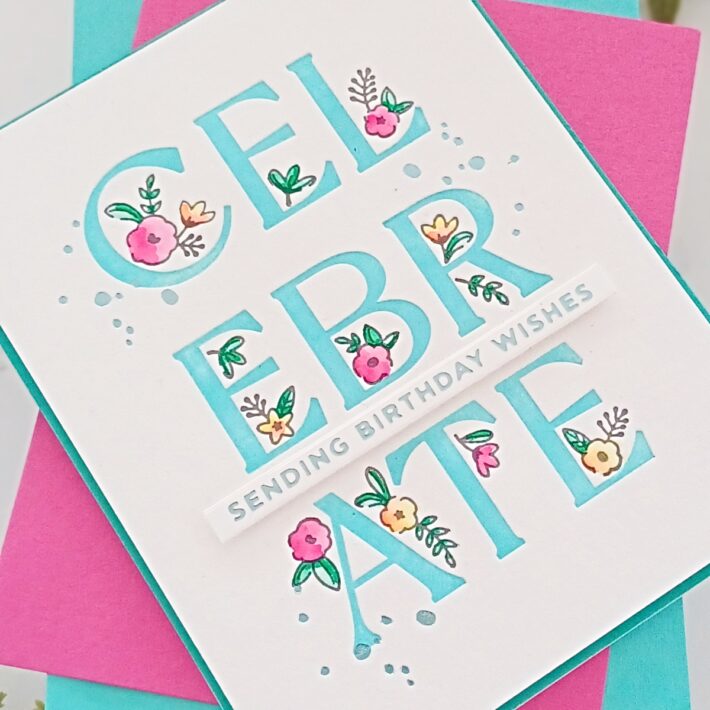
My sentiment is from Mini Everyday Sentiment Glimmer Hot Foil Plate and Die Set. I foiled it onto a white card using Skybright Glimmer Hot Foil and the Glimmer Hot Foil System. It was trimmed with the sentiment die included in the set and then put to one side.
It was at this point that I thought it would look extra pretty if I added some faux splatter around the letters. So, I used the smallest splatter foil plate from Splatter Sentiments Glimmer Hot Foil Plate and some Skybright Glimmer Hot Foil to add the detail. I love how this ended up looking!
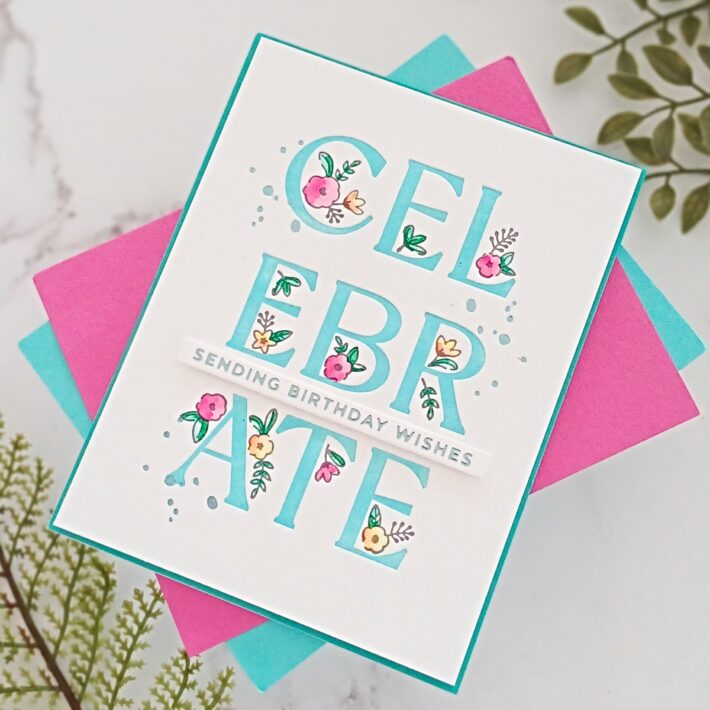
To finish, I trimmed the panel down slightly and then added it onto an A2 panel of Teal Topaz Color Essentials Cardstock with some thin foam tape behind. This was then adhered to a top folding A2 white 110lb notecard. The sentiment was then adhered on top using a small amount of thin foam tape.
Let’s Celebrate
For my next card I used the stunning Peony Celebration Etched Dies. I have kept my card really clean and simple so that this gorgeous bloom takes center stage!
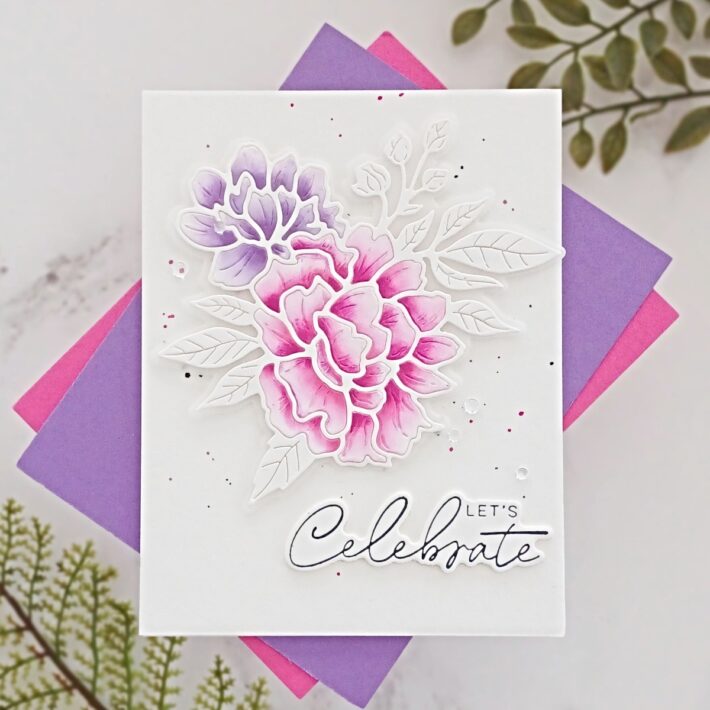
To begin, I cut the shadow die from some vellum and the outline die from 80lb white card. I adhered the outline piece onto the vellum with some Bearly Art Glue. You don’t need to be really precise with applying the glue onto the thin lines of this die cut as you will be filling in each section of the flowers and if you have any excess glue showing on the vellum, it will get covered up. Set this to the side as you will be needing this a bit later on after your colouring.
Tip – You could cut the outline die with some double-sided adhesive sheet on the back of your white card and then you don’t need to worry about any excess wet adhesive.
Next, I took a panel of 80lb white card and added some masking paper onto the back. I ran it through my Platinum 6 die cutting machine. Because I had added some masking paper to the back of my card, this created an extra thickness, and all the pieces were subsequently held in place after cutting.
If you find any pieces are dropping out, just add some Best Ever Craft Tape onto the back to hold them in place.
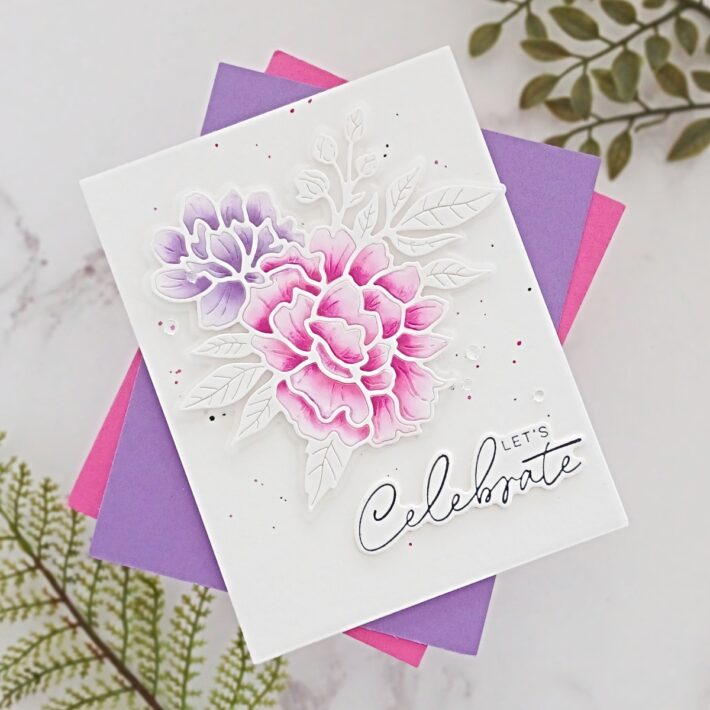
I took each of the petals out one by one and blended ink onto them. For the smallest flower I used three shades of purple and applied the ink with a small shader brush. For the largest flower, I used three shades of pink and again applied the colours with a small shader brush. The inks I used were Shades of Purple Dye Inks and Cherry Blossom Dye Inks from Altenew. You could also color each petal with alcohol markers – that would look really pretty too!
After ink blending each petal, it was then placed back into my masked paper die cut. Once I had colored all the petals, I was then ready to transfer them into the final die-cut piece that was adhered to the vellum shadow. They were added using Bearly Art Glue and this part went really quickly. I love the process of die-cut inlay – it’s like doing a jigsaw and it is fun watching your “puzzle” take shape!
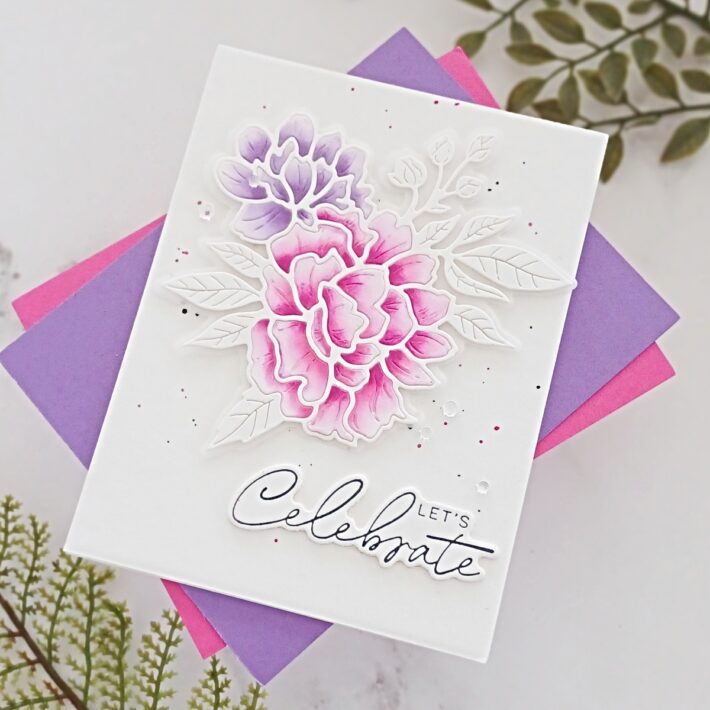
For my background, I took a piece of BetterPress Porcelain card and using Picked Raspberry and Black Soot Distress Inks and a small round brush, I splattered some drops across the panel. Once dried, I added my flower on top using foam tape.
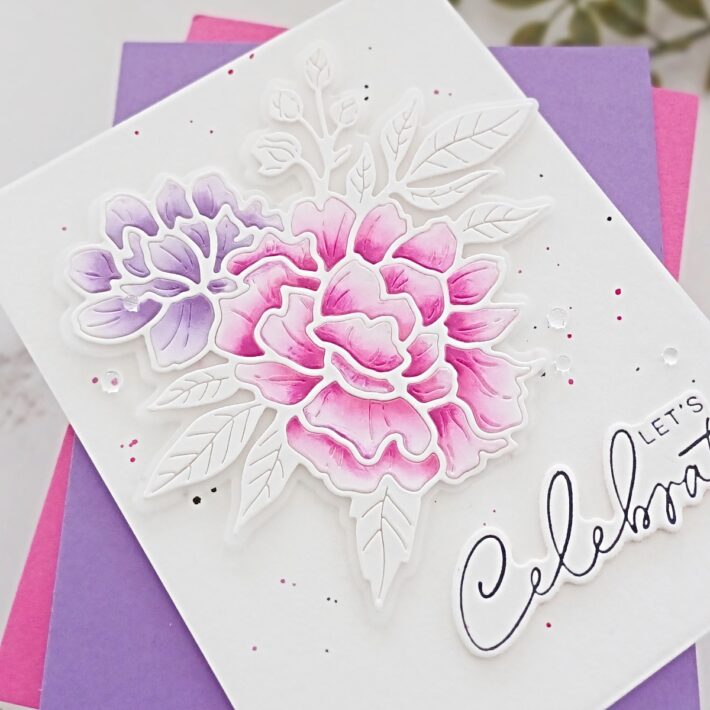
The sentiment is from Let’s Celebrate Sentiments Press Plate and Die Set and it was pressed using BetterPress Black Ink onto Porcelain Cardstock. I cut it out with the coordinating die and cut an extra layer so that I could make a small stack. This was then added to my card using Bearly Art Glue. I finished by adding some raindrops as embellishments around the peonies.
Let’s Celebrate
For my final project, I am playing with the Floral Celebration Press Plate. I use the press plate on its own but you can purchase a coordinating stencil set which you can use to “colour” it in.
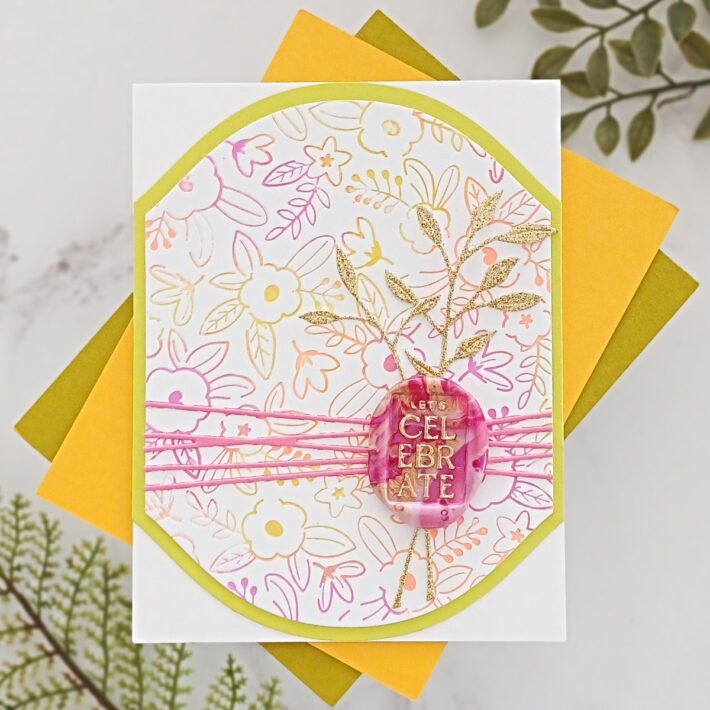
I placed the Floral Celebration Press Plate onto the BetterPress Letterpress System magnetic plate. As the plate is slightly larger than an A2 panel, I taped an A7 piece of Porcelain Cardstock onto the underside of the platen. This way I can just cut out what I need.
I randomly applied Tiger, Peridot and Wild Berry inks over the plate before running the platform through my Platinum 6. I reinked the plate again, not worrying too much about getting the same color in the exact same place, and ran it through the die-cutting machine for a second time. As all these inks play well together, the randomness of application didn’t matter too much,
I trimmed the panel down with a die from Mirrored Arch Etched Dies and die cut another slightly larger from Peridot Color Essentials Cardstock and set those to one side.
It was then time for a little bit of wax sealing! I melted all four different colored beads from Must-Have Wax Bead Mixed Pink using the Wax Seal Starter Kit. I then placed the Let’s Celebrate Wax Seal Stamp onto it, left it to cool, and removed the stamp. I highlighted the letters using a DecoColor Gold Metallic Marker. This really helps to bring out the letters and it is such a beautiful gold!
The Sealed Twine Etched Dies were then cut from Fruit Punch Color Essentials card and adhered across my floral panel. I trimmed off the excess from the sides.
I thought I would add a few pieces of gold foliage for decoration so I took the Sealed Leaf Springs Etched Dies and cut them from gold glitter cardstock. They were adhered over the pink strings and the wax seal then added on top using double-sided tape.
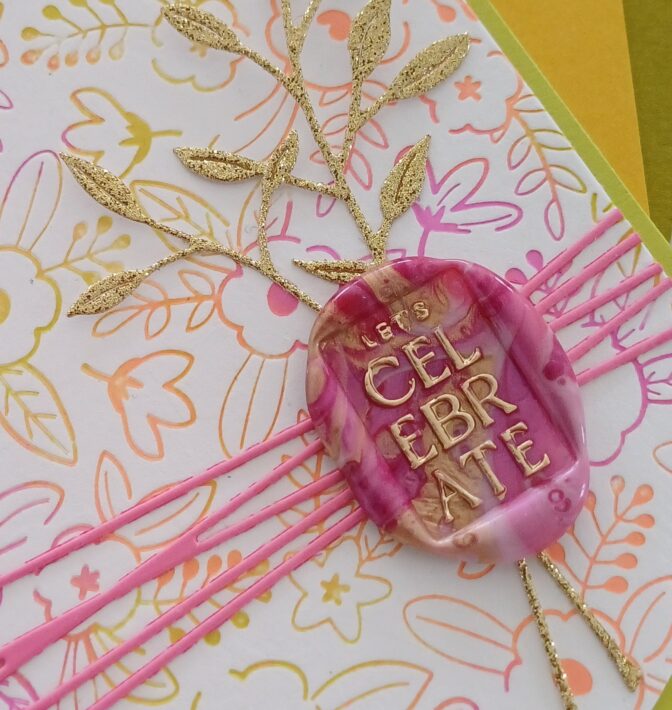
To finish, I just assembled the pressed panel onto the larger mirrored arch die cut. These were then added onto a top folding 110lb A2 notecard.
That brings us to the end of my projects for today! I really hope that you like them and that they give you some inspiration for this beautiful new collection. If you would like to see more of my cards, I would love to have you join me over on my blog, Instagram, Facebook or YouTube. In the meantime, thank you so much for spending time with me here on the blog today. I hope that you have a fabulous day!
Spellbinders Supplies:

Other Supplies
Neenah Solar White Classic Crest 80lb and 110lb card, Tweezers, Embellishment Wand, Thin Foam Tape, Fine Tip Water Brush, Paper Trimmer, Hero Arts Glitter Paper Holiday Sparkle, Double Sided Tape, Altenew Shades Of Purple Dye Inks, Altenew Cherry Blossom Dye Inks, Waffle Flower Grip Mat 4.25” x 5.5”, Waffle Flower Shader 0 Plus Brushes, Gina K Masking Magic, Lawn Fawn Vellum 36lb, Distress Inks Picked Raspberry and Black Soot, Little Things From Lucy’s Cards Raindrops.
3 Comments
Nancy
Hi, very pretty cards. My favorite one is the pink and purple flowers.
joanbfree
No surprise that these are gorgeous. Everything you make is beautiful. I cannot believe you ink blended the petals one by one. I need to try that with the other two similar Yana flower sets that I have.
Lisa Ainscough
Wow Lisa these are all stunning.
My fav is the peony because florals are my first love.
What an amazing collection.