Creative DIY Party Décor Series | Falloween
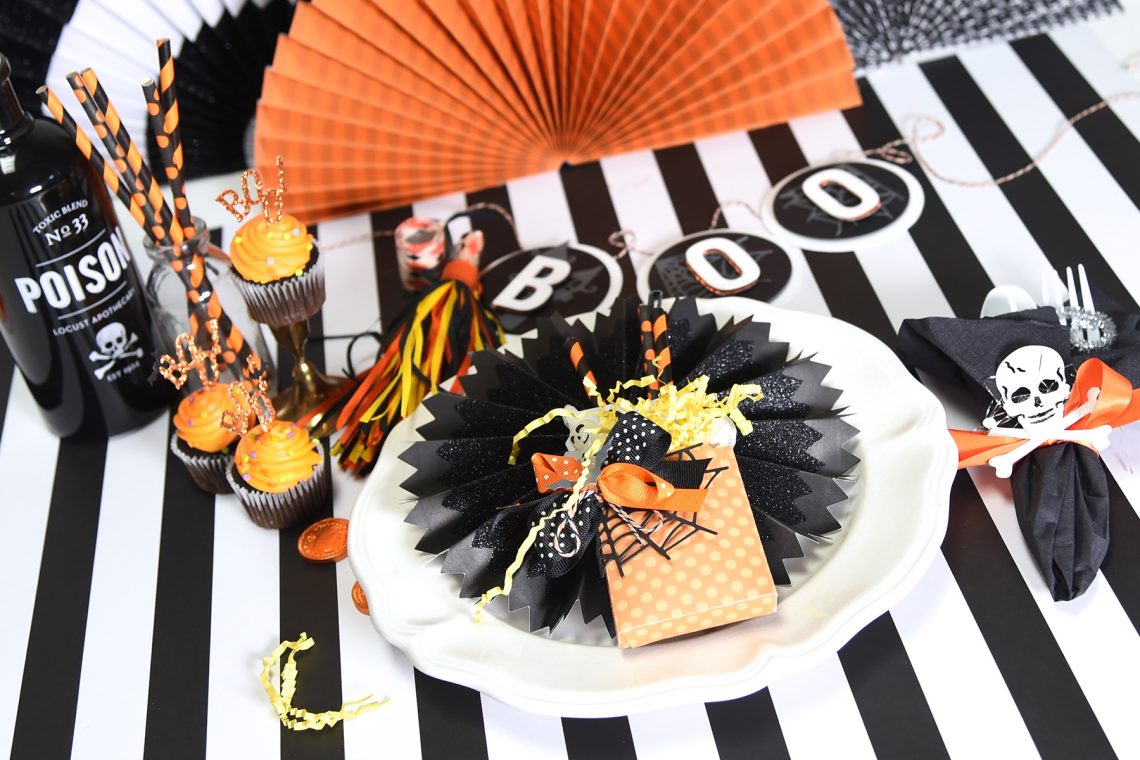
“Falloween” as I like to call it. It’s my favorite time of the year. How about you? I’m Debi Adams and I love the colors and scents of the season. When my kids were young, we would go apple and pumpkin picking this time every year. They are all grown now so when I start to reminisce, I pull out my favorite fall colors of paper and craft supplies and begin making some new fall décor as a way of creating my own new tradition. Today is Round 3 of my DIY Party Décor series and since Halloween is just a few short weeks away, I decided to make it…
No-Sew Phoenix Pennant Tutorial
This crowd pleaser project is easy, fun and doesn’t require sewing! All you need is our Contour™ Steel Rule Dies, felt materials, some adhesive (we used Them-O-Web® PeelnStick®) and a pennant! INSTRUCTIONS: Apply 1 strip of PeelnStick adhesive along the edge of the back of 8” side of pennant. Adhere half of the strip of black felt to the adhesive, leaving half of the felt to wrap around to the front of the pennant. Apply the second strip of PeelnStick along the edge of the front side. Fold a piece of ribbon in half, slide the looped end of the ribbon through the top slit in the black felt…
4th of July DIY Party Ideas
With the 4th of July about two weeks away, I thought I might inspire you to start a little early by sharing my three piece ensemble. Grabbing my Contour™ Steel Rule Dies, I created a banner, matchbox party favor and utensil holder to make my set. I’ll break down instructions for each piece so that you can recreate them too! Let’s get started… USA Banner Instructions: Cut both sizes of the fish tail banner with patterned papers using Three’s A Crowd Contour™ Steel Rule Die and Platinum™ Machine. Layer the die cuts and adhere with E-Z Runner® Grand. Repeat this step two more times for a total of three…
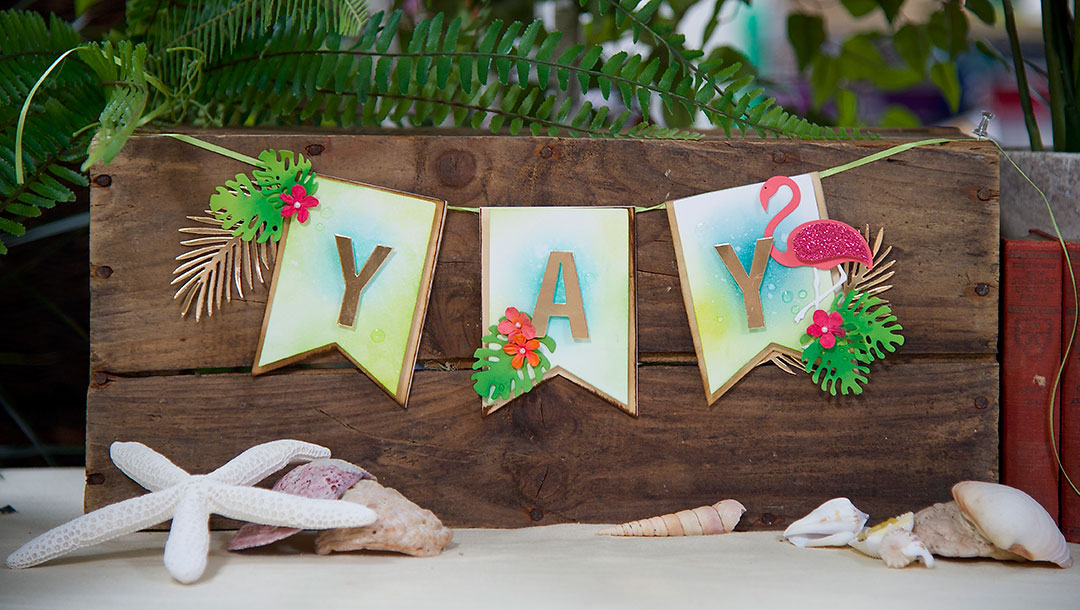
All Strung Out Summer DIY Party Banner
It is always summer here in Arizona, but summer is also just around the corner for everywhere else. What better way to celebrate, but with flamingos, palms and a party! Create this easy DIY party banner for your next summer shindig, follow the simple steps below to create yours: Die-cut mat board and wood paper from larger Banner die. Die-cut mixed media paper from the same-shaped, smaller Banner due. Adhere wood paper to mat board. Use a Tool ‘N One with the sponge applicator to apply distress ink to die-cut mixed media paper. Mist paper lightly with water. Blot with paper towel. Die-cut sentiment from gold poster board. Adhere sentiment…
Conquer the World Graduation Page
With (Inter)National Scrapbook Day just around the corner (like this weekend!), I thought I would start the week with a scrapbook page. It’s of my son’s high school graduation a few years back…yes, I’m trying to catch up! LOL! Featuring SR-061 Globe Trotter Contour™ Steel Rule Die as inspiration, I came up with this… I start with building my background scrapbook page with custom 12 x 12 inch high school patterned paper and layering on top with a 12 x 9 3/8 inch burgundy cardstock using my E-Z Runner® Grand Permanent Strips. Now for the FUN: Die Cutting! I die-cut SR-061 Globe Trotter Contour™ Steel Rule Die but first I…
From Wardrobe to Art Book: Fabric Art Journal
Hello, friends! This is Yana Smakula. What do you do when you come to U.S. eat a lot of yummy food and can no longer fit into your favorite pants? You use them for an art project! Hover over the image below to see what product I used. I’m sharing a first post in a mini series titled “From Wardrobe to Art Book” where I’ll show you an art journal created using Spellbinders® products, old jeans and shirts and some pretty fabrics. I encourage you to join me in creating an Art Book of your own. Let loose, die cut, up-cycle and enjoy! Let’s start with the base for the…
Maker Moments: DIY Valentine’s Day Party
Well, I bet you know exactly what I’m going to say in regards to today’s topic. I LOVE a party! Always. And I’m excited to bring you some pretty little banner, Valentine treat boxes and some cupcake toppers. Maybe I should have created just one project but I so love this occasion that I couldn’t stop myself. So here you go. Staying true to Maker Moments, these projects are simple and quick to make. They all were created using our Platinum Machine found here. So let’s talk through those cupcakes. Adorbs, right? I can’t even claim to have made them but with the cute die cut pieces on top, they…
Maker Moments: Arizona Cactus Pennant
Hi everyone! If you are anything like me, you might be a tad bit slow in moving today since a lot of the festivities of the season are over. As much as I would love to just lay around, the truth is, 24 years ago I had my fourth wonderful daughter and so the party continues! No slacking for me and no slacking here either. Today on the creativity board, I’m bringing you a custom-made pennant. Oh my gosh! I know I say this often but…this is sooooo easy and hardly any work! And, I might add, is very trendy right now. You only need felt, fusible webbing, sewing machine…
Maker Moments: Festival of Lights
Well these past few weeks I have focused Maker Moments on Christmas so I decided it was time to change it up and do Hanukkah. Some people have asked to see dies for this holiday awhile ago and although we currently do not carry that particular theme, I decided to show what you can do with what we have. I have to say, I had a great time designing these decor pieces. Most especially, I learned a lot about the significance of this religious tradition. So really, it was a win, win for me. And the colors, I loved them! So here we go. I hope to inspire you to…
Guest Blogger: Debi Adams, Merry & Bright Christmas Advent Calendar
Well it’s no secret but I am a major fan and friend of Tammy Tutterow! She is one of the sweetest people I know and I am better person and artist for knowing her. Actually I feel so very fortunate that I work with a LOT of fabulous designers here at Spellbinders. They always amaze me with their creative artistry. Knowing and working with them is one of the best parts of my job! Today as a Guest Blogger, I am showcasing Tammy’s dies by using them as a Christmas Countdown home decor piece. Loving the mini envelopes! So perfect for tucking in sweet treats or messages. I made this…